Monday, October 28, 2013

MIXED MEDIA MONDAY - The Faerie Swap


I finally broke down and participated in a swap. Mostly because I needed to get my butt in gear and finish something I had promised a friend months ago and this seemed like the incentive with a bonus. The picture above shows the tag and a gazing ball I made for my friend, Dody. We've been sharing faerie garden posts on Pinterest. 

Because the swap was on Splitcoast, we had to include a paper item of some type so the coordinator, Susan Farrell, decided that we would make a tag to coordinate with our faerie item. For Dody's I used Perfect Plum and a coordinating outdoor acrylic. I had to do 3 additional sets plus 1 for me. I made mine in Pretty In Pink. The other three were done in Elegant Eggplant, Certainly Celery and Daffodil Delight.


Here is a pic of the items I got back in the swap. There is an adorable little faerie house, a table made from a wooden spool complete with a plate of sweets made from very tiny polymer clay canes, a gazing mirror, mushrooms made from polymer clay and a walking stick with a bell. The baggie in the front is the Thank You gift from Susan for participating full of little bits of this and that a faerie may find use for. 

If your not sure what Faeries use, watch the Tinkerbell movies. I love them. Very industries little folk. I can't wait to create my faerie garden and use this precious items as a starting point.

Creative Blessings!


Monday, October 14, 2013

MIXED MEDIA MONDAY - Simple Sleep Shirts

I did have these pics under my Needlwork Thursday but since they are also an upcycle kind of project I thought the would work well here, too.

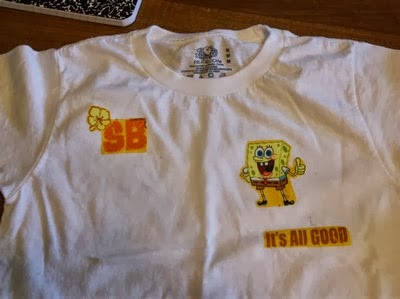
When the girls were here this summer, I discovered Adrian has grown into the T-shirt and undies sleeping attire. No more buying cute night gowns or jammie sets. In a way, that isn't a bad thing. Even at places like Walmart, those girly items are getting so expensive. A trip to a thrift store will provide you with options for t-shirts to sleep in but they just seem 'blah' to me. Unless you have a favorite like Sponge Bob or Angry Birds. In which case, you don't find a lot of those t-shirts on the discount racks.

So this grandma got creative. I bought a back of boys plain white cotton t-shirts in 2 sizes larger than Adrian typically wears. For about $8 I got 6 shirts. I raided my fabric stash for items I knew Adrian liked. Most of the fabrics were remnants from when I've made her other things in the past such as her Sponge Bob pillow case.

On the night before I had to take her back home, she fell asleep in my bed watching her favorite shows while I whipped these together with the trusty wonder under and the iron.


All 6 only took me about 3 hours but that included pressing the fabric, adhering to the wonder under, detail cutting then ironing onto the shirts.

Creative Blessings!


Monday, October 7, 2013

MIXED MEDIA MONDAY - More toys

Last week I told you about my ability to bring up the rear when it comes to trends and introduced you to my newest obsession of working with Alcohol Inks (well, as soon as I get them made hehe)

The other thing I've been eyeing for some time but not worked with yet is Washi Tape. I kept telling myself I didn't need any because I have TONS of ribbon and fiber. (who doesn't? LOL)  But two things keep pulling me back. 1) there are some really nifty designs out there that fit my Mixed Media style. 2) I can make my own to match what I'm working on.

So aside from picking up a couple rolls at Michaels while in Paducah a couple weeks ago, I also bought supplies to make my own. a roll of masking tape and a roll of paper tape.

So my measly Washi Tape supply looks like this:

Ignore the spool of bobbin ribbon. LOL The package on the right is part of a collection I got in a Secret Sister swap about 4 years ago. Here's a closer look at the two on the right I bought in Paducah:

I have stamp sets that are for doing borders and I'm looking forward to spreading blank strips out on my desk and creating my own designs. 

Now you guys know me and how I like to be organized. So this Washi Tape/ Ribbon tutorial by JenniBellie on YouTube got my attention. Because we heat with wood, keeping tapes/ ribbons/ etc dust free is not always easy. I really like this option so look for my version on an upcoming Mixed Media blog post.

Creative Blessings!


Friday, October 4, 2013

FRIDAY SURPRISE!... Getting Ready for 2014

No one shoot me for that title. With Christmas less than 3 months away (yes, you heard me) I am already looking ahead to how I want to be organized in 2014. And not just in my space but with my time as well. My first novella will come out in early 2014. That means added social media and blogging tasks to what I already do. Until now I've been building a network and letting people get to know me. I'll have to continue that aspect and meeting new people while letting the world know I have a book out and more to follow soon (That's the plan). To accomplish everything I want to do, I HAVE to plan ahead.

I've been pinning lots of 'printable forms' to my Organized Home board on Pinterest. As I began figuring out what I wanted from my new planner, I visited a lot of the websites from those pins. Here's what I came up with:


I used papers from Colorbok Rosewood slab. Fits in with the peach/blue/ vintage I want to use in the office. The quote at the bottom says: Go confidently in the direction of yours dreams. Live the life you have imanged. ~Henry David Thoreau  I've always loved that quote and appropriate for the purpose behind this planner. To go confidently towards a full-time published author.

Knowing what you need in a planner is important. Like other aspects of our life, they are not a One Size Fits All. I'm going to walk you through the pages and why I chose them for this planner.

CALENDAR PAGE
This is an example of a calendar page. I started the planner with December 2013 and ended with January 2015. Out of all the calendar pages I looked at, this one from Infarrantly Creative most fit my style. A basic calendar month with a spot at the bottom for notes. The main thing I use a calendar for is to keep track of Bob's boat schedule. This lets me see at a glance whether or not I can plan to attend a conference or concert. Someone has to be here to take care of the doggies. The other thing I liked about Infarrantly Creative is her planner is put together from a BLOGGING perspective... which is 80%+ of my day.

Behind the monthly calendar The rest of the month is broken up into WEEKS. So the next page is my Master To-Do List for the coming week:
WEEKLY MASTER TO-DO
I can list what I need to accomplish for the week, the Due Date and rank the item in priority.
SOCIAL MEDIA TRACKER
How many times have you entered a challenge or contest on someone else's blog then forgot about it?
The next page (printed on the back side of the Master To-Do, creating the left page) is my Social Media planner is to make note of when I post on someone else's blog. I also make note if I took part in a challenge, shared a post from one of their contests and/ or entered a contest. 

WEEKLY PROJECT PLAN

This is where I make more detailed notes about projects for specific blogs. I can also track Pagiviews on any given blog to see how things are going, twitter/ fb/ pinterest new followers. 
One of the things the gal from Infarrantly does (which this printable is from her site, too) is to make sure to encourage a fellow blogger. There's a space for noting which blogger I'm boosting that week.


This is my BIG page. I list all of my blogs on every day of the week that I want to post on that particular day and what the daily theme is. You'll see the colored in squares.. those are the bullets for that blog. Then the blank one below each one is my 'check off' box for that post.  I'll probably use the Weekly Goals at the top of the page for scribbling notes or tracking my WOYWW Blog #s of those I visit each week.


I thought I had a single shot of the right hand page. This is BOOKS READ. I can track the Title/ Genre/ Author/ Length of 4 books per week plus write a brief review or note where I'll post a review. I'm hoping this page will help me remember to actually post reviews for books I read as I know this is very helpful for an author.


Finally, this last page I created to keep track of what type of Fiction project I work on each day. I can track the number of new words as well as number of pages edited as I am usually working on one while editing another. There's room at the bottom for notes as I'm writing/ editing I want to make sure I take care of.

With the exception of the printables I've already credited, most of the others came from Life Your Way They have over 300 downloadable templates! You can pick the ones you want for free or you can purchase a download of ALL of them for $7! 

Once I had everything printed and the pages in the order I wanted them, I clamped everything together really well with Jumbo Binder Clips then took it into the UPS store and had it spiral bound with a clear coat sheet on the front.

That is my Planner for 2014. 

I'd love to hear about yours. What do you need a planner to do? (the hard copy kind, not the human kind hehe


Tuesday, October 1, 2013

TEAPOT TUESDAY - Patty Bombyk

I haven't played for a couple of weeks but I'm trying to get back in the swing of things. This week's card goes out to fellow SCS member, Patty. Patty's father recently passed away. We all know how difficult those times can be. The teapotters are banning together this week to shower Patty with some of the things she loves such as butterflies and birds.


I chose fall colors for Patty's card as this Anna Griffin butterfly wings her way to Carsonville MI with a special message:

There is no season such delight can bring,
as summer, autumn, winter and the spring.
~ William Browne

I got the basic layout for this card from one on my Pinterest Paper Playground Board. The original was created by Meredith at A Delightful Waste of Time Meredith was inspired by a Flourishes challenge. As you'll see from Meredith's card I did not go all girly with this card. I love hers so much better but didn't feel this occasion called for pink or lace. 

THE RECIPE:
SU - Crumb Cake (base)
SU - Very Vanilla (mats)
Anna Griffin - Butterfly image 
Scrapbook Addict - Sentiment (printed on vellum), printed vellum stickers
Ball - Gold & Green Grosgrain ribbon (sold in a 4-color pack in the canning supplies!)
Misc. Fall wire-edged ribbon

I hope this brings a bit of cuddle to Patty.
Creative Blessings!
Kelly

Monday, September 30, 2013

MIXED MEDIA MONDAY Returns - sort of ...

With the craziness of summer behind me, I'm trying to get back to work on a regular schedule again. I don't have an actual mixed media project this week but did want to share a couple of things.

For as long as I can remember, I've always brought up the tail end of a trend... with enough space between me and the rest of the group to drive a semi through. I'm at that point again. I'm finally getting brave enough to play with alcohol inks. The reason I'm behind is because I have avoided the expense. Like Copics (which I am NOT good with), I was afraid of putting the money out for something I wouldn't like working with... or worse yet, would want ALL of them LOL.

I've known for some time you could make your own. And I've wanted to do this with my SU ReInkers. So with my coupons, I've been picking up the 3-pack mister bottles from RangerInk. They'll be perfect size for a minimal amount of the Alcohol Inks and I can store them with my other SU ink products.


I still need 5 more packages of the mister bottles to have enough to do the current SU standard color families. Then I'll worry about the retired colors in the art room and the In Colors - both current and retired. My goal is to have an alcohol ink to match every SU color I own. 

The Cut n Dry pad is for the next stage of the process. In one of the many videos I watched there was some discussion as to whether the extra 'cush' was necessary or if you could do just as well adhering the velcro and felt sheet directly to the block. My thought was this: If you're 'pouncing' the pad as Tim does, I think the extra padding would help with the overall effect. If you're 'swiping' as some artists do then maybe the extra pad isn't necessary. 

Hubby and I have enough scrap lumber in the shop to make small applicators like the one shown HERE. I bought 2 sheets of felt to cut my own pads based on the size of the applicators I decide to use. I also bought Industrial Strength Velcro to put on each one. 

While watching videos on home made applicators, inks and blending solution there was a division as to whether having just the one applicator then needing to remove the inky felt pads while they're still wet was an issue or not. Alcohol Inks are PERMENANT and although I won't wear the plastic gloves when working on projects most of the time, I would want them on to remove the pads. I know I wouldn't reach for a glove to do that. I don't like wearing gloves of any kind (because they never fit my tiny fingers) So I like the idea of having at least three or four applicators I can work with at once, let them dry then remove the felt. I could buy the RangerInk ones. They are not as expensive as some of the videos lead you to believe. I found them at Michaels for $4.99. That's doable for a couple even without a coupon. For those artists who want one for every color, yeah, maybe not so much. Another point one of the video instructors made was that she tends to grasp the block directly when applying the inks rather than using the post handle. I think I would be doing the same thing so why pay for something I'm not going to use all of when I could easily recycle wood from the shop.

TracysTreasures24 on YouTube was the first video I saw on recycling stamp blocks. Although this gal isn't the one I originally watched, I love her rounded applicators. I think they'd be more conducive to work with when the arthritis flares up. Keep in mind... her video has a warble in the sound but you can at least see how hers differ from the traditional block. 


One of the coolest things I'm going to love about Alcohol Inks is that try as I might I can NOT find YELLOW bling. I can find ones in a slightly yellow/ orange tone but no true Yellow to use for flower centers. With alcohol inks, I can buy bling in the clear whenever they're on sale and make them ANY COLOR I need! Whoo Hooo!

So tell me, do you use Alcohol Inks? Share your experience and usage tips! 
Creative Blessings!


Tuesday, September 24, 2013

WOYWW #225

Okay, first off, is it coincidence that WOYWW #225 is on The 25th? I think not. If you have no clue what I'm talking about, head on over to Julia Dunnit's blog for a long list of blogs we spend hours hopping to. Then for further explanation, go to her EXPLANATION page.

I'm squeaking this in on Tuesday night while I'm tweeting TheVoice for work. I'm trying not to work too  much while my MIL is visiting. Once I get started I forget to stop. LOL

Next on the list is the big REVEAL. Back on #223 I told everyone about the Surprise gifties I was making for members of our Paper Blogger Reunited (PBR) group. Five of our members were meeting up at ScrapFest in Mall of America. I couldn't go but I sent pressies for the other girls via member Maggie. So what did I send?


I took one of those $1 20-pic plastic photo albums then created the cover in PrintShop. I used a glitter mat from DCWV Glitter Pad. They'll have a brag album to remember their trip and pics of each of our members who made the trip.

Finally... my desk for this week. I have no place upstairs to work... aka the music promo/ writing stuff I do every day. The card table I might use is being used for our dining room table while Bob's mom and her husband visit for a couple more days. So everything is on my stamp table. 


You'll see a couple of things handy. I'm putting together a couple of Sympathy cards for her and have some images to stamp. Then it's back to working on my books. The first chapter of my Western Historical Romance, Jayson's Range, took 2nd in competition last weekend so I'm hoping to finish that novel and start putting it out the door soon. 

I should have a scrap project of sorts on the desk next week and back to regular blogging again soon.
Creative Blessings!