Showing posts with label The Build. Show all posts

Tuesday, March 24, 2015

Technique Tuesday - Organization - SU Catty's

I've been promising this post for over a week. Things are just not the same with Bob home 24/7. Not a bad thing in that our time together is so important - and he does NOT encroach on my work time. I just limit my work time so as not to totally ignore him. Thank you all for understanding.

So today is all about how I am going to organize the SU Catty's in the new space. Because that part is not done yet, I can't show them in place. But I am going to show you what I've done in prep. When the time comes, I'll just need to put them on the shelf.

I wanted a way to display the catalogues while still being able to see them. My other goal was to keep Sale A Bration and Mini's with their same yearly Big Design Book. I thought about a 2 pocket folder but the sturdy ones are expensive. Then I found an in-house shipping envelope amongst my stash and knew they would be perfect.


On an internet search I found them in pkgs of 12 on line with a company called ShopLet. They have a wide inventory of office supplies to choose from and their service was FAST! I ordered on a Friday morning. The invoice went through that afternoon and I had my package the following Tuesday!

While I waited for the envelopes to arrive, I prepped the spine tabs.


I photocopied the spine of each catty. This involved laying the catalogue open on the scanner and getting way more than I needed. Then I cut the spine from each picture and adhered them to strips of white cardstock that I had cut about 1/8 inch wider on each side. 


Then I cut them apart and sealed them in clear contact paper. I wanted them to be substantial. So while the front is wrapped in the clear contact, I kept a wide enough strip to wrap around and attach to the inside of the gusset on the side of the envelope.


Now when I stand them on the shelf, I can see the tab showing what year the catty is. 
These envelopes have 2 pockets. An inner pocket with the string closer. I chose to put the catalogue in so that the front faced out... 


Then on the outside pocket (used for slipping in the shipping invoice) I put the special sale flyers and minis as well as a retired list for the ones I had.


I will either custom make a magazine holder to store them or use Totally Tiffany's 12x12. In the envelopes, they are a tad too wide for the standard holder. While Tiffany's might be a bit over overkill, that might be easier than making my own. 

One more organization item situated for when I can get in the new office... at this point we've slid to sometime after June. Getting Bob's hands in working order are more important right now. 

How do you store you cattys?


Saturday, February 28, 2015

FRIDAY FREEBIE - The Build Part 8


To see a  larger version, click on the picture. 


Welcome to the Creative Dreams Studio. Sorry this is a day late. After I turned in my article yesterday I went into 'relax' mode. So let's talk space.

I have 16' x 30' to work with.  You enter the studio from off the dining room (North Wall) (See door opening on right side of graph)

Before I take you on a tour, let me explain some of my markings. The ORANGE dots denote approximate placement of the recessed light fictures. That Wagon Wheel looking spot over the sewing island is the ceiling fan /w light.  The RED Xs and Squares denote either outlets or switches throughout the room. As I type this, I realize I've mismarked outlets and switches. I probably should have had at least one full cup of coffee before re-drawing this floor plan this morning. LOL However, we do have switches and plug-ins placed around the room to match the specific task areas. The two red Xs within the confines of the sewing island are actually in the floor. 

So let's tour the room. Turn right when you enter the studio. That big cabinet is the repurposed entertainment center I currently have in the basement. This holds my loose block stamps, embellishments and will go through some modifications to become my Project Life station.

Circle around to the left, (WEST wall) I have a spacious work area below that 36x36 window. Air and natural light to craft by! The TV/ VCR/ DVD will be to my left so I can watch movies or follow along on many of my art videos. The island that stretches out from that will be my cutting/ embossing area - holding my Cricut and Vagabond. I plan to have shelves underneath. On the studio side they will hold all of my slabs. On the side facing out into the room I will store my mixed media/ art journaling books. At the end of that cutting area I will have my ScrapRack.

Okay, backing out of the craft area, we'll continue along that same wall. Three tall bookshelves flank the sofa and that 48x48 window. The windowsill will be built out to hide a compartment behind the sofa (think tall window seat with storage). I will keep the bedding for the sofabed in those shrink bags and stored here. 

Although it does not look like I have much room between the front of the sofa and my large sewing island, that big island is on casters and rolls easily. I am looking forward to having this surface to work on again. Plenty of room to lay out mixed media items to dry or cut fabric. 

Past those last three book cases you turn to the left again. (SOUTH Wall) That bare space on the wall is designated for hanging a LARGE picture quilt I made years ago. The original quilt is 10x10 so once I'm in the studio I'll have to figure out how to deconstruct the quilt down to a size that will fit that space WITHOUT losing any of the precious signatures I have. In front of that wall space is where my vintage singer sewing cabinet will be placed. I want to put my simple brother machine in the cabinet so it is handy for straight stitching on either fabric or paper.

The AC/ Heating unit is in the wall up above the row of 3-shelf book cases that connect to my desk. My vintage vanity - turned - desk sits under the window.  To the left of that, coming around (EAST wall)  is a large 6-drawer dresser I bought at auction. The top is perfect for the printer and laying out manuscript pages in progress.

At the end of the dresser, I'll have a lateral filing cabinet. The top of which is where I will display my Denver Broncos collection including an autographed ball from John Elway and a poster of him my daughter got me for my birthday eons ago. I've always wanted a lateral filing cabinet. No trying to reach into the very back for files and I am still a hard copy person when it comes to research.

Another tall book case then my vintage wardrobe for housing my spiritual items. I am still looking for a low table to go below that window. On the left side of that window as we get closer to the doorway again... I have an old rubber stamp display shelving unit my friend, Carla Bazenhow, rescued from me years ago when Michaels changed their display out. The shelving has adjustable glass shelves. This will be my paint storage. All of my Folk Art paints and their coordinating misters. A 2-drawer filing cabinet will fit in the base to store glue, gesso, and other mixed media mediums.

Next to that will be my 8-drawer cabinet that I use to store my SU 12x12. I'll have room on top for my 8.5x11 SU Cardstock and my 12x12 DP collections. Above the cabinet, I want to put a shelf to store the altered books where I keep my SU embellishments. 

Last on that wall is my 2-door Mixed Media art cabinet. I like how I have this cabinet arranged right now but think some things will change.

One last thing - a shelf will go all around the room on top of the book cases. Over the Mixed Media and SU cabinet, I will keep my retired SU catalogs. I will also have the space to display my Girl Scout memorabilia. A section of the shelf over the long wall of book cases (sofa wall) is where I will put my Antique/ Vintage book collection.

So there you go. Although it seems like a large space, this is both an office and a studio. A place to be creative, to enjoy items I currently have in storage and to get work done! Everything will be in one spot. When I need to take a stretch break from the computer, I can apply a coat of gesso or mod podge to a project in progress. Or curl up on the sofa while I listen to the newest CD I am reviewing, without having to sit at the desk. 

And anyone is welcome to come play once it is finished :-)
Creative Blessings!
Kelly


Friday, February 20, 2015

FRIDAY FREEBIE - The Build Part 7 & The Winner


This page planner by The Paper Studio has become one of my favorite organization tools. I can select papers, photos and embellishments for a layout and keep them all in one spot. While I do not go to crops, this is a great way to pre-plan for when you do have time to sit. Flip through your pictures and put them in one pocket, Then, when you go shopping, take this with you. As soon as your purchases are rung up, put the items right in your page planner pockets and you'll have everything in one place when you are ready to sit down to scrap.

On January 29th, I posted about the 5-Dash system for getting organized. You can use these Page Planners to file things together as you are going through your space.

I had 4 comments (one was from Sandy herself so really, you have 1 in 3 chances of winning).  So who has won this 3-pack of Page Planner Goodness?

And the winner is:

Random. org refused to load so I put Bobby to work. He needs something constructive to do while he's only 1-arm capable right now. I yelled into the other room and said pick a number from 1-3. He yelled back - 2

Pretty scientific, eh? LOL

That means... Joyce Casaldi has won the Page Planner Goodness!  Congratulations, Joyce. I'll drop these in the mail as soon as I can get out of my driveway LOL

In the mean time, I invite all of you to click on Joyce's name to check out her blog. So creative!

Thanks again to Sandy Leigh for her inspiration in this giveaway!


Now, on to the Build Update.
This is all about the lighting. I had two key things in mind for this room. LIGHT and AIR FLOW.
We've talked about my windows... so now let's discuss the lights. I LOVE them!


We have strategically placed 5 of these throughout the room. The diagram I'll show next week will be more precise but basically I have them in the following places:
 Over the area of my SU paper storage
Over the office area
One on either side of the center ceiling fan
Over the sofa area


This is a ceiling shot. Bob gave each one their own wall switch. The two on either side of the ceiling fan activate by a wall switch as you enter the studio. Then the others are placed in the wall near their respective light. They cast a great beam without being a glare. Already thinking how to take smaller ones and make a photo box. 


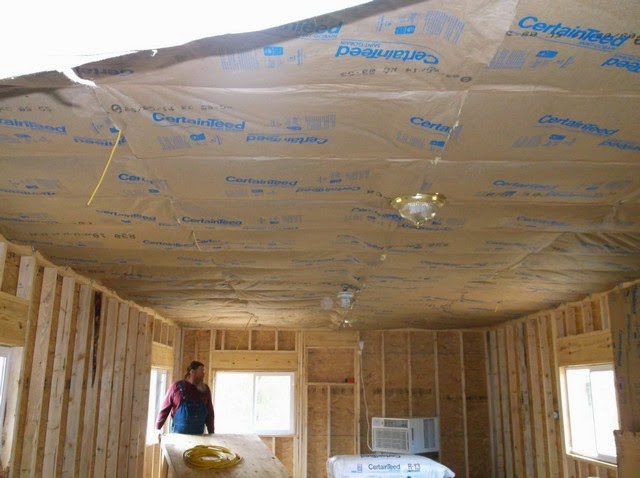
This is the room prior to the ceiling tiles going in. Where that one globe light is in the foreground is where one of the recessed lights is now. The walls also have insulation. That AC unit you see in the background is an AC/ Electric Heat unit. I hope not to use either option much in that room but is nice to have just in case.


One last picture. This will give you an idea of how cold it is out there right now. Bob has a t-shirt, his bib over alls then his insulated flannel shirt on. And although it looks like he's wearing a hoodie, he is not. That's his dark hair LOL I had to think about that for a minute. As you can see by the boxes on the stool this was an early picture when he still had not run all the electrical.

You guys have been asking about the floor plan so I'll have that for you next week.
Creative Blessings!
Kel


Friday, February 6, 2015

FRIDAY FREEBIE - The Build Part 6


Before we get to the inside, this is one of the last pics with various crew members. That handsome man at the end of the table in the orange shirt and bib overalls is my loving hubby, Bob, who works so hard to make this whole thing possible. Lunch for the day was one of Ian's favorites. Chicken fried steak, mashed potatoes, gravy, green beans and 7-Up rolls. 

As I promised, this week we step inside The Studio for the first time.

The entrance to my studio is from off our dining room. There was not a door there.. only this really big picture window:


Bob is removing all of the sashing/ trim pieces so that he and his friend Tracy can remove the window in one piece. Bob wants to save this glass in case he needs to replace glass elsewhere in the future.


here we go.....

Tracy came in from deer hunting. He doesn't always wear the orange vest LOL

Almost there....


The window is gone and the wall is stripped away. As soon as they had the rest of the wall out of the way....


I stepped into my space for the very first time! ::: Happy Dance :::

Though I did stand in the 'space' on Nov. 1 to celebrate the Spiritual New Year. Trevor took my picture standing on the 'space' the day the footings were poured. Just can't find that pic. :-(

Next week... The interior work begins!!!!!


Friday, January 30, 2015

FRIDAY FREEBIE - Part 5


My husband can build things, though his work schedule (as you'll see when we get to the inside posts) doesn't always allow things to clip along at a steady pace. But his main concern with this build was being able to tie into the existing roof. There was a very narrow margin of error to clear the chimney with the tie-in. Even our contractor wound up having to come out and redo a section to fix a leak.

But as you can see from this picture, at this point we have trusses and the studio is connected to the main house.


Then the stripping of the rest of the roof began so that I could end  up with this:


Our entire house is now covered in this pretty forest green metal - which matches my garden shed.
Before the guys started on the addition, they built the overhang for my front deck and put the metal roof on...


Just don't look at the mess. The front entrance was still part of the construction catch-all zone hehe
Next week, I take you inside and introduce you to my handsome hubby.


Friday, January 23, 2015

FRIDAY FREEBIE - Part 4


After the foundation had a chance to cure, Lanny and his team came out to remove the forms then the actual build of the Studio began. Here you see the three Ian's (that's Ian contractor in the foreground) beginning to lay the floor over the joists. 

Then the walls began to go up. Ian and little Ian were the only two working on the walls. When they were ready to raise the first one, Ian called me out to lend a hand. I helped raise the East and West walls. Ian made sure I was a part of this build every step of the way. 


Notice the two big window openings? There are five big windows in all. Four are 48 x 36 (2 on the East wall, 1 each on the South and West wall) and one (over my stamping desk on the west wall) is 36 x 36

For the first time I will have tons of natural light and cross-breezes. I'm not worried about too much heat from the south window over my writing desk as that end of the room is shaded by this gorgeous Maple tree. 

This tree is one of the first things I fell in love with when we looked at the property. The limbs on the ground are from having the tree topped out. We've already lost one big limb from this tree and we didn't want to risk losing another as that would mean the whole tree having to come down. Our tree man, Ricky (Ricky Pruitt Tree Service) suggested we try topping the tree out first. He thinks we can save the only Maple on the immediate property. I will try to remember to share a picture this fall when the leaves are in their majestic finery. 


Friday, January 16, 2015

FRIDAY FREEBIE - The Build Part 3


Except for the trusses and the concrete, I found it hard to believe that these were all the materials required to build the shell of my studio. Or what this small amount of wood and floor joists could cost!


Once the footings had proofed, Lanny along with his wife Barbie and son Laken, came out and spent the morning building the concrete forms for the foundation. LANNY & BARBIE WADE CONSTRUCTION is a family business. 

After lunch, Brian from Vaugn Redi-Mix arrived with the concrete truck


and the first pour began....


I didn't get a picture of the crew on this day but lunch consisted of oven roasted chicken breasts and ranch potatoes with green bean casserole and dinner rolls. 


Friday, January 9, 2015

FRIDAY FREEBIE & Studio Progress - The Build Part 2

Okay... before I go any further, let me first thank all of you for your patience in waiting for me to pick a winner from the October 23rd post. Really? I did not mean to take this long. Just got lost in the shuffle of building, ill, holidays...

So here we go. I don't know how y'all get just the pic of the Random.Org thingie. I tried a PrintScreen and got the whole screen. My Copy/ Paste came up like this:

True Random Number Generator
Min:  1
Max:  6
 Result: 5

Powered by RANDOM.ORG

However, this still gives me a WINNER!!! And that would be:

Jackie!

Jackie... I'll be dropping you an email but you can choose from one of the following categories:

Paper Pack
Metals Pack
Theme Pack

Okay, now that I'm caught up, let's talk about the Studio Progress. Being sick definitely took some of the fun out of this whole process. One thing I did enjoy was cooking for a crowd. Here's a picture of one of our noon meals:

From Right to left starting with tan shirt -
Ian Maddox - the contractor, Lanny and his son Laken (concrete), Ian and Trevor (crew)
For lunch this day they had BBQ pulled pork on homemade rolls, cole slaw, baked beans and sliced tomatoes.

My crew never went hungry LOL

One of the final shots of the south side of the house. Here, Lanny and his son Laken discuss the measurements before breaking ground for the footings. 

By end of day we had the footings. Didn't look as big as it sounds.

Next Friday I'll show you the next step in the process... and maybe more food.


Thursday, October 23, 2014

THE BIG REVEAL! - The Build Part 1

My Inspiration Colors

The day is FINALLY here! Well, we are getting closer. A bit of backstory:

My office (I'm a writer) and studio are in the basement. My space is about 120 square feet (10x12) and has one small casement window. Air flow is a real issue. Then I have a separate room about the same size for my sewing and mixed media - no window. When we moved here seven years ago I had a place for everything and room to work. However, with time to play and explore new mediums - not to mention new techniques and products being introduced daily - I've outgrown the space.

During a quiet dinner for two about four years ago, my darling husband made the comment I needed to get out of the 'dungeon' (the basement).

Challenge 1: Funds
We looked into determining the cost of building an above ground addition for me. Though the estimates were comparable, I was not ready to go into debt for my work space. So we put the project aside and I continued to outgrow my 120 square feet.

Challenge 2: Knees
I know I'm overweight by about 50 pounds but for some reason I never considered myself 'fat'. I am very active, though not athletic. I never was. But I don't stand still for more than about 5 seconds... if you're lucky. Since I also work from home, I have to make multiple trips up and down the steps every day to multi-task between work and household stuff. I have finally gotten to the point where by the third trip my knees are telling me to pick a level and stay there. I was raised family and home come first yet I'm at a juncture in my writing and music promotion career where I can't let that slide either.

So with both vehicle payments behind us and needing to put a new roof on the house, we revisited the possibility of my addition. We signed the papers on Monday afternoon.


This is a check register designed specifically for the project. I will track every bit of spending. Over the coming weeks I'll share some of my inspiration pieces with you. However, I am querying a couple of magazines and since they will want 'first rights', I may be limited to what I can show. I hope to know more on that part soon. In the mean time, updated posts of some sort will run on Fridays... recapping the week's progress.

And Now... The Floor Plan:


Our house is the front rectangle - about 1200 square feet. The new studio will come off the south side of the house into the backyard from off the dining room. The new space is 16' x 30' = 480 sq. ft. 

Thanks to a 1/4 credit in Home Ec in the 1970s I am able to draw floor plans to scale. I have utilized every inch of space to accommodate:

Office
Mixed Media
Sewing
Spiritual (currently in our bedroom)
Paper Crafting
Collections (Broncos & Girl Scouts) that are currently still in tubs in storage

In future posts I'll show you more of how I'm utilizing the space. Some of what I've learned along the way will be used in my Organization Class in mid January. 

In the mean time, tell me what you would do with this much space and what your medium of choice is (paper/ mixed media/ fabric/ etc) . I'll draw one person for a Surprise Bag of goodies!