Wednesday, February 26, 2014

WOYWW #247 - GASP!

We have a blast on WOYWW. Don’t have a clue as to what I’m talking about? Stop in at Julia Dunnit’s blog for all the DETAILS. In a nutshell, this gives us an open invitation every Wednesday to showcase what we’re working on and to peek in on work spaces all over the world. We would love to have you join us!

So here’s my desk for this week:


GASP! There is a work surface under there! Who knew? Well, I did but finding it was another issue. There are still a few little things I need to do something with on this surface. The tiered boxes to the left are for my new venture into Project Life. I'm thinking of adding a couple of the matching drawer units underneath them as a base for storing punchies and ephemera. I started with 2 primarily so I'd have one for each of the granddaughters. But I'm thinking I might also want 'big girl' items for my Documented Life Journal and this would be a good place for those things. I guess if $General has another one tomorrow then I'm suppose to have one ;-)

The important thing is I have room to play again and I can't wait to get painted up!

Creative Blessings!
Kelly

Monday, February 24, 2014

FRIDAY FREEBIE - Unclaimed and Undecided

I had promised pics of the RAK box for Ruby but did not get them up last Friday so am bumping the post.


As of today the winner still has not responded to winning the box of Valentine goodies. I am going to set it aside for a later date.

In the mean time I've already figured out what the Friday Freebie will be in April but still stuck on March. Yes, I know I skipped February. Bit crazy here with taking the Organization Class and the day job. But I am looking ahead to March - which will post next Friday!

In the mean time, I've been purging A LOT of paper/ CS. I've sent a huge box (18 pounds!) off to the Kindness Club in MN and am now working on a box for a lady in GA


There is a gallon bag each of CS and DP - I emptied 2 drawers!
Misc Ribbon, 3 ink pads, a pkg of markers, Tombo Adhesive and 3-pk refill, bling and a qt bag of stamped images.


This plastic container contained punched butterflies /w bling boddies, stamped/ punched sentiments and a variety of flowers. After I got the box packed, this would not fit in the box so I repacked these items in jewelry zippy bags.

Ruby Taylor had a couple of minor strokes last fall. While she was in the hospital her granddaughter PITCHED ALL of her paper craftings upplies - EVERYTHING! Not so much as a pair of scissors left for Ruby to use. Can you imagine? Here's the full post about the RAK event many of us on SplitcoastStampers are taking part in:  RUBY


Creative Blessings!

Monday, February 17, 2014

GET ORGANIZED - Week 4 - Photos!


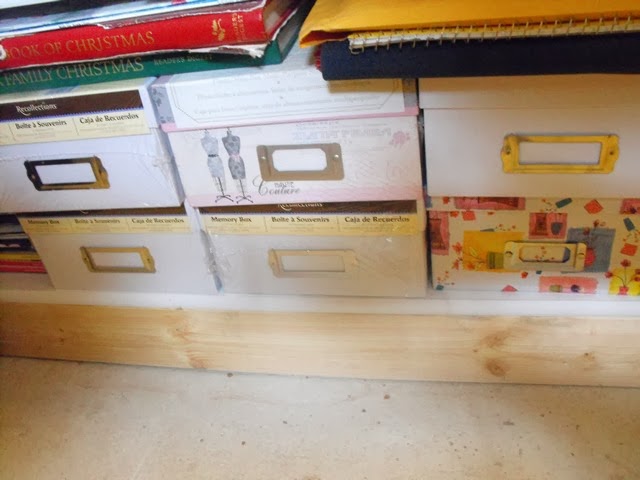
This is half of the empty photo boxes I have to sort pictures into. I got them for $1 each last fall at Michaels knowing I needed to get a handle on my photos. I'm thinking I might color code at least 4 of the boxes with papers to match the girls - 2 for Adrian and 2 for Abby. Because here is the 3-drawer sterilite unit currently holding their photos:


Pay no attention to the stamp rack (air vent) sitting on top or the empty sterilite box (product of emptying a container) This is on my 'holding' table in the sewing room. 

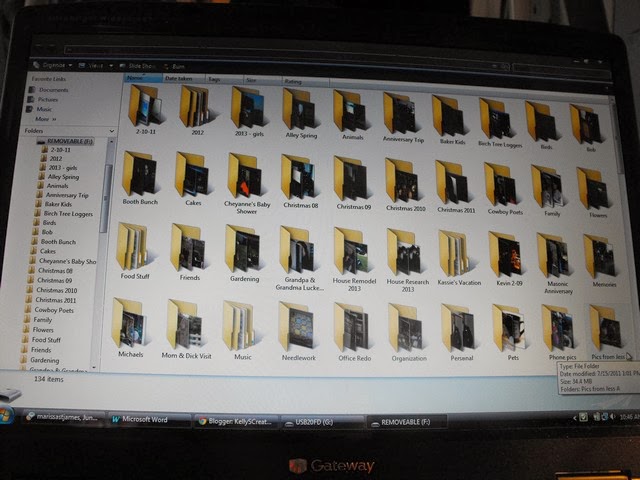
Aside from the hard copy photos, I also have all of them filed digitally on the computer:

Each subject has it's own folder with sub folders by year or event. I always transfer the pictures from my camera memory card over to a computer file (which are on Flash Drives - not on the hard drive). The pics stay on my memory card until I've uploaded them to a Walgreens Album AND ordered prints. I just don't trust digital completely. I want a hard copy in my hands before I delete the picture from the camera.

I didn't get any sorting done last week as I spent the last three days of the week getting back into full-work mode now that Bob has gone out on the boat.

One of the projects has been to finish putting together the purge box for the Kindness Club group in MN. I first learned about this teacher last April (2013) and have known ever since I wanted to donate my purge to her great cause. You can read about Barb and her extraordinary endeavor to teach her children through practice HERE These first grade students are going to have so many new things to play with. Aside from the massive amount of ValuCS, I know they do not have a die cutting system of any kind so I've put together a few embellishments for them to add to their cards:

Two boxes of the ValuCS needing a home. I cut down all the full pieces into A6 card size. All they will have to do is fold them and add their embellishments.

Flowers of all kinds. The round centers on the flowers were stamped using 'For You' from the A Round Array stamp set and the mini scalloped circle punch.

I also stamped 'For You' from the matching rectangular set and tons of the mini butterrlies. The Daisy flowers were put together with 2 large daisies in monochromatic colors with a small daisy center and a brad.
I broke my MS lace punch as I was punching several strips in red (Wilton is replacing!) and lots of white strips in the scallop lace edge punch. Yes, there are a few layered pennants, too.  The little punches in the upper left are going in the box to add to their minimal tool supply.

If you would like to gift the Kindness Club with your purge, please email me KellyH (at) artlover (dot) com and I'll share her mailing address.

Creative Blessings!
Kelly

Wednesday, February 12, 2014

WOYWW #245 - A different creative area

We have a blast on WOYWW. Don’t have a clue as to what I’m talking about? Stop in at Julia Dunnit’s blog for all the DETAILS. In a nutshell, this gives us an open invitation every Wednesday to showcase what we’re working on and to peek in on work spaces all over the world. We would love to have you join us!

So here’s my desk for this week:

In this picture you'll see the important things: laptop, music magazine (I blog for), my coffee and external speakers to better hear music cds for review.

This is not in my studio but where I do other creating besides playing with paper.
For several weeks I've been on the hunt for a 1950s style vanity or desk. Something small, solid with lots of drawer space that I could use as a desk.

I've resigned myself to the fact we will not be building a studio and getting me out of the basement. Since the majority of my day is spent in the 'office' side of the studio I made lots of trips up and down the stairs multi-tasking... aka juggling business with housework. My knees can not take the abuse any more. I'm hoping if I don't continue to beat them up maybe they won't force me into surgery down the road.

This little desk fits off to the side of the double-doorway between the kitchen and the laundry room, the two places I spend most of my non-working time. Though my research books and office supplies are still downstairs, I have the immediate needs to do the music promotion and article writing close at hand.

The Get Organized Challenge is still in progress. We are on Week 4 - Photos. This is where I've fallen off the wagon in the past. Next week I hope to be back in the studio.

Creative Blessings!
Kelly

Monday, February 10, 2014

GET ORGANIZED - Week #3 - Embellishments!


This is the upcycled entertainment center I am always referring to. To help brighten up the 'dungeon' as hubby calls my basement studio, I covered the entire surface with white contact paper. The depth of the drawers were each designed for what I planned to store in them. The dimensions are approx. 15"x15" and slide in and out on shelf pegs. My Embellishment drawers are 3,4,5 down from the top on the left side. Each drawer looks like this on the inside:


Okay.. here is where this whole Get Organized and Scrap Rack thing and I class. In the Scap Rack, these items would store in 2x2 zip bags in THIS page configuration. The page is called the Embellishments Page. When I first met Tiffany and learned about the 4-Section System I was totally excited. How cool to store EVERYTHING in ONE PLACE. The only problem I had was I did not like having to get the small items like brads and eyelets out of the zip bags. So when I designed the layout for the cabinet, I decided to make little boxes from white card stock. I'm still grouping all of my embellishments in the RAINBOW section... just not in the ScrapRack. Here is a close-up of a COLOR section:


So if I'm looking for a PINK embellishment, I pull out this drawer and I can see EVERY pink embellishment I have to choose from. 

Take note: Although the little things in zippies drove me nuts, I am going to store the Calendar themed embellishments - witch hat brads, tree shaped buttons, etc - in the pockes of the SR under their category. Those items are bigger and easier to get a hold of. 

During Embellishments this week we also talked about FIBER. You've seen this pic before:


These store in the bottom 4 drawers ( currently have tools in the very bottom but need to relocate for Christmas) by RAINBOW. So I'll have drawers 9 & 10 on the right for RAINBOW, #11 for CALENDAR coordinated (Easter, Halloween, etc) and the bottom drawer for Christmas.

Lastly, we needed to organize Die Cuts, Punches, etc. The concept, keep a REFERENCE sheet in the Scraprack to coordinate with your theme but you can store the actual Cartridge, Punch, etc elsewhere with your supplies. HOWEVER - Spellbinder type dies can store directly in the SR if you choose. So how do you store a REFERENCE sheet?

The Cricut cartridges are great examples. For instance, I have the Home Improvement cartridge. I scanned the back of the box and put the picture in a pocket under my HOME IMPROVEMENTS Theme section:

For punches, I punched one of each shape and will store them in the Sweet Sixteen Pocket under SHAPES in Alpha/ Numeric. -  

I really went through my stickers. I had a bulging Cropper Hopper Sticker binder full of every sticker I've collected over the years. Not all of them related to scrapbooking. Some dated back to Encouragement stickers for my down-line when I sold Undercover Wear. Others related to the days of Homeschooling my daughter and 2 preschoolers. I'll keep a few for those pages, but a majority of this binder went in the box to the Kindess Club. 
Here's an example of what I kept:

When I get my SR pages, the alphabet will go in the Baking/ Cooking - NOT in Alpha/numeric like you might think. Why? Because this is NOT a plain alphabet. The letters are all made up of baking/ cooking components and were purchased to go with the other things in this pocket, like the mixer stickers. 

The KEY to filing ANYTHING in the ScrapRack is to put an item where I am most likely to look - as long as it is in the 4-Section System.  So when I go to work on either baking pages for Adrian's book or to scrap pictures from my days competing in county fair's, all of my paper and embellishments are in the Baking/ Cooking section of the SR. One-Stop Shopping!

My reward for this week is 2 Spinders for the Travel Tote I bought years ago. I used the tote for going to crops when I worked at Michaels but the tote did not come with spinders. Since I do not go to crops, I plan to use the tote as a HOLDING Album for each of the girls' books. I'll have one spinder for Abby and one for Adrian.

Next week is my biggest challenge - and where I've fallen off the wagon in the past - PHOTOS. I've promised myself a BIG reward for doing this one because I know it is my most time consuming/ hardest challenge but I am DETERMINED!


Tuesday, February 4, 2014

GET ORGANIZED CHALLENGE - The Rainbow!


Can you see the rainbow? Trust me, this rainbow was easier for me to grasp then how I could incorporate the RAINBOW in the Scrap Rack 4-Section System. But after the third time of watching the video, something finally clicked.  BLING!

After meeting Tiffany several years ago I am happy with how my Embellishments are stored. I found getting little things out of the 2x2 zip bags irritating for me. So the boxes I showed yesterday in their custom-made drawer works the best for me.

But then Tiffany showed me things like this:


This type of bling is carded - usually on an acetate sheet. Removing this from a pocket on the ScrapRack would be so simple compared to how I store them now:

The bottom box is all peals and vintage embellishments like the metal flowers or the brads shown in the picture above. The Pooh container was a gift from a Secret Sister - Maggie and holds all the other bling. The little box in front holds pre-carded SEWING themed ribbon I got from the $1 tower baskets at Michaels. Guess what? These go in my THEME section under 'sewing' with the DP and clear stamps! 3 more boxes off my desk! Of course I'll have to find other things in the house to use these cute boxes for. 

So what is our RAINBOW Section?
RED
ORANGE
YELLOW
GREEN
BLUE
INDIGO
VIOLET
WHITE/ BLACK
NEUTRALS

Anything solid in color or with a predominant color that does NOT fit a theme category goes here. You know, like that aqua paisley print or the Monet inspired 12x12. I have almost no 'color' DP except for what goes under GIRLS - Abby or Adrian because those papers were purchased for their albums specifically.
But the BLING... yep. Now I have to add some pocket pages to my order to cover the Rainbow.

What's in your rainbow?
Creative Blessings!


FRIDAY FREEBIE! - Sweets for the Sweetest WINNER!

I am surprised there were not more jump-ins on this give-away. I know I would LOVE this color collection. Maybe the February Friday Freebie will catch your attention

In the meantime... Here is a list of the Entrants:
FOLLOWERS
1. Joyce
2. Brenda


COMMENT
3. Joyce
4. Brenda
5. Veronica
6. Sharon


SHARE
7. Brenda

And the WINNER of the Sweets for the Sweetest is.....

True Random Number Generator  5Powered by RANDOM.ORG

VERONICA Z...
Congratulations!


Several years ago, when I was teaching at Michaels I saw a magazine with a product ad. They had a heart shaped candy box full of sweets! Not just any sweets. Each paper liner was filled with a paper craft embellishment! Now who of us would not want that instead of the chocolates for Valentine's Day?  At the time I had thought of doing up some of those as 'in-store' specials for hubbys to buy their wives. My class list was long and there just were not enough hours in the day (allowed by corporate) to do all I would like to have done. My boss, Brett, was amazing to work with but even he could only squeeze so much past the powers that be.

So for my first FRIDAY FREEBIE of 2014, I decide to give you all a chance to win a box of scrapbooking sweets.


There are 16 compartments filled with buttons, brads, bling and a little of whatever else I had in my stash. You'll also see some white lace trim and brown velvet ribbon. I have used glue dots to adhere a sheet of acetate over the top so hopefully everything won't be all mixed up when the box arrives and look just as inviting as the picture.

So how do you win?
I'm really trying to grow my fan base this year but I'm going to keep this one simple.

1: Follow Me (If you're already a follower, let me know in your comment
2: Leave a comment - tell me what would be your dream Valentine gift
3: Share this post with your followers, FB friends, etc. Somewhere and everywhere.

You get one entry for each of those - total of 3 chances to WIN!
I will draw a name on Friday Jan. 31 using Random.org
This Friday Freebie will run all month long. Feb. 7th, I'll post a new one.

Creative Blessings!
Kelly

Monday, February 3, 2014

GET ORGANIZED CHALLENGE Week #2 - Paper


I spent the weekend sorting all of my loose sheets of 12x12 paper. I do not have near the amount of paper some scrapbookers have. I only by DP when I have a specific project in mind and the paper is on sale - a combination of the two, not one or the other. I do not buy paper just because there is a sale. There must be a project in mind.

The concept behind The Scrap Rack is that all of the supplies are broken down and stored in one of four sections.. aka The 4-Section System. Everything fits into one of four categories: Alpha/ Numeric, Themes, Calendar, Rainbow (which I will talk about in a separate post).

The Alpha/Numeric is the easiest category. If it is a letter/ number (be it sticker, chip board, stamp, etc) then  you file the item under this tab. I am also including WOW - Words of Wisdom and Shapes under this category. Because unless they fall into a specific theme, which I'll talk about next, they really don't fit anywhere else. The other thing is to file items where YOU are most likely to find them. For me, having these items up front works best.

The next category, THEME, is a bit longer. This is where you list individually all the different things you would scrapbook (or make a card for) by theme in alphabetical order. Here is a short list of my categories:
ANIMALS (subcategories - Cats, Dogs, Wildlife, Zoo)
ARTS/ CRAFTS/ FAIRS (because I have pics to scrap for these items)
BAKING/ COOKING
CELEBRATE
   I included everything I would make a card for in this category as well as things to 'celebrate' so my sub-        categories include: Anniversary, Baby, BD, Get Well, Grad, Sympathy, Thank You, Thinking of You,      
    Wedding
COWBOY/ WESTERN
DISNEY/ PIXAR/ LICENSE
ENTERTAINMENT (subcategories - Artists/ Concerts/ Music/ Shows)
FAMILY & MILESTONES
GARDENING

And the list continues.

Because Tiffany has broken this down and does not want us to become overwhelmed in the process and give up, she breaks things down into manageable bites. Because she knows most scrapbookers have mounds of papers, she suggested we only sort an 8" stack this week. Over the remaining weeks of the course we will sort an additional 4" each week.

Mine is done - Totally 6" of paper.


The stack on the left is all of my themes. The stack on the right is the CALENDER stack.
The Calendar is the THIRD category in the ScrapRack where we break the paper down according to the Calendar year either by month, season or a combination thereof. I have broken mine down into combined months with subcategories.
JAN/ FEB - New Year, Winter/Snow/ Valentine's Day
MARCH/ APRIL - St. Patty's/ Easter
MAY/ JUNE - May Day/ Mother's Day/ Father's Day
JULY/ AUG - 4th of July/ Summer
SEPT/ OCT - Fall/ Halloween
NOV/ DEC - Thanksgiving/ Christmas

Christmas is my biggest section over-all. LOL I see LOTS of the SR single pocket pages in my future.

I do have MORE PAPER then what I'm showing here. All of my other DP falls into 2 categories - SU, which I keep in 12x12 hanging file tote next to the SU cabinet and the DCWV slabs. I keep these on a shelf on the Entertainment Center. The good news is - in transferring the loose paper to the SR, I'll have more room on that shelf for slabs and there are still a couple from DCWV I want to buy.

In this process I purged a lot of DP from my days at Michaels. That is all going in the box to the Kindness Club in MN.

The only thing I have left is my scrap drawer. I need to determine my smallest size - I'm thinking 3x4 - then pitch the rest.

I have met my GOAL for Week 2. My REWARD: - The Spring Mini order from SU. I did not see anything in the SAB to warrant spending a party's worth of ca$h so am just ordering the items I want from the Spring while I still can.

Tomorrow begins Week 3 - Embellishments!
Oh FUN!