Thursday, September 27, 2012
Computer Issues
Due to computer issues, I will not have the techniques post up until Saturday... hopefully. I really wish people with talent would use it constructively. Grrrr!
Thank you for your patience.
Tuesday, September 25, 2012
HAPPY BIRTHDAY SUE!
Yep, today my daughter turns... well, I won't tell ;-) But she has grown into an amazing woman, partner and mom. She's blessed me with two granddaughters I thought I'd never have. And I love her. This is is her card:

If the card looks familiar it's because I took one of those cards from Monday and showed how you can make up the simple cards ahead of time. Then, when you need a card, you can personalize it in minutes for that special someone.
Happy Birthday, sweetie
Love Mom

If the card looks familiar it's because I took one of those cards from Monday and showed how you can make up the simple cards ahead of time. Then, when you need a card, you can personalize it in minutes for that special someone.
Happy Birthday, sweetie
Love Mom
Monday, September 24, 2012
Magazine Monday - Happy Birthday Sue!

This week I'm celebrating our daughter's birthday. I'm starting with a simple card. On Wednesday, when she and I officially celebrate our birthday, I'll have another card for her. Sue seldom checks her snail mail so I know even if I were to priority out a card today, it might be next week before she sees it. hehe. She's a busy mom of two working full time. I hope Jeremy does something special for her on Wednesday. She's earned it.
The inspiration for this week's card - and several others I'm going to show you - came from the Summer 2009 issue of Paper Creations Magazine Card artist, Sarah Small (sorry, couldn't find a blog or web for her) created simple tile cards from Scrapworks Alphabet Stickers. It doesn't get any simpler than that. Peel, place, send.
Since I'm always encouraging my stamping friends to use their stash, I pulled out my paper stash drawer..

The drawer is approx. 15" square and holds all of my misc. paper scraps from various slabs. This does NOT include my SU DP. I keep that in the SU cabinet with the full pads.
I used the Cricut cartridge Accent Essentials to cut 1.25" scalloped squares. As I began placing my tiles I could tell I should have used 1". However, I'm on a time crunch today (thanks to a thoughtful hubby) and had to go with what I'd already cut.
The stickers Sarah used were geometric/ contemporary in design and bright colors. The stickers also included pre-stamped words on some of the tiles. I improvised using stamps I had on hand.
I also saw this technique in all patterns of papers for different occasions. Here's what I came up with:


These are great cards that serve multiple purposes:
1 - Use your stash!
2 - Have quick cards on hand for any occasion
3 - Make multiples very quickly for gift sets
4 - Great simple cards for people you know are going to toss them eventually (face it - they do!)
I'm going to make more of the Christmas design for my 2013 cards. Some I"ll leave plain while others I'll dress up a bit more.
Because many of you have asked about Gelato techniques, I'll be showcasing those on Thursday so make sure you come back!
Hubby leaves tomorrow and I'm back to my routine.
Creative Blessings
Monday, September 17, 2012
Magazine Monday - kind of.
Okay... so you will not see a card today. I've managed to mess up the alignment in my neck so I'm just not up to playing or being on the computer like I need to be on Mondays.
I can tell you I had a wonderful visit with my youngest sister-in-law, Kelli Bay, over the weekend. She purged her work area a bit and guess who brought new things home. I think the Scor Pal will get a workout. LOL She handed off several SU wheels she no longer uses. They'll work perfectly in my mixed media art work. A few stamp sets and some brush markers... yep, new toys. Also some new ideas.
We went to Hobby Lobby where I picked up some christmas ribbons ( I know - didn't need but hard to pass up) LOL and 2 pkgs of Texture Accents Samplers from Faber-Castell. Each package has a small tube of Gesso, Gel Medium and Glaze. I'll pack these away with my Gelatos and have them handy. I also got a 6x6 album in brown with pink polka dots for the Tea Recipe Swap I was in last month. I think I'll embellish the outside of the album... just not today.
Hopefully tomorrow I'll be ready for Teapot Tuesday. In the mean time, check out Kelli's blog. She's really creative. Keep checking back as I know she's done some really cute Halloween treat bag kind of things you won't want to miss!
Creative Blessings
~Kelly
Tuesday, September 11, 2012
Teapot Tuesday - Happy Birthday Eula!
Today's card goes out to an incredible lady in PA. Eula Cousins will celebrate 110 years young on September 14th. I can't imagine living to be 110. Miss Eula is still young at heart. She loves getting mail (who doesn't?), reading the letters and answering when she can.
This is my third year to send Miss Eula Happy Birthday wishes. For some reason I always see roses when I think of her. So to keep with my theme, I've sent her roses again this year. Why break with tradition!
I pulled out the Color Bok Rosewood slab. It is so vintage, feminine and romantic. All the things that come to mind when I think of Miss Eula.

I was trying to decide on a verse for the front of her card this morning. When I came down stairs to clean off the desk, there was a mat square from a previous project laying right on top of everything. Just the poem I needed for someone turning 110. So I typed it up and printed it on vellum so the DP would show through. The red trim is an edging cut from the same sheet as the background paper. I layered it with a strip of Wrights Trim. The DP is matted on SU Cherry Cobbler (my favorite go-to vintage red) then on a SU Very Vanilla card base. I ran the vellum mat through the Xyron so there would be a clear seal behind it. I added a bit of stickles to the rose petals and leaves and 3 'pearls of wisdom' to the corner.
Aside from the poem on the outside, there is a personal note from me on the inside and a quote that says... age is merely the number of years the world has been enjoying you.
The envelope is lined with a solid pattered DB from the same slab and I used accents from another piece to decorate the outside of the envelope.
We're hoping these cards arrive to Miss Eula by the weekend so she'll have them for her HUGE (approx. 500 people) birthday party on Saturday. I didn't see the email in time to send it regular mail so I'm popping it into a 2-day priority envelope and crossing my fingers.
Monday, September 10, 2012
Magazine Monday
Last week I promised you guys a touch of vintage. While this isn't over-the-top vintage, the card does carry some elements.
The card was inspired by Magical Dreams in the Fall 2011 issue of Paper Creations Magazine. Artist Diane Noble created a striking card using Old Olive as a base and the Poison DP for her background. Diane accented the rest of the card with A beautiful satin bow and the sentiment -'may all your dreams be magical' made this card elegant.
Well... I kind of had the card before the inspiration this week. I had it in my head I wanted to try one of those harlequin collar rosettes and I wanted it border-punched with the MS spider punch. So with that in mind I went searching for a layout that would at least come close to what I envisioned. This is what I came up with :

To map out my card compared to Diane's, I have the rosette where she had the bow. Her ribbon went through the back of the top mat and where I have bling she had a black die-cut mat against the purple.
I used SU Elegant Eggplant for my base mats. The orange swirly paper is from a holiday-themed pack. The witch mat is from daisyds trick or treat and the sentiment is a $1 stamp. I auditioned several ribbons before I decided I liked the 'vintage' take of the rick-rack ribbon and it helped to anchor the rosette. I added the feather for a touch of whimsy. Incidently, that feather found its way to my basket at HL one day. The gal in front of me was returning it and I thought, Hmmm I could play with that so all three of them went into my cart. hehe
Am I happy with this? Yes. Is it what I wanted... not exactly. Mostly because I was trying to fit the square peg (my design) into a round hole (the magazine layout). But now that I've made one of the rosettes, I hope to create the card I have in my head for another post.
Creative Blessings!
Thursday, September 6, 2012
Technique Thursday - Acetate Meets CuddleBug!
Today’s project was inspired by a demo I saw at the Convention last month.
Mary Key was running acetate sheets through the Cuddle Bug and adding color to the image! Okay.. that was just plain Cool! I knew I was going to have to try it.
Mary used gel pens to color in her images. Well, wouldn’t you know it, all of my gel pens had dried up! They just don’t keep well. So I tried painting in the areas with SU inks… but they wouldn’t dry on the acetate. Instead, they seemed to evaporate.
So here’s what I came up with:

 I put a couple drops of ink in the pallet wells. Then off to the side I put a drop of Clear Gesso medium. You can see from the pic how the size of the drop compares to the largest pearl in the SU Basic Pearls.
Using a dry water brush I dipped it first in the ink then pulled a bit of the clear gesso off to the side and mixed them together. The gesso acts as a glue so when it dries, a translucent color is left. I also did one with Perma Markers and it turned out well.
Today’s card is a Christmas card using the Poinsettia background EB folder. I used Real Red ink with the gesso and the centers are Daffodil Delight. I layered it on Pear Pizzazz and accented it with Cherry Cobbler Seam Binding. The silk poinsettia in the upper corner is from Making Memories.

So what EB folder do you want to try? I’d love to see what you create! Make something then come back here and link me in the comments section.
Unless I can get the cutting table cleared off downstairs, there won’t be a scrapbooking post tomorrow. I need the whole cutting table to work out the logistics of how this house book has to go together. But I’m trying.
Creative Blessings!
Wednesday, September 5, 2012
Recycle Wednesday - Cocoa anyone?
I think I’ve told you guys about my fluffy coffee. If not, here’s the link to the recipe. It’s a lot like a Starbucks Carmel Macchiato but with way less sugar and calories. I mix this up by the triple batch once every two months - more during NanoWrimo and Jano. Which means these containers accumulate pretty quick:

Because of their shape and size they are easy to cover, store well on any shelf and hold tons of goodies as you can see from this picture.
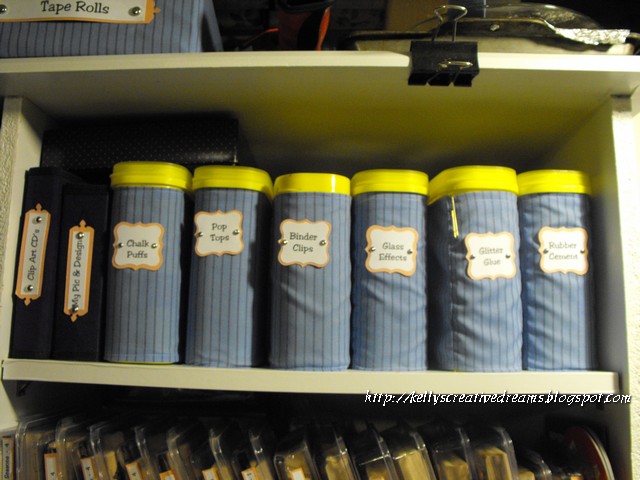
I have one for Binder clips, Pom Pom balls (great for applying chalks/ inks), pop can tabs, glitter glue bottles (not my stickles –they’re special) and just about anything else.
The key is to make sure to LABEL them. Because you can't see through them like a glass container. But if you have everything labeled, it’s still easy to find.
So that’s my tip for this week. With winter coming on, Nestle Quick should be in everyone’s cabinet. It contains 25% less sugar than other leading brands (except Ovaltine hehe). And it makes a great fluffy coffee base!
Creative Blessings!
Tuesday, September 4, 2012
Teapot Tuesday - and a Sneak Peek!
This week our cards are going to Brenda in PA. She and her son were on their way to the grocery store when they were struck head on by another car. Her son was not hurt but Brenda didn’t fair as well. For awhile, they did not believe she would survive. But her faith and determination are pulling her through. It will be some time before she’s able to go home. We all know how depressing hospital rooms can be so we’re out to fill her room with flowers and butterflies – two of Brenda’s favorite things.
My card for Brenda actually gives you a sneak peak at Thursday’s technique… you know, the one you were supposed to get last week LOL. Though I did just notice I"ll need to change the sentiment LOL Why was I thinking Birthday! Oh well, easy fix before it gets mailed.

I won’t go into details about the design so I don’t give anything away. I did choose to stick with a blue/ white/ yellow theme. I mounted the image on SU Bashful Blue. I added a strip of yellow grosgrain ribbon and 3 daisies from a daisy ribbon trim. The yellow seemed like the perfect choice to let the sentiment stand out so I stamped SU Vintage Labels on white, with Daffodil Delight and matted it with Daffodil Delight CS. The butterfly is from the Studio 112 line by Spotted Canary.
So have you figured out the mat yet? Hehe See you tomorrow with something cool to do with Nestle Quick containers.
Creative Blessings!
Monday, September 3, 2012
Magazine Monday - Spider Greetings!
As promised, this week we revisit Halloween with a greeting from a trio of spiders.
I was inspired by a card in the Fall 2011 issue of Paper Creations magazine- page 54. Halloween Spiders was one of three cards designed by artist AJ Otto. When I saw AJ’s trio of spiders, I knew I had the perfect stamp to play with. However, AJ used a flat background then layered the green and purple strips. The purple was cut/ punched to look like a scalloped eyelet trim. A fine orange chord was the fiber of choice.

I wanted to expand on the ‘spider’ theme. I found the Spiderweb embossing folder (similar to the Sizzix one) from Darice at the convention last month. I chose it to add some texture to the expanse of white. The spiders didn’t stamp completely on embossed edges so I just touched them up with a black flair pen. I used the MS spider web border punch to continue the theme in the purple stripe. The black fiber yarn with a bit of silver filament running through it seemed to be the perfect choice to bring it all together.
I chose the ‘web-encased’ Halloween sentiment from a set I picked up at Big Lots.
Next week… we’ll stick with the Halloween theme but bring in a bit of vintage.
Creative Blessings!
Sunday, September 2, 2012
A Sweethaven Challenge
Last week I linked you to the Sweethaven blog by author Courtney Walsh. Courtney has an awesome challenge for us to create some type of layout in the media of our choice that reflects something from the Sweethaven series. The details of the challenge and list of prizes can be found HERE.
Here's what I came up with:

The Sweethaven series is about friendships. Though separated for many years, there are some bonds that can not be broken. You truly are friends for life. Friends, like soulmates are as the quote says... 'A true soulmate is a mirror. The person who shows you everything that is holding you back... The person who brings you to your own attention so you can change your life." ~ Elizabeth Gilbert
Soulmates doesn't have to mean a lover or husband, though they can be. They are the person who we really connect with on a much deeper level.
The base was created on a piece of canvas board. I applied a layer of white gesso, then got out the paint! I chose FolkArt Red Violet, and Sweetheart Pink. I put 3 or 4 quarter-sized drops of each color in various places on the canvas then spread it around with my fingers. LOVE the feel of paint. While it was still wet, I used the swirls and heart wheel from Stampin Up to run a little texture on the one side. The papers are from DCWV Once Upon A Time (My FAVORITE DCWV slab) and a piece of lavender paper from my scrap drawer. I tore the edges then inked them up a bit.
I printed the quote on vellum then sprayed it with a clear fixative and let it dry over night. Then I tore and distressed the edges a bit. The edges refuse to lay down. They only curled up worse when I tried to put a gel medium wash over the whole thing. So I'm letting them curl, giving the whole thing a bit of texture.
The metal tag in the bottom corner is from K & Co. It says 'Together is a wonderful place to be'. I balanced it with a copper and wire heart I'd stitched several years ago. The stash drawer is a wonderful place to play! The tags down either side say SOUL and MATE and are anchored with Ranger Stickles in deep purple.
Win or lose, I enjoyed creating my very first full piece of mixed media art. Now to figure out where to display it! LOL
Creative Blessings!
Subscribe to:
Posts (Atom)