Friday, January 30, 2015

FRIDAY FREEBIE - Part 5


My husband can build things, though his work schedule (as you'll see when we get to the inside posts) doesn't always allow things to clip along at a steady pace. But his main concern with this build was being able to tie into the existing roof. There was a very narrow margin of error to clear the chimney with the tie-in. Even our contractor wound up having to come out and redo a section to fix a leak.

But as you can see from this picture, at this point we have trusses and the studio is connected to the main house.


Then the stripping of the rest of the roof began so that I could end  up with this:


Our entire house is now covered in this pretty forest green metal - which matches my garden shed.
Before the guys started on the addition, they built the overhang for my front deck and put the metal roof on...


Just don't look at the mess. The front entrance was still part of the construction catch-all zone hehe
Next week, I take you inside and introduce you to my handsome hubby.


Thursday, January 29, 2015

INSPIRED - Eat, Write, Dream, Stitch - and a GiveAway!


Okay, some of you have seen this picture before.. And this one....


Sadly, the office still looks a lot like this... maybe even... dare I say... worse.  But that will all change soon. Mostly because I will be moving into the new studio... all 480 square feet. (The current space is only 150 square feet)

I am already planning to go through every bin, box, stack, shelf. No item will go untouched. But here's the thing... How do I approach such a monumental task without wanting to pull my hair out? Then I visited a post from fellow WOYWW blogger, Sandy Leigh over at Eat Write Dream Stitch. She has it going on!  

Aside from being a fellow blogger, Sandy and I share a lot of the same interests so I was captivated when I visited her blog this morning. I'd read a post and follow one of her links to a previous post. I was on READ, CLICK, REPEAT mode for over an hour.

One of her posts got my attention fast. FIVE SIMPLE RULES TO DASH YOUR STASH
Go ahead and check it out. I'll be here when you get back. 

One line cracked me up - but made total sense.  In essence, if stuff is going to take up space, then said stuff needs to earn it's keep. SERIOUSLY! I mean, would we let people live in our house without contributing something? Not me! 

But more importantly, her Five Steps gave me direction as I begin to prep for the move from the Dungeon to my shiny new office/ Studio. Creative Dreams is my DREAM SPACE. My day time office, my play area, my place to just be me. NOT be suffocated by STUFF!

1. I like the idea of shopping my stash. After all, my nearest craft store is a 2-hour round trip; 4 hour round trip if I go to the Big City. We all know I have enough. LOL

2. Use an under-used item more. I like my knitting loom (she has some. Told we have similar interests) I also don't use my embossing powders or my Cricut enough. 

3. Learning new ways of using some of my stash will breathe new life into them... and into my art.

4. Making money from my stash has possibilities. I was caught by a YouTube video the other day that I have talents some others might not have. Or maybe they would rather buy an item they need for their style of art rather than making that part themselves. I'm thinking Etsy shop by the fall. An extension of Creative Drams. We shall see. 

5. More time in the craft room is a plus. Though I don't spend a lot of time in stores, I do tend to work more and play less. That brings me back to the whole 'BALANCE' thing I'm striving for in 2015.

Do any of Sandy's rules apply to you? If you haven't been to her site yet, please go then come back and share how they apply to you.

Everyone who comments telling me how they can apply the 5- Dash rules will go into a drawing for something NEW to add to your stash.. We all like new toys :-D

Creative Blessings!
Kelly


Wednesday, January 28, 2015

WOYWW #295 - All Over the Place


Good morning, friends!
I have no clue why I am bright eyed this morning. After working over ten hours on my new book yesterday, I slept like a rock and was awake when the alarm went off. An attempt to go back to sleep was futile as my fuzzy Goddess cat kept head butting me. You see, when the alarm goes off she insists that I get up. Why? So she can have her treats then take over my spot. That's my girl.

Another WOYWW rolls around! WOW - time flies around here. Did you know that simply by going to Stamping Ground you get access to almost 100 Creative studios Every Week? And becoming one of the many on the tour is easy. Come join us! We'd love to have a peek into your creative space!

Okay, so making the rounds at Julia's Stamping Ground this week, on my stop you will see multiple desks. This is the dining room table where all the wet work has been going on. A bit staged as I threw the piece of background from the Documented Life Project Week 1 that I was not happy with over the one I will be showing on Monday.

Speaking of Documented Life - if you are in the group, please leave that in your comments. I want to compile a link list on my side bar to all of us who are playing.

Next stop is the living room....Brace yourself, this is a pretty scary area....

Yes, the tree is still up. I've been a bit busy trying to keep up with a couple of challenges and write the entire first draft of my new book in 30 days.... okay, I did not start until the 21st so only 10 days! I might beat my record of 18... which is how long it took me to write Somewhere Down the Line.

Anyhow, this is my 'staging area' as I pack up the old office in prep for moving into the new studio space sometime late spring. The tree will come down on Sunday then let the piling of boxes begin!


I know ironing boards are for ironing... and I use mine for that.. .most of the time. Right now this is SU Cardstock central. All of my 8.5x11 has been brought up from the filing cabinet. This was a good height to work from this past week. I also have my sterilite tub of adhesives and my Pooh container of bling along with remnants of the projects.

And lastly... some of you inquired about the Zodiac stickers from last week so wanted to give you a closer look. I purchased these years ago at a $ Tree. My husband and I are both Libra so I figured I could use them for something :-) I had thought about my Tim Holtz Tag then changed my mind.


That's all for me this week. I probably will not stop in for a chat with most of you until Sunday. I have until midnight Saturday night to write this book and I'm giving it every minute I can spare.

Creative Blessings!
Kel


Tuesday, January 27, 2015

TUESDAY TECHNIQUES & CHALLENGES

Butterflies & Tulips

One of my GOALS for 2015 is to take part in more challenges. I am in two between now and Valentine's Day. Well, this one is a SWAP and the other is a SECRET SISTER but they both are forcing me to MAKE TIME to PLAY. Something I did very little of in 2014.
This morning these 6 cards will wing their way to CO and our wonderful hostess, Susan.

Today's card is for the 'Friends' swap on SCS. Because my supplies are a bit scattered at the moment (Come back tomorrow for WOYWW to see what I mean) I had to cut the ovals by hand. I hated that but the best i could do at this point. I did not think about inaccessability when I joined the swap. And though they look a bit off here, they actually turned out nice in reality.

I CASed this card from MrsBoz on SCS. You can see the original (which is her CAS lol) HERE Also, please take a few moments to check out her blog HERE.

My kitchen stove covered with a cutting board became embossing/ cutting central with my Vagabond. The tulips are watercolored. 

Here's the Recipe:
A2 Card base embossed with Starry Night
Mats are cut from SU Island Indigo
Stamp Sets: SU Dear Friend and Simple Florals
Derwent WC Pencils: Grass Green/ Sap Green/ Dark Violet/ Deep Vermillion/ Deep Cadnium
Butterflies punched with the SU small punch from Tan Floral Tapestry by Paper Pizzaz
     I then added tear drop bling from Studio G/ Spotted Canary


Monday, January 26, 2015

MIXED MEDIA MONDAY - Tim Holtz January 2015


NOTE: I chose not to visit other tag links until I had mine completed. Now that mine is added to the fold, I'll be checking out some of the other creative tag artists. 


My first EVER Tim Holtz challenge. I have watched Tim all the way back to his early days of guesting on The Carol Duvall show. The man just flat out amazes me the way he thinks. I'm trying.
So I was determined I was going to jump into the 2015 Tag Challenge

I really liked the first challenge.Setting Goals is a big thing for me. I'm a strong believer in if you don't have a road map, you will meander aimlessly with no purpose. Life is too short. I want to do and see everything. I want to learn all that I can. 

My focus word for this year is BALANCE. I spent a majority of my time last year working. Very little to almost non-existent play time except for what I posted here. I wanted to change that this year without going the total opposite end of the scope. My plan is to find BALANCE between the two. My first tag of 2015 showcases this. 

Our Hobby Lobby did not have Tim's tissue paper. Instead, I bought a 12x12 sheet of music printed scrapbook paper. Music is the base of my daily existence so seemed fitting to use that here. I then took a piece of muted tissue paper and layered it over the top... scrunching while the glue was still wet to add texture. They also did not have the colors he worked with. Here's his list of color suggestions followed the colors I chose in Folk Art:

Tarnished Brass/ Antique Gold
Evergreen Bough/ Holly Leaf
Broken China/ Deep Ocean Blue
Pumice Stone/ Thunder Gray
Picket Fence/ Wicker White
Walnut Stain/ Nut Meg (they had this one but I chose to go with all Folk Art)

Rather than use Tim's Chat Stickers, I thought about the words that fit what I wanted to accomplish this year. Here's what I came up with:

expand
lose
creativity
write
play
research
grow
firm
Libra
spirituality
learn teach

I chose chipboard numerals. I covered them with Mod Podge then coated with fine gold glitter. When they were dry, I edged them with a gold paint pen.

I chose the key because those words are the KEY to achieving my GOAL of BALANCE in 2015 and the rest of my life. 

The ribbon is a piece of vintage seam binding. The color helps pull out the aqua tone in the ridges of the texture. 

I'm looking forward to the February Tag. 
Creative Blessings!


Friday, January 23, 2015

FRIDAY FREEBIE - Part 4


After the foundation had a chance to cure, Lanny and his team came out to remove the forms then the actual build of the Studio began. Here you see the three Ian's (that's Ian contractor in the foreground) beginning to lay the floor over the joists. 

Then the walls began to go up. Ian and little Ian were the only two working on the walls. When they were ready to raise the first one, Ian called me out to lend a hand. I helped raise the East and West walls. Ian made sure I was a part of this build every step of the way. 


Notice the two big window openings? There are five big windows in all. Four are 48 x 36 (2 on the East wall, 1 each on the South and West wall) and one (over my stamping desk on the west wall) is 36 x 36

For the first time I will have tons of natural light and cross-breezes. I'm not worried about too much heat from the south window over my writing desk as that end of the room is shaded by this gorgeous Maple tree. 

This tree is one of the first things I fell in love with when we looked at the property. The limbs on the ground are from having the tree topped out. We've already lost one big limb from this tree and we didn't want to risk losing another as that would mean the whole tree having to come down. Our tree man, Ricky (Ricky Pruitt Tree Service) suggested we try topping the tree out first. He thinks we can save the only Maple on the immediate property. I will try to remember to share a picture this fall when the leaves are in their majestic finery. 


Wednesday, January 21, 2015

WOYWW #294


Another WOYWW rolls around! WOW - time flies around here. Did you know that simply by going to Stamping Ground you get access to almost 100 Creative studios Every Week? And becoming one of the many on the tour is easy. Come join us! We'd love to have a peek into your creative space!

Mine hasn't changed much from lasst week. That tag turned over is my Tim Holtz tag. I'll be posting that on Monday. Only thing new on the desk is the pink paint and the bottle of gel medium. I'm either using the pink to try and rescue the Documented Life Project Week 1 or I'm starting over with fresh torn book pages and new gel medium.

So what am I going to see on your desk this week? Leave your # with your comment and I'll hop on over.

Creative Blessings!
Kel

Monday, January 19, 2015

MIXED MEDIA MONDAY - Shopping!


I'm almost finished with my Tim Holtz tag for January 2015. I'll have that to show you next week. I'm still plugging away on the Documented Life Project. I am NOT happy with the base for Week 1. It's too dark. I have one more idea in mind on how to maybe brighten things up a bit. If that doesn't work, I'm setting the page aside to use in something else and start over.

In the mean time, I thought I'd show you the fruits of a very relaxed shopping weekend in Springfield. The weather was a balmy 62* and a healthy breeze. Just gorgeous weather to make you happy to be out and about doing something you love. For me, that would be looking at artsy stuff.

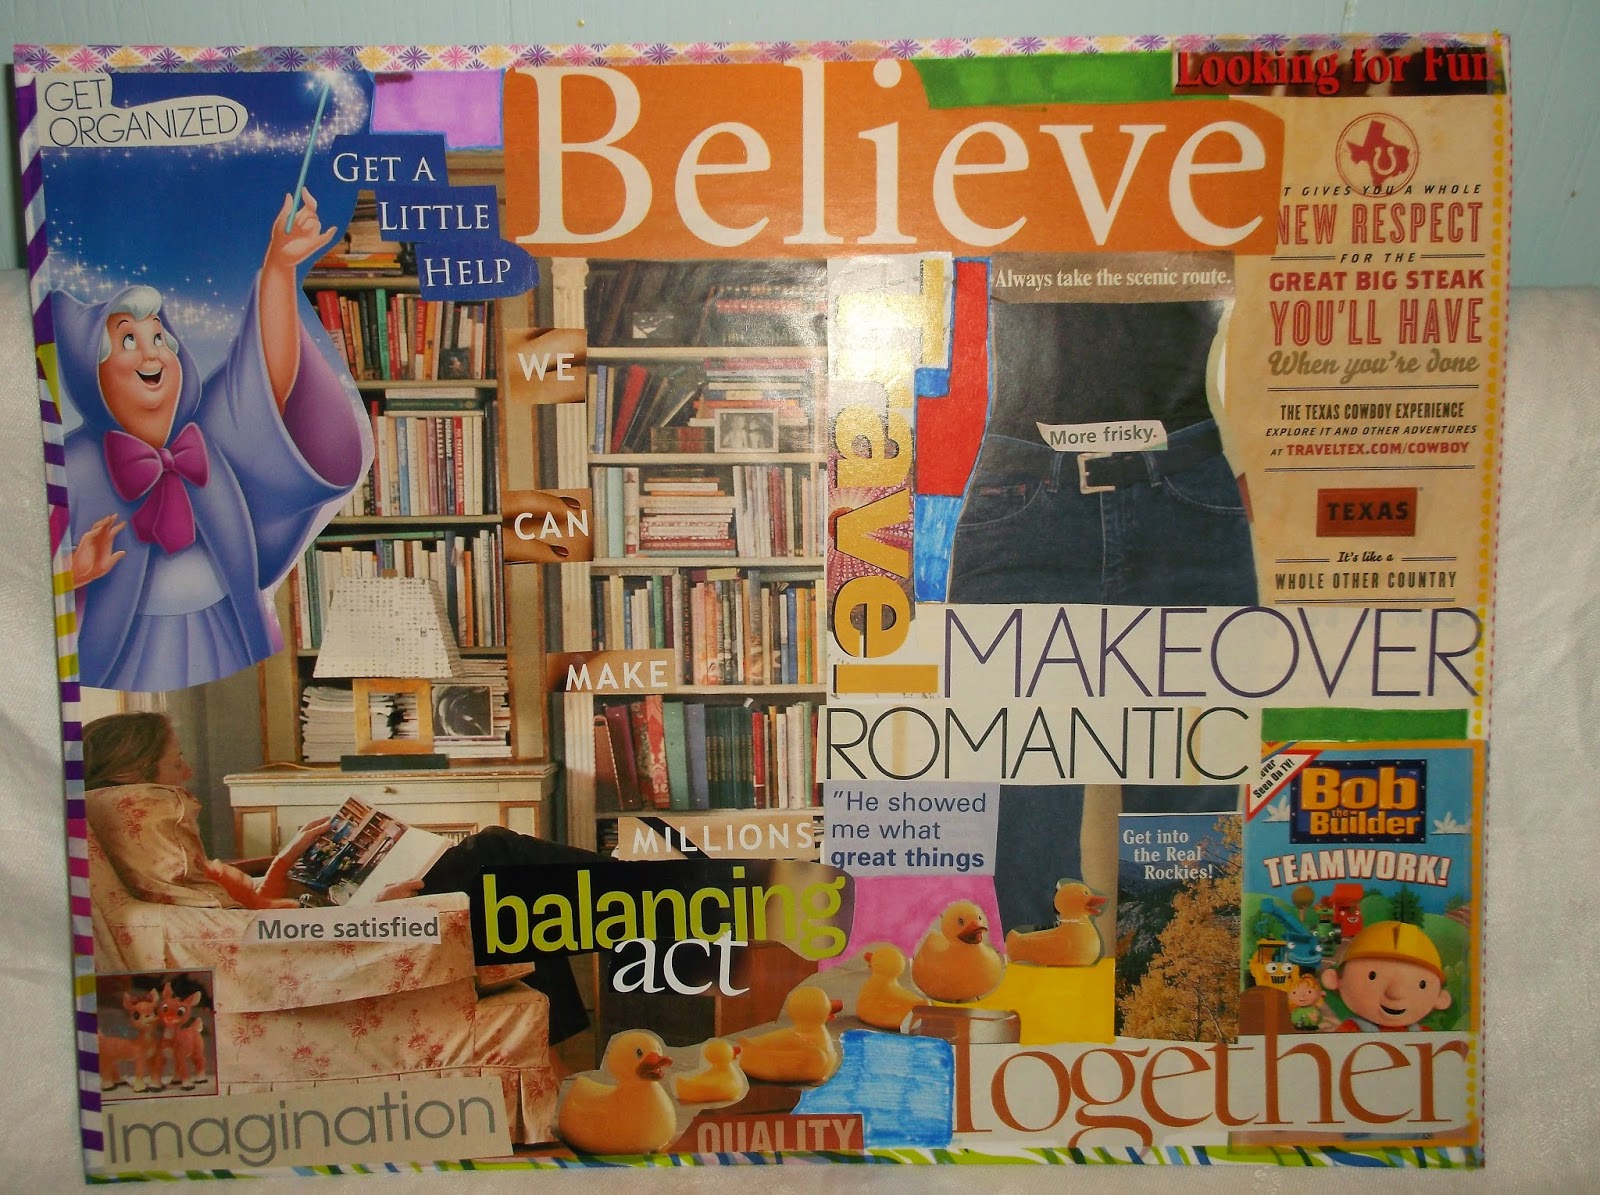
Before I show you what I bought, I want to direct your attention back to the top pic. This was my project from a Treasure Mapping workshop I took on Saturday. The concept is to create a visual board of things you want to accomplish - a visual target. Mine wasn't so much about tangible things like money or a trip but was more about the things I need to focus on to accomplish those things and components in my life that can make everything possible. I haven't put one of these together in a long time. Was really nice sitting in the library conference room tearing through magazines looking for gems while Native American flute music played in the background.

After the workshop I got about an hour of writing on the new book. Really struggling with this story for some reason. But I'm plodding along. Before heading to the hotel I made a quick stop at Hobby Lobby. Found some things for the Secret Sister Cupid swap and a couple things for me. Storage was 50% off and I never pass up the opportunity to grab at least one paper keeper when they're on sale. This is how I store all of my slabs.


Sunday morning after checking out of the hotel I spent over an hour in JoAnns. Aside from some yarn I needed for the Mitten Tree project, I came home with these goodies:


Tim Holtz (as well as just about anything Scrapbooking) was 40% off. The one thing they didn't have I wish they had was the pocket watch fob. I already used one of the keys on my January TH tag. Those little heart charms in the center? Where were those when I was looking High and Low for my book promotion back in June? I guess I should have just contacted Theresa Collins. These are part of her gold embellishments. I purchased all they had. I plan to put together special give aways for my trip to the Romantic Times Convention in Dallas in May. 

And here's a close up of a couple Tim Holtz items:


I am 5'4". The ceiling in my studio is 8'. the ceiling fan is a flush-mount so I can't reach the pull chain for either the center light or the ceiling fan. Before Bob left we talked about we'd have to extend the chains. So I bought the ball chain kit from Tim Holtz. Then I thought how cute the lantern charm would look to distinquish the fan chain from the light! I think I'm putting a key on the fan chain.

Are you tired from shopping yet? I hope not. So much FUN!
After a relaxing couple of hours at Barnes & Noble doing research and purchasing a book I couldn't leave behind, I went over to Michaels and found more goodies!


I bought these boxes for storage in the new space. There are 2 of the ones on the bottom and 4 of the ones on the top. They were 50% off. I bought all the blue ones they had. What I'm going to use them for, I'm not sure. I have a couple of ideas but we'll see if they stick once the room starts coming together.


The paint markers I'm not sure about. I bought them hoping they were refillable only to find out they are identical to the Crayola ones. :-( I just have 4 extra colors. Everything else came out of the tower bins. (Except for that one little item back by the stamp. I think if you click on the picture to enlarge it, you'll see it's from the beading department) I just liked the little canvas tags. I'll put them to use. :: Smile :::

The keys, the gear charms and that item from the beading department are all a part of a project I'll be working on soon for the Romantic Times Convention I mentioned earlier. Our theme night is Wild West meets Steampunk. I'm going as a Steampunk barmaid. If all works out, I'll have all kinds of 'tonic' bottles attached to my waistband. I'm on the hunt for vials a little smaller than film canisters that have screw on lids so I can travel the room with a bit of libation at hand :-)

Okay, I'm tired. Let's head home. We have a two hour drive. I hope you found what you were looking for today.

Creative Blessings!
Kelly


Friday, January 16, 2015

FRIDAY FREEBIE - The Build Part 3


Except for the trusses and the concrete, I found it hard to believe that these were all the materials required to build the shell of my studio. Or what this small amount of wood and floor joists could cost!


Once the footings had proofed, Lanny along with his wife Barbie and son Laken, came out and spent the morning building the concrete forms for the foundation. LANNY & BARBIE WADE CONSTRUCTION is a family business. 

After lunch, Brian from Vaugn Redi-Mix arrived with the concrete truck


and the first pour began....


I didn't get a picture of the crew on this day but lunch consisted of oven roasted chicken breasts and ranch potatoes with green bean casserole and dinner rolls. 


Thursday, January 15, 2015

TANGLED THREADS

Happy Thursday, everyone!

Not a stitch crocheted this week. I've been dealing with arthritis in the wrist bone on my right hand. Having to work with the mouse all day probably isn't helping. By evening, there is nothing left for crochet. So I've been giving the wrist a rest in the evenings. I hope to have something for you next week. In the mean time, maybe something on my Crochet Pinterest Board will inspire you. 

Wednesday, January 14, 2015

WOYWW - 293


Welcome to my dining room table. Bob left yesterday so I can spread out here for the next 21 days. I'm nearly finished with my Tim Holtz tag. I should be able to post it Monday, as well as Week 1 of the Documented Life. The paper for that is off to the top left. My paint bottles to the right, you can just catch a glimps of the coordinating mister bottles.

My plan for this week is to finish the tag, Weeks 1 & 2 of the DL project and start on a handmade item for my Cupid Secret Sister. And somewhere in there get a wedding card created and the 6 cards I need for a 'friend' swap. Feels good to be inky!

To visit other creative spaces, hop over to Julia's Stamping Ground where she has a complete listing of blogs from around the globe full of creative goodness. We'd love to have you join us!

Creative Blessing!

Friday, January 9, 2015

FRIDAY FREEBIE & Studio Progress - The Build Part 2

Okay... before I go any further, let me first thank all of you for your patience in waiting for me to pick a winner from the October 23rd post. Really? I did not mean to take this long. Just got lost in the shuffle of building, ill, holidays...

So here we go. I don't know how y'all get just the pic of the Random.Org thingie. I tried a PrintScreen and got the whole screen. My Copy/ Paste came up like this:

True Random Number Generator
Min:  1
Max:  6
 Result: 5

Powered by RANDOM.ORG

However, this still gives me a WINNER!!! And that would be:

Jackie!

Jackie... I'll be dropping you an email but you can choose from one of the following categories:

Paper Pack
Metals Pack
Theme Pack

Okay, now that I'm caught up, let's talk about the Studio Progress. Being sick definitely took some of the fun out of this whole process. One thing I did enjoy was cooking for a crowd. Here's a picture of one of our noon meals:

From Right to left starting with tan shirt -
Ian Maddox - the contractor, Lanny and his son Laken (concrete), Ian and Trevor (crew)
For lunch this day they had BBQ pulled pork on homemade rolls, cole slaw, baked beans and sliced tomatoes.

My crew never went hungry LOL

One of the final shots of the south side of the house. Here, Lanny and his son Laken discuss the measurements before breaking ground for the footings. 

By end of day we had the footings. Didn't look as big as it sounds.

Next Friday I'll show you the next step in the process... and maybe more food.


Thursday, January 8, 2015

TANGLED THREADS - Mitten Tree Project


Here is a shot of the hat/ glove/ scarf sets I donated to the Mitten Tree at our local bank. If you've missed previous posts, this is a project our bank does every year. We decorate the tree with hats/ scarves/ mittens/ gloves/ socks. A few days before Christmas vacation, the items are taken to the local grade school and the office distributes them to students they see the need.  Several communities in our area do this for their local schools.

Here's a close up of one of the sets:

I buy the hats/ gloves usually on clearance at the end of the season then pair them with a yarn color and crochet the scarves. Each set is tagged with this gift card:


I haven't changed my GOALS on the side bar from 2014 yet. You'll see my target was for 52. I wound up with 25. And for some reason, when I got to the deadline I couldn't imagine what I'd been thinking. I didn't have 52 pairs of gloves... or so I thought.

In searching for my crochet hook keeper the other night I found 2 gal zip loc bags full of pairs of gloves. So I have a stash to start on for this year. So far this year I've completed 3 full sets. I have a glove/ scarf set but need a white hat and they seem to be sold out everywhere I look. While at the library the other day I picked up a pattern book with several different hat varities.. thus the purpose in searching out my crochet hook stash.

Over the weekend I'll change my GOAL bar to reflect my targets for 2015.
Creative Blessings! 

Wednesday, January 7, 2015

WOYWW #292 - Displaced Work Area

WARNING!
This post is a bit longer than our hostess, Julia, prefers. And I'll be more brief from now on. But this week is all about getting myself organized.... and is my only work surface at the moment.

Have no clue what I'm talking about? Each Wednesday for 292 weeks and counting, a bunch of us from all over the world invite you to peek into our creative spaces. Need a map? Pop on over to Julia's Stamping Ground for all the details.  I hope you'll join us!


This is where most of my creativity will come from for the next few weeks. My dungeon studio is a disaster. I hope to work on packing up some stuff later this week so I can at least work on my desk some down there.

This tote bag has seen a lot of variety since it's purchase almost 10 years ago. I used it for toting tools back and forth to Michaels for the classes I taught. Then the bag sat on my desk here until Bob built my permanent caddy out of 1x4s. I don't go to crops so I didn't need anything portable. At that time, I put it in my rolling art bag in case I were ever lucky enough to attend a Mixed Media art retreat. Which I would still love to do.

One of my challenges with the DL project last year was not making enough time to do the art journal prompts... which is like a major point of the whole thing. LOL  While researching ideas for my dayplanner I came across THIS YouTube video by Nadine's Mixed Plate.

Cool concept! This will allow me to have all of my tools at hand while I'm watching TV in the evening. And when I travel, I have a basics art bag to go! Let's take a peek inside...


This is the collection of goodies I unearthed from the office to select from plus what I purchased at 
$ Tree and Walmart to fill in the gaps. 


My notepad/ post it note assortment. Those ones in the front with the kissy lips... are left over hostess note pads from my days of selling Undercover Wear. ;-)


This is what I wound up actually putting in the bag. Some things are packed in the old clamb shell stamp boxes from Stampin' Up. Example is the stamping case in the upper left corner. I have a few acrylic stamps, and a square of a stamp scrubber. I still need to add a memento pad so I can use the watercolors and watercolor pencils. The 2nd clam shell box holds various adhesives and the third my variety of ink pens. I should have opened that blue diaper wipe box. Inside I have a selection of large paper clips that I have decorated the ends by hot gluing decorative buttons or ribbons.

So far I'm on track. Tomorrow I'll be showing you how my Mitten Tree project turned out for 2014 and my plans for 2015. 
Creative Blessings!


Tuesday, January 6, 2015

TECHNIQUE TUESDAY - Documented Life Planner


This is one of the inside 'daily' pages in my 2015 Documented Life planner. Kind of plain, right? I agree. But I'm fixing that... little by little. 

All of the Daily pages will look like this. I'll use the spaces for appointments and keep the notepad for the To Do's. I can also use these spaces for doodling and marking repetitive things such as the reindeer on the 25th of each month. The reindeer denotes that this is Reindeer Club Day. The day each month I will make one batch of Christmas Cards. No boxed cards to be mailed in 2015! 
One of the things I'm striving for this year is to take the planner week by week, day by day. For someone who has always been a planner this will be my challenge for the year. But I'm going to give it my best shot. 
I wanted to be able to work with any medium on the daily pages. Rather than a 2-step process I added a bit of acrylic medium to white gesso then spread a single coat on all 52 weekly pages. The color varies by month. I picked School Bus yellow (the only yellow I had) for the month of June. But I still wanted to break the weekly up into 'daily' time slots. I was inspired by a picture one of the other DL participants did. Since I can't remember who it was, I won't post her picture without permission. Instead, I'll show you what I've done to mine... or will do - week by week.


Sunday night will be my time to sit on the couch, watch my favorite tv program(s) and do the art for the week. 

Remember, I mentioned yesterday how I am finding my Daily To Do works best on long notepads? While shopping at B & N last November, I found this gift kit. 

Cute, right? Each notepad has enough sheets for every day that month. The little flag post -its to the right match each of the longer pads. So here's my plan. I use one sheet per day for my Daily To Do then attach with Washi Tape to the weekly page, just as I did last year. But these pages are so much prettier than the plain notepaper pad I used then. And the flags are super sticky. They don't peel off their pad very easily so when I put them in the dayplanner to mark something, I'm pretty sure they are going to stay put.

Monday, January 5, 2015

MIXED MEDIA MONDAY - Documented Life Project


I am on track to begin the Documented Life Project through Art to the 5th with the rest of the group this year... instead of 3 months into the year. The above was my DL planner for last year. Well, one of the four. I used composition books - one per each quarter of the year. By the end of the year I found it frustrating to go back and find things I'd entered in earlier dates that I needed to reference.

What I liked about last year's planner:
The size and basic layout

What I didn't like:
having to break up the year into quarter books.
My small desk area wasn't really equiped for the full dayplanner but a long, narrow notepad I could do.

My challenge was how do I get an entire year into ONE planner when I don't traditionally work 'By the Week'. My Day job has to be done in 'Daily To Do' tasks.

What I wound up doing was using a long, narrow notepad for my Daily To Do. I would put the date at the top, do my daily tasks then at the end of the day use Washi Tape to incorporate it into the journal.

So with a new year of DL approaching I took to YouTube looking up all kinds of things having to do with planners. I figured I could take any planner idea and adapt it to meet my DL planner needs.

I came across THIS video by Danielle Batog about using a deconstructed compostition book. DUH!

So I set about cutting a composition book down the middle. I then decided on my cover for this year. I loved the papers from DCWV Once Upon A Time I used last year. This year I decided to use my favorite slab from Colorbok - Rosewood. I pick up a new slab at Walmart about every other month.
I chose to use some of the swag from the slab this time and picked out Cherish the Moment for the cover accent.


I covered the front and back covers of the comp book. Added border trims from the same slab then covered the entire thing in clear contact. This will help protect the DL planner from anything that might mar the beauty as I cart it from place to place... though I'm not seeing 'carting' being much of an option unless I'm traveling overnight.

Inside, I have a 2-page calendar page:


I had this anchor stamp in one of the sets I purchased from Close To My Heart earlier this year. The anchors note the days my husband is on the boat. This allows me to plan my travel schedule at a glance. 

Aside from the calendar pages, each of the weekly pages are edged on the hole punched side with washi tape then covered in a 1.5" wide strip of clear contact paper. This acts as hole reinforcement. The binder rings are the 2". 

Tomorrow, I'll show you more of the inside 'weekly pages' - which I think I can work with as well as how I'm doing my Daily To Do (DTD).

Then on Wednesday, I'll show you how I'm conquering (at least that's the plan) my absence of actually doing the art challenges last year.

So stay tuned... 2015 is full of Creative Blessings!