Showing posts with label Postcards. Show all posts

Monday, August 31, 2026

CREATIVE MONDAY - SACs Challenges

 Good morning!

Slow moving this morning but I did want to show you what I've been working on.

I've jumped back into the Spectrum Art Creations challenges in the Spectrum Art Creations Friends FB group. I love the products Madi gets in and the challenges she comes up with.

She started August with a new monthly challenge based on a prompt. At the beginning of the month she pulls a 'prompt stick' then we can interpret the prompt however we want. This month was Fairies.

I knew instantly I wanted to do a display of some sort then the project morphed from there.


I started with four things: a 4x6 easel board from $Tree, a Spectrum Art Creations original design postcard, Flower Fairy Diary stickers from Spectrum Art Creations, and a fairy light string that came in a Diverse Romance Writers conference swag box in July. The string has three settings - solid, slow bling and flashy blink. 

I positioned one small fairy nimph in the Y of the tree and an onery little girl fairy on the ground, looking up at him. Then I positioned the lights on the back of the postcard so some highlighted the jars, the pearl strings and behind the girl fairy. I anchored everything with strategically-placed spots of hot glue. 

I used glue dots double-layered around the edge and a couple in the darker spots of the postcard then placed on the easel.

the height of the legs on the easel bothered m so I had Bob cut them off level with the bottom of the flat part of the easel. Looked okay, but I felt the picture needed more so back to shopping for a round piece of wood, the grass, mushrooms, and pinecones. The wood base is actually a sign from $Tree that I flipped over so I had the flat back. Layered everything with the grass and embellishments for the forest floor leaving an opening in the center. I wanted to be able to pick up the easel and fold it flat for storage.
Oh.. I also had silk leaves in fall colors from $ Tree. I used a couple of small leaf dies from a Stampin' Up! set called Gorgeous Leaves and die cut them from the silk leaves to create a scattering/ pile of fall leaves. 

I'm really happy how this turned out.

The other challenge I took part in for August was SHAKERS.  We were to purchase our choice of shaker bits and incorporate them in anything of our choosing. I ordered three different sets of the shakers and used one of the sets in this card:


I used the Marianne's Designs ROMANCE shakables. I knew the pink hearts in the collection were perfect for a Pink Ribbon card and also matched the Polished Pink cardstock from Stampin' Up! The die cut is from the Support Ribbon from Stampin' Up! and a sentiment from my stash.

The deadine for August challenges is today and I have a couple more shaker cards planned. You'll see them in future posts.

I won't be doing a Tag Tuesday post tomorrow as I'll be finishing up the challenges, though there could be a showing of what I make today.

Creative Blessings!
~ Kelly


Monday, November 26, 2018

MIXED MEDIA MONDAY - Nano Postcards

Good morning, everyone!

I have to say I'm having a blast playing again. Especially in things that get messy, like today's mixed media project. - Postcards

I participate in National Novel Writing Month every November. The goal is to write 50,000 words in 30 days.... the length of the book, Moby Dick. This is to be a first draft, dump the story from your brain and get it down on paper. Perfection and editing are for another time.

Like most places on the internet, Nano has a massive amount of forums/ threads to connect with other like-minded people. One group I found this year was a Post Card swap. we are assigned 5 people to swap with. We send them a postcard with words of encouragement for the Nano battle. The postcards may be purchased or handmade. Well... we know which one I'm going to do! LOL

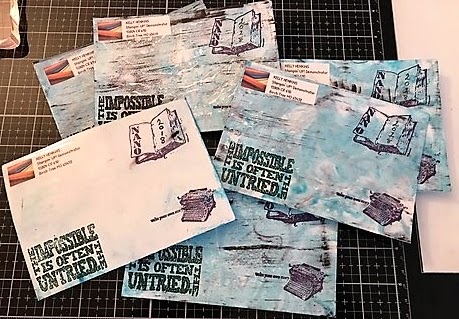
This was the front of my postcard. This swap gave me the opportunity to play with stamps I've not touched in ages!


I started with one of my favorite techniques - shaving cream marbling:


I swirled then pressed 12 postcard bases which I'd made by gluing 2 pieces of cardstock together using Modge Podge. They needed to be sturdy. One card was destined for Spain.

Lined up on waxtex on the ironing board to dry:


I sponged ink on the back side to tone down the white.

Finished and ready for addresses:


You'll notice the one in the foreground is different. That's because I messed up and put the images on the wrong side. LOL The rest are done the way I'd intended. 

As I said, I'm getting play time in again. Probably not a good plan since I'm supposed to be writing Book 2 but it's so hard to concentrate when Bob is home :-)
Tomorrow will be our monthly Card Chicks cards. I made three from Suzy's kit. Can't wait to share!

Creative Blessings!


Monday, April 18, 2011

Magazine Monday!


We all know how crazy March was for me. Needless to say, the March Christmas Card Challenge at SplitcoastStampers wasn’t met on time. So I decided this week I’d find something quick and easy while pairing it with Magazine Monday. I didn’t realize I was going to find something THIS easy.

I pulled out the Winter 2005 issue of Paper Made Easy. I only have 3 or 4 of these magazines but really enjoy the projects they include.

Card designer/ artist (and I do mean artist in multiple mediums) Loretta Mateik 4-page spread on 9 simple cards. The first 2-page layo
ut used a Vintage Christmas Collage Paper from Paper Love Designs. She matted them simply, added a sentiment and called them done. With the exception of one card, her only embellishments were brads to adhere the sentiment mats.

Loretta said she purchased the collage paper and coordinating card stock. Everything else came from her stash. Now that’s the way I like to play! She says, “I hate to let anything go to waste!”

So I pulled out a 12x12 sheet of Vintage Santa Postcards from Flair Designs and matching scraps from a Christmas Slab I’d purchased about 5 years ago. To keep these super simple and perfect for the recipients I know won’t cherish the car
d past the holidays, the only embellishment I added was Christmas Red Stickles (a gift from my Secret Sister back in February).


I made the 11 base cards from Mello Moss cardstock (Retired SU). I used Always Artichoke to accent the Mello Moss for the pine bough punch outs and stamped the sentiment in Mello Moss ink (Retired SU). The sentiment is from SU – Bells & Boughs set. I stamped the greeting on Very Vanilla and matted on the inside.

Now to think about April's Christmas Card Challenge.


Friday, April 3, 2009

Spring Time!


The Missouri stamp group did another postcard swap. This one had a spring theme.

I enjoyed playing with the shaving cream technique for the background. The markers were my LePlume.