Showing posts with label #Spectrumartcreations. Show all posts

Monday, October 6, 2025

MAKE-UP MONDAY

 Hi everyone!

Last week was just nuts! When I got home I found out Bob had been streaming MeTV on our dish network and took me down to about 17% of my data. I was getting up before daylight to upload the tag video but then had to shut the internet down to get me through until the data reloaded Saturday night at midnight.

I'm back to full capacity and playing make-up. So photo-heavy. Are you ready?

You saw the Day 1 tag of the #31DaysofHalloween tags. Here are Days 2 - 6 to catch you up:


Day 2 - Thrifty Thursday


Day 3 - Fabric Friday


Day 4 - SACs Saturday


Day 5 - Spooky Sunday

Today's Tag:


Day 6 - Mixed Media Monday

I'll be making tags ahead over the next couple of days and scheduling the blog posts. I'm off to the Ozark Creative Writers Conference in Eureka Springs Arkansas on Thursday and won't be home until late Sunday. I've made room this week to get the tags made up/ video'd and scheduled ahead of time.

What are you playing with? Are you inspired to get out your supplies and make some tags? I'd love to see what you're  making. Tag me on instagram! @kellyscreativedreams

Creative Blessings!
~ Kelly


Tuesday, July 16, 2024

ALL THINGS ALTERED & TAB TUESDAY - Double Play

Hi everyone!

Coming of the great writing conference this past weekend, I barely got the videos done--let alone posting here. 

Let's start with yesterday.

I made Hidden Paperclips from the cookie box packaging I've been using for the #allthingsaltered journal. 


I originally made 3 in the VIDEO but realized I was out of frame most of the time so the third one from the left was the make for the final video.

Aside from the cookie box for the base, I used the same paper pad I've been using, lace & ribbon from my stash and the floral stickers from $Tree.

For today's Tag Tuesday, I made what I'm calling a French Door tag with pocket. I got the idea from a video a couple of weeks ago but can't find who the creator was. She offered a template for the tag where I just did the math, as you'll see in today's video (it's still uploading).


OUTSIDE


INSIDE w/ TAG

After I recorded, I did wind up putting a bit of velcro behind the jelly fish to help keep the doors closed. 

I used Enchanted Ocean from Sara Davies at Crafter's Companion. This is also for the nautical challenge in the Spectrum Art & Friends FB group. As soon as the video for this project is done, I'll link it HERE.

That's it for me. I'll be back tomorrow with WOYWW and possibly a Friday project.

Creative Blessings!
~ Kelly


Wednesday, May 1, 2024

WOYWW #778

 Good morning, crafty friends!

Beautiful day in the Ozarks. I've sent Bob off to spend the day with his buddies from IA. He took a roaster full of pork steaks and gravy and some minute rice to cook when they're ready.  As soon as I sit for a few minutes I'll get the cinnamon roll dough started.

My desk:


I finished up a challenge item for Madi's Spectrum Art Creations & Friends FB group, filmed the video then was done for the day.

This is what I made:

You'll find the inspiration video -- > HERE. Madi's is 3x4 I believe (perfect for putting into a junk journal for journaling spots) but I wanted something larger that I could put in my planner. I'll use the pockets to tuck the challenge detail cards from the FB group. We have challenges - usually 4-7 - that go from the first of the month to the end of the month. Madi's plan is not only for us to buy products but to USE THEM! Cool concept, right? LOL

Mine measures 6x8 with 5 pockets. In Madi's video you'll notice her entire base is also a pocket. I made mine to just be a flat base. Except for the charm and brads, I used all Stamperia products. the papers were from the Artelier paper pad. 

You'll find my video explaining better ---> HERE.

Okay. I promised you Clematis pictures this morning so here you go:


Little Duckling


Fuschia


Purple 1


Purple close up

I always wanted Clematis and am so happy to see these beauties flower every spring.

That's it for my desk (and story) this week. Who's Miss Julia and why am I here?  When you are done visiting me in the Ozarks, please hop on over toStamping Ground for all the details. Miss Julia has a long list of other studios you can peek into. No standing on an up-turned milk pail to look in the window. We open the doors wide and welcome you.  Please leave your number and you'll be among the first on my list.

Creative Blessings!

~ Kelly


Monday, July 3, 2023

MAKE A CARD MONDAY - Christmas in July!

Good morning, crafty friends!

I started a new series on my YouTube channel. I'm featuring Christmas the entire month of July.  This is our first official Christmas card of the month.

I've heard some questions from junk journalers that didn't start as card makers. They have no clue where to start. I tried to take some of the mystery out of this puzzle in today's video... linked below.

I started with an 8x8 paper pad called This Miracle Night from Craft O' Clock (now retired) that I'd purchased from a Spectrum Art Creations Live Sale then added Stampin' Up! items from my stash.


You'll notice a touch of gray in the background foliage and ribbon so I used Smokey Slate cardstock for my base and matted the image cut from the paper on a piece of Cherry Cobbler. The Baker's Twine was from Stampin' Up! and the charm from Hobby Lobby.

Here's the quick instructional vide:


I'll be back tomorrow to make a couple of tags from this same collection.

Creative Blessings!
~ Kelly


Monday, May 22, 2023

CARDS AND OTHER PRETTIES

 Good morning, friends!

Kateri, one of the Spectrum Art Creations & Friends FB group moderators, went on a cruise to Europe last fall and took some amazing photographs. So she offered up a challenge for us to create something with any of the photos. Our deadline is today - her wedding anniversary.

I chose four of the photos to manipulate into pretties (at least in my opinion). Note that while I did do the castle on Friday and the other three on Saturday, I didn't wait til the last minute. I plan everything out in my head for days before actually creating the project(s).

Since it's Monday, let's start with the card:


The background is of a terra cotta roof. Do you see what's hiding between the tiles?  I also used a Vintage fashion paper doll from Spectrum Art Creations... similar to this pack HERE.

I created the font in word. I may swap that lady out for one backed in white rather than black but I wanted to help draw out the item on the roof.

Next I used a photo she took of some mushrooms:


I placed the photo to the back of the frame then printed a second photo to fussy cut out just the mushrooms. I distressed the edges of the fussy cut pieces with a brown ink then layered them on top of the background photo with dimensionals. At the base of the photo, I mimicked the ground cover with some dried moss and pieces of acorn then added a couple of plastic ants, Tim Holtz tiny bone pieces and a gnome charm. (If you click on the photo to enlarge the image, you will see the tiny gnome hiding amongst the ground cover). I added a lady bug to the larger mushroom.

To make the layers fit into the frame, I put a double layer of dimensional tape all around the parameter of the photo. The tape is hidden by the frame. This gave me a bit of breathing room between the glass and the display. I simply eliminated the two pieces of cardboard backing that were in the vintage frame.

Number three:


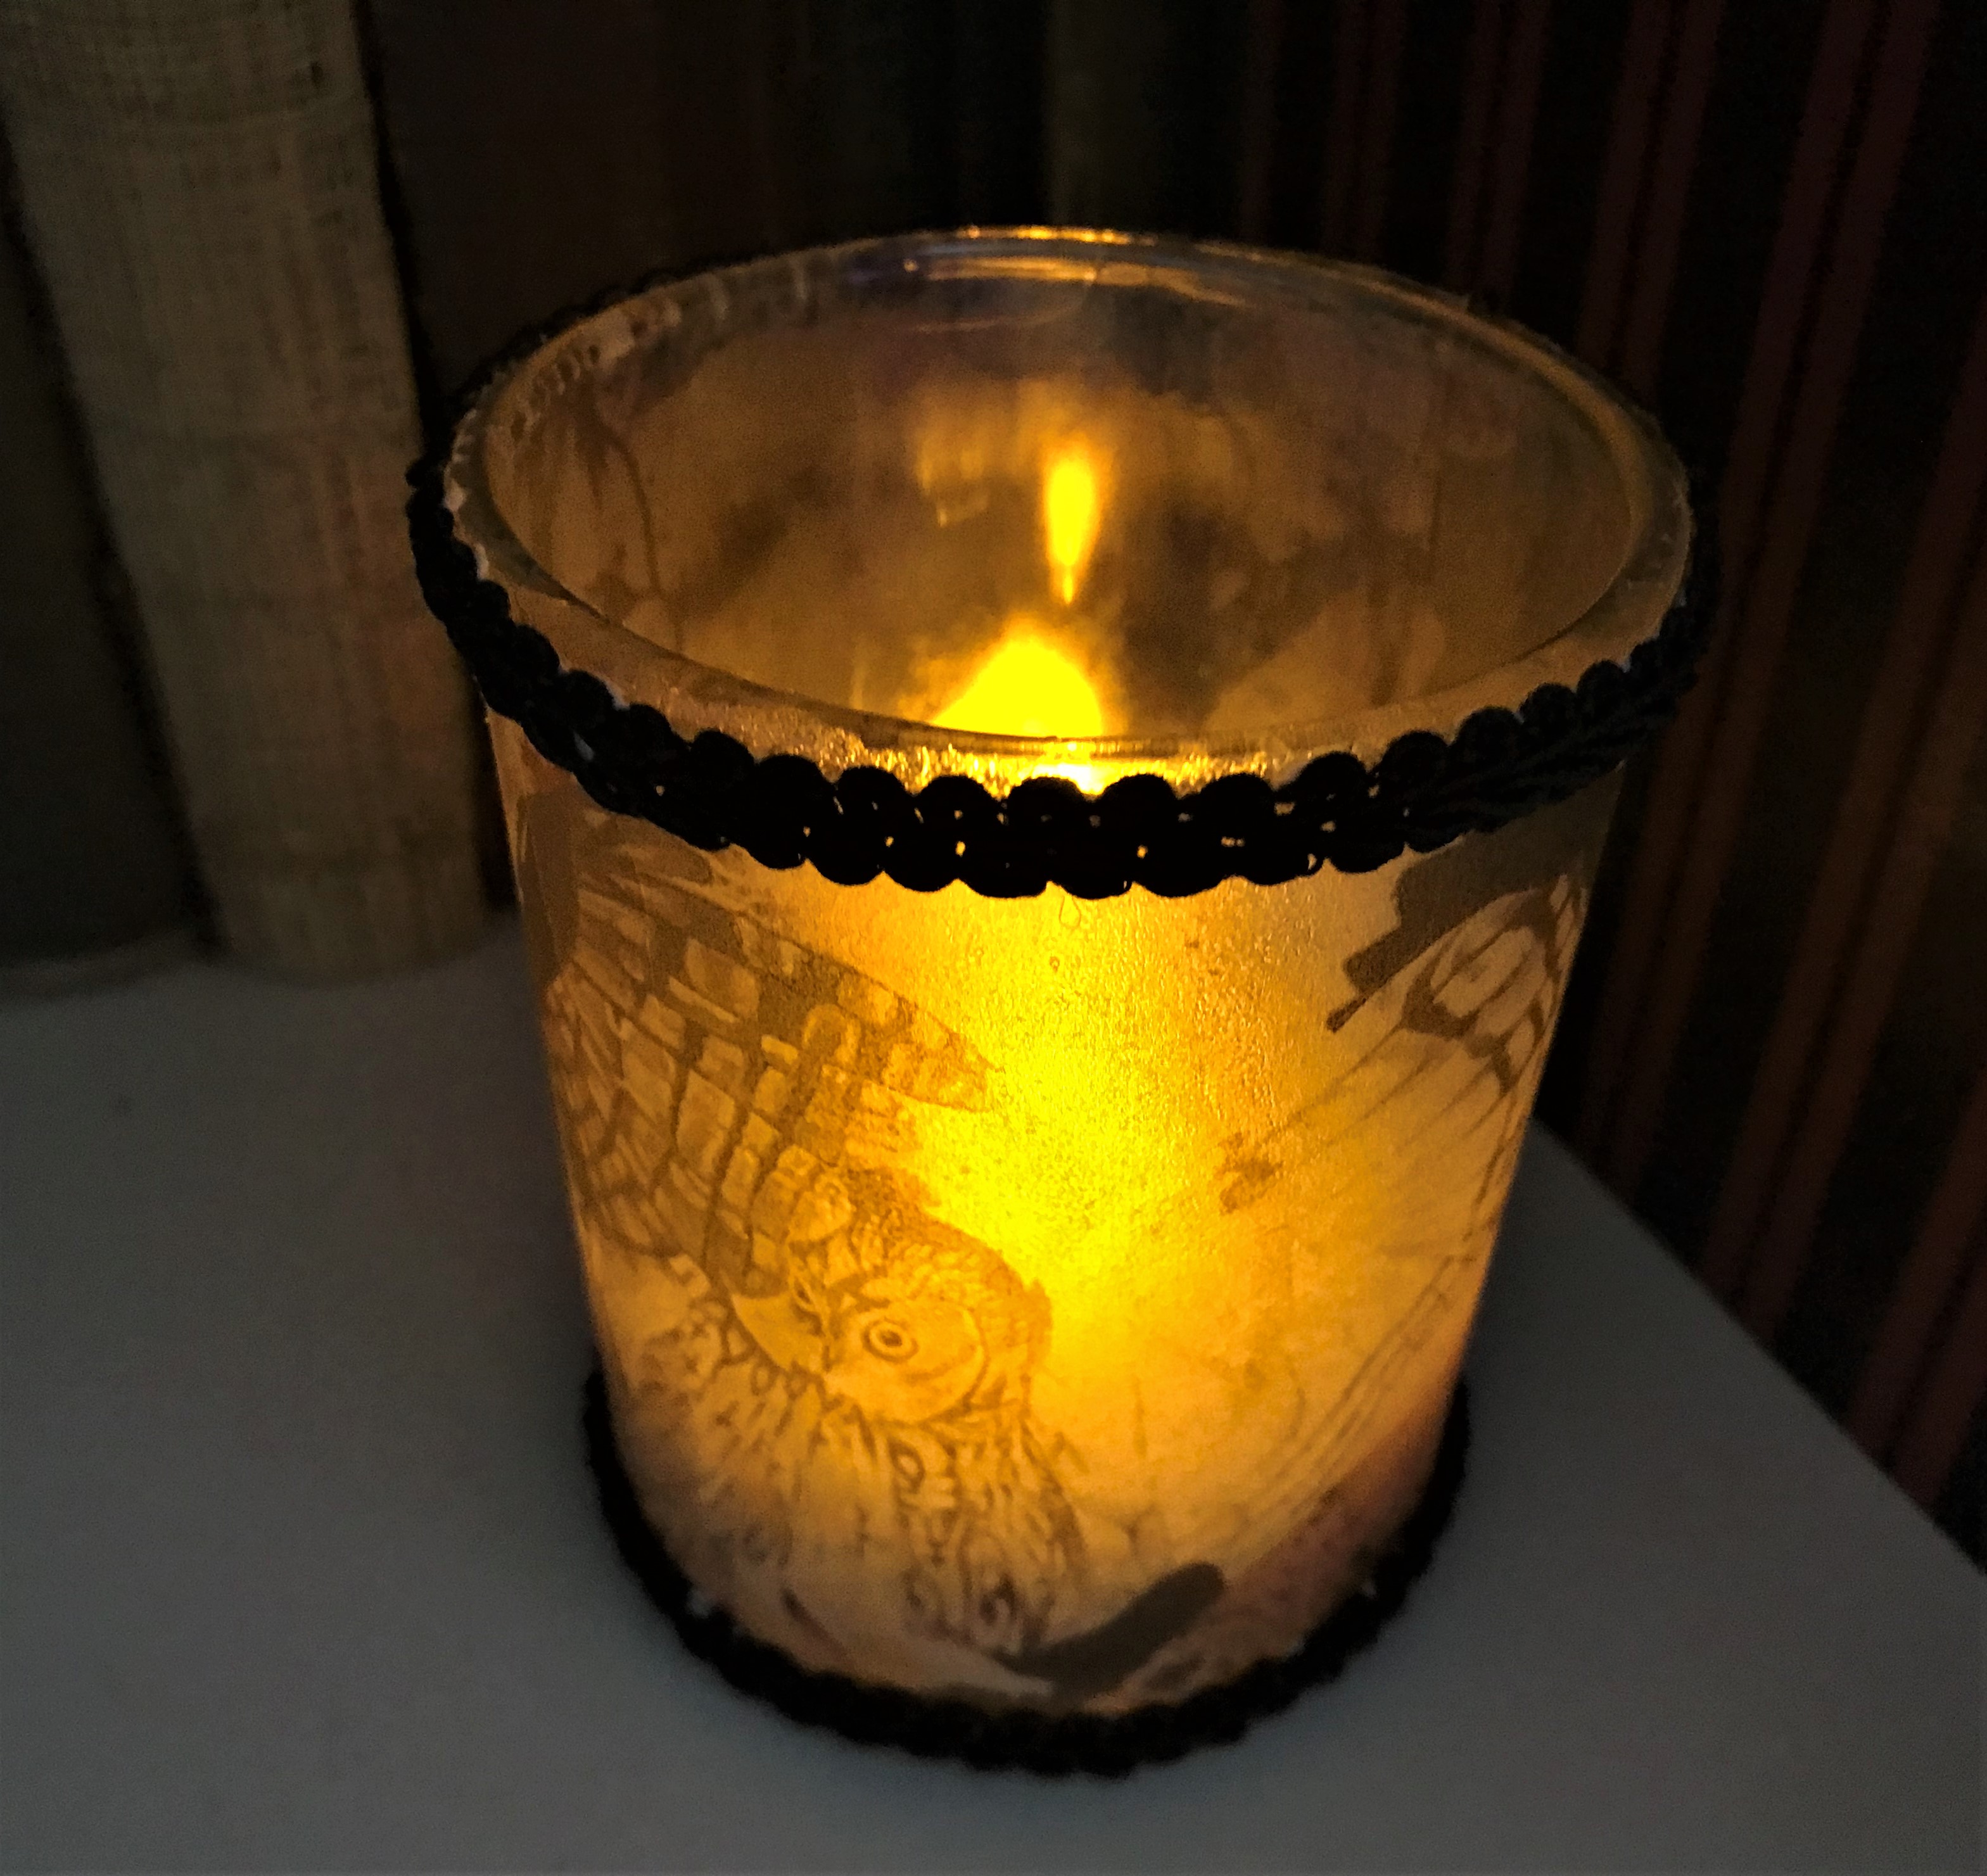
This photo was of one of the many beautiful art pieces Kateri saw on her travels. The owl seems to be warding off a crow/ raven flying past him. The raven is on the back side of the votive cup. I printed the image on vellum and adhered to the outside of a votive cup from Dollar Tree then added French Gimp Braid Trim trim from Spectrum Art Creations.  (Note: they appear to be sold out of the brown but I've linked the white, which you can dye any color)

Here's the votive with an LED candle:


Finally, the largest piece:


I loved the picture of this castle and knew I wanted add more dimension. 
I used a black shadow box frame. First, I printed the photo out at 8x10 onto photo paper and put into the frame. I printed out a second one on photo paper so that I could fussy cut out the bird. I mounted him on two layers of black cardstock, cut him out then set aside. 
The castle was printed again but on Vellum and left to dry for a couple of days. I didn't want the ink to move/ smear. When it was dry, I fussy cut out just the castle (away from the sky/ tree background) then adhered to the outside front of the glass with Aleene's Spray Adhesive. Then I put the bird in place over the one on the print with a strip of black dimensional from Stampin' Up! The dimension appears to change depending on how much or little the frame is reclined. 

I'll be back on Wednesday for the weekly blog hop. Wait til you see my work table!!! Before AND After shots coming!

Creative Blessings!
~ Kelly


Monday, April 17, 2023

SMMR Card Group Monthly Swap

Good morning, crafty friends!

I've not posted cards for this in awhile. Not sure why, but I'm trying to get better.

I've been with the SMMR card group for about ten years. Doesn't seem possible! I've had the pleasure of meeting up with some of the ladies at Stamp n Scrap Expo in Collinsville once and we swapped ATCs. We're down to a handful of us now. 

Each month, our fearless leader, Barb matches us up with another member of the group for us to send a card to. I was running really late on my cards there for awhile. Got tough for me after we lost the Yahoo groups. I don't do FB as much - but I'm trying.

For this month, I tried out a die I'd requested from Madi @ Spectrum Art Creations. I'd seen a similar die on a FB ad demo and fell in love. To my surprise, Madi was able to find three different ones - including the one I used for this card. (I don't see them on their website so they must be sold out)

Here is the die I used:


I had a strip of leftover paper from Mintay called Graceful that was the perfect size for me to cut two cards from the single strip.  I bought the last one Madi had but I found it on FranticScrapper

The card:


After cutting out all of the pieces (does everything in one pass!), I mounted the frame on Purple Posey cardstock (Stampin' Up!). The green pieces are the reverse of the floral print. I cut a scalloped circle from Fresh Freesia, stamped the Hello from the Oct. 2016 Paper Pumpkin in Tuxedo Memento Black on Basic White cardstock. 

I love this die and can't wait to play with the other two!

Creative Blessings!
~ Kelly


Tuesday, May 31, 2022

GERMAN SCRAP CHALLENGE - Photo Heavy

 Hi everyone!

I do apologize for not getting the Card Chicks card up last week as planned. After Bob left, I pretty much just dosed up with Nyquil and slept most of the next two days. By the time I felt better I had to start busting out a challenge I signed up for with Spectrum Art Creations. You'll be seeing me playing with more of things I've purchased from them in the coming weeks/ months as I turn my attention away from strictly Stampin' Up!

If I learned anything from this challenge, it was that I am so much more inspired when I can play with the toys I WANT to play with rather than the ones I HAVE to play with. My Stampin' Up! business isn't going anywhere so it's time I started enjoying the creative process again.

So what is German Scrap?

Scraps are small paper images printed lithographically. They have been produced in America, Germany, Scandinavia and more recently England. The German printers were the finest and most prolific producers of scraps in Europe - queensferry-at-war

Here is the sheet I had to work with:


For the challenge we were to incorporate the images into 5 different items. The 5 items counted as 1 entry for a chance at gift cards to Spectrum Art Creations store.  I'll be doing a video for Friday but for now, here are pictures of the items I made with a bit of description:


Inspired by vintage photo albums. The cover is 2 layers of Warm n Natural quilt batting on chip board then covered in an olive green velveteen. 
The doily is a  coaster crocheted by my late eldest sister many years ago. We never use the placemats/ coasters anymore so I've decided to incorporate them into keepsakes. The corners are Tim Holtz.


Inside of the album. This is one of five photo pockets I made. Each pocket holds 2 'photos' back to back.
The pockets were made from coffee-dyed Crumb Cake cardstock. I used a retired SU set - Very Vintage to stamp part of a doily beneath the banner (a Darice die) as well as the florals in Tip Top Taupe.
The photo mats were Very Vanilla cardstock lightly coffee dyed.
The images in the album are all Tim Holtz paperdolls

This piece is dedicated to my eldest sister - Barbara.
She loved roses and a true cowboy pistol she'd purchased a few months prior to her death.

I've been wanting to make an altered paint brush for about three years. This challenge was the perfect opportunity to step out of my comfort zone. 
I started with two coats of gesso then added a couple coats on the front of Tapioca acrylic paint.
You can see half of one of the coasters and I've done a pearl trim wrap.
For the floral, I chose the basket arrangement, photocopied the image five times in black n white onto cardstock then layered them up to create a 'chipboard' effect - this added dimension to the piece.
The pistols are a charm from CHARM ME that I purchased at Hobby Lobby.

This is a TAG BOOK

inspired by Jennifer Tritle. Her tag books are showcased in the April/ May/ June issue of 

Art Journal magazine by Stampington

You'll find her article beginning on page 48.  She was inspired by 

Jessica Rosengren (Jesson Art on YouTube)

While Terri was here, one of the things she brought me were several unused time cards. The were 14" long. I knew I wanted to use them as the base for the tag journal. Then following Jesson Art's tutorial, I got brave and played with layers, using gesson, Shimmering Embossing Paste (Stampin' Up!) and Pigment Sprinkles (retired SU). I used the Tim Holtz rose doily stencil. The ribbon is Stampin' Up, the lace and pearls from Hobby Lobby. 


This is a Gildan white t-shirt. 
I applied the German Scrap with Fabric Mod Podge, making the t-shirt washable. I added half of a coaster trimmed in what I call Barbara Pink ribbon (Stampin' Up!) Barbara always wore a beautiful bright pink nail polish.  The neckline is a loose wrap of the pearls and ribbon tacked into place. 


The last Sunday of each month we play TRINGO Live on YouTube to celebrate that month's birthdays. Anyone can join us!
We call it Tringo because it's a mix of Bingo interspersed with Trivia with Madison.
One of our regular members has a box she keeps her bingo card/ markers in. She inspired me to create a Bingo Box of my own. 
The box is made from 2 canvas frames ($ Tree), decopaged with coffee-dyed music paper. I distressed each torn piece of the music paper with Tip Top Taupe (retired SU). I took a bingo card I had in my game elements stash and shrunk it to 75%, layered it on a piece of thick chipboard to add dimension, then placed one of the German Scrap items on top. 
You can see other German Scrap elements decorating the corners. I applied them to all 4 corners with the box shut. When the glue had dried, I slit them with the Xacto knife so the box would open again but they'd look like one piece when closed. I use 2 vintage bingo markers stacked together to for the feet for the box.


BINGO is spelled out by cutting 7 layers of each letter out of cardstock (using Sizzix adhesive sheets) then adhering them together to create thick chipboard letters. The top layer is gold foil.


I lined the inside of the lid and bottom with chipboard covered in Garden Lane (retired SU)
I created a bingo card from the one Madi has for me. The squares are 1" then I stamped the numbers/ letters using Garden Green and retired SU stamp set - one of the first things I ever earned with Host Credits years ago. 
I'm using flat-backed glass marbles from $Tree. There re 5 clear ones to use for Wild numbers so I can see what's below them, a dark blue to cover the free spot and green for the rest of my markers. 

I'm exhausted but it was so much fun playing with lots of different mediums and stepping out of my comfort zone to try new things. 

What have you been wanting to try? Take the plunge and have FUN!

I'm off the rest of this week but should be back on track Monday. Thank you for your patience.
Creative Blessings!
~Kelly