Showing posts with label Thank You. Show all posts

Monday, April 11, 2022

MAKE IT - MAIL IT Monday

 Good morning, everyone!

There are storms in the forecast for this morning so I'm trying to get ahead of them. 

Today, I'm sharing a card made using sketch SC06 - which is a Splitcoast sketch.


Here's the card I made using Flowering Fields DSP and Flowering Tulips stamp set:


This sketch also lends itself to a corner double tuck for a journal page.

RECIPE:
Stapler

Start with a Mango Melody cardbase - 5-1/2" x 4-1/4"
Cut a piece of DSP 5-1/4" x 4" and layer on top of the card base
Cut a second piece of DSP 3-1/4" x 4-1/4" 
With this dsp portrait 3-1/4"  wide across top & bottom - cut from the top left corner to the bottom right.
Glue to card front
Cut a coordinating piece (You could also use a piece of Mango Melody) 1" x 4"
Stmp the sentiment on a piece of either the DSP (as I did) or from Basic White cardstock, then cut out using the 3rd smallest layering circle die.

Line up 2 Stampin' Dimensionals across the back of the circle - lining up with the Thank You. Place on the card.

For the tag, you'll need a piece of 3" x 4" then cut to make the corners. (Directions in video HERE
Cut a piece of ribbon 3", fold in half then staple to top of the tag. 

For the inside of the tag, cut a piece of Basic White cardstock 4" x 5-1/4". Stamp a design on the inside using the Flowering Tulips stamp set then add a note or additional sentiment.

Your card is ready for the mail!

I'll be back tomorrow with a belated Card Chicks card.  Until then...

Creative Blessings!
~ Kelly


Tuesday, April 13, 2021

COLOR CHALLENGE - Granny's Doing A Delightful Mambo By the Bay!

 Good morning, crafty friends!

I do love a colorful challenge. Being a Stampin' Up! demonstrator I knew before I even saw the color swatch we'd be working with Granny Apple Green, Daffodil Delight, Melon Mambo and Bermuda Bay cardstocks. If we would like to bring Dessert to the challenge, then we need to add a Designer Series / Patterned Paper ingredient.


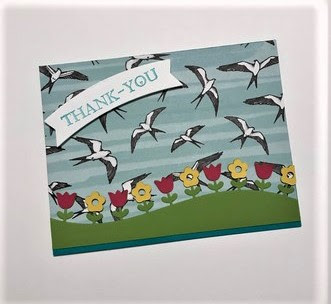
This color combination provides lots of opportunities for spring cards. So this is what I came up with:


I chose the swallow background designer series paper from Bird Ballad (Stampin' Up!) as my dessert. The thank you is stamped from Heidie Grace on to a Darice Banners die in Bermuda Bay. The flower border is a die from Lawn Fawn. I adhered a strip of the Sizzix Adhesive sheet to the back of each color of the flowers - Daffodil Delight and Melon Mambo. 

The border was first cut from Granny Apple Green. Then I cut just the flowers off of their strips and paper pieced them onto the green base. Everything is built onto a Bermuda Bay cardstock base.

I had the opportunity to interview a local bakery/ floral shop owner yesterday. This will make the perfect Thank You card for her. Psst... she's on Facebook at Sugar Lily Bakery & Floral. - Jennifer Connor. 

I'll be back tomorrow for What's On Your Workday Wednesday. Not sure what you'll see. Dealing with a pinched nerve again today so you may just get leftovers LOL

Creative Blessings!
~Kelly


Monday, April 2, 2018

BIRTHDAYS & ANNIVERSARIES

I'm finally on track to share Birthday and Anniversary cards for the month.  I saw a video on YouTube by Dena Rekow on "How to Make Quick Cards From DSP". Shared the video on my WOYWW post last week.

This is one of those projects that exploded into a much larger project than I'd planned based on the DSP I chose to work with. I wound up with a total of 40 cards! I spent one day cutting everything then another day putting the pieces together. While this is a simple layout, if you're going to do a bunch, then it is labor-intensive but you have so many cards done and ready for when you need them.

This would be a great card for a class. Each person could select their own color combination and sentiment. You could have the circles pre-punched to coordinate with each color.

I knew I wanted to use the Fresh Florals DSP from the All Occasions Catalog 2017-2018.


Fresh Florals DSP coordinates with the 2017-2019 In-Colors:


I made whatever I could from each sheet of DSP. I wound up with six of each color combination - fronts and backs. Smokey Slate appeared to be the best background choice. However, I didn't realize I was almost out. Here are all the pieces cut out. I have a few left to put together once I order more of the card stock in April.


I wanted the actual floral for the focal point so used the flip side for the card base mat. 

Then I started stamping the banner pieces from coordinating card stock before remembering I had the ribbon in the In-Colors so I switched. Each color collection has some of the stamped banners and some ribbon banners


In the video, Dev staples her banner pieces together. I chose to do this as well, but felt they still needed a bit of stability. Mini glue dots left over from Paper Pumpkin kits was a perfect fit. I positioned one glue dot towards the far reach of the banner...


then stapled the left end:


After putting them together, I didn't care for the staple. So I got out my 1-1/8 and 1-3/8" scalloped circle punches from the Spring catalog:

Here's one each of all the color combinations:


Here are a couple up close:


DIMENSIONS:

Card base: 4-1/4" x 5-1/5"
Base Mat: 5-1/8" x 4"
Floral Base Mat - 4-7/8" x 3-5/8"
Floral Mat - 3- 1/4" x 4-1/2"
Banners - 3/4" x 4"

STAMPS USED:

Bloomin Love - flower on the Thank You card strip accents
Timeless Textures - flourish on the banner strips

Sentiments from the following:
Beautiful You
Your Inspiring
Eclectic Expressons


Monday, April 8, 2013

MIXED MEDIA MONDAY - Thank You!

okay, so not exactly a Mixed Media project. But in my defense, I'm not even home at the moment. I am on a 8-day writers retreat. Trying to make the most of a great internet connection and a full day of nothing to do but focus. So here goes...

Before I left home I tried to get some things caught up. One project was to get a box of goodies shipped out to my SIL in Oklahoma... Kelly Bay. Remember, when I visited her last fall she sent me home with tons of goodies including stamp sets and my Score Pal. So before closing up the box I took a few moments to case THIS card from a Pinterest link.


I can't remember what colors I used. Cheat sheet is at home. LOL But the DP is from MME and everything else is from SU. The medallion images under the buttons are from the new SU mini scallop set. The sentiment is from SU Thanks So Much.

My card is a 4.5x5. I cut the mat strips 1.25x3.75. I seldom use bumpy elements on a card but this was going to someone I knew would appreciate the card and was being mailed inside a priority box so no issues with postage.

I'll make more of these cards but without the actual button embellishments to keep in my stash. They are a great way to use up narrow strips from your stash.

Creative Blessings!
Kel