After a horrid week last week, I'm finally getting into the flow. I'll be posting about the issue last week on tomorrow's WOYWW blog.
Today, I'm kicking off six weeks of Share the Love. While that is the title of the series, I may use papers other than the Share The Love 6x6 DSP (Stampin' Up! 2017 spring)
Each tag will be 2.5 x 5 using the Heavy Weight cardstock from Ollie's as the base. I'm also only using items from my stash.
Week 1:
You can see how this tag came together on today's video:
I have the next six tags in the series. I can't believe we're almost finished!
For Day 22 - Whatever I Want Wednesday, I played with lots of different elements from Simple Stories Vintage Halloween. I love this kit. I really need to make an album with the rest of the kit.
Day 22
Day 23 was Thrifty Thursday. I took strips from Halloween Night (Stampin' Up! 2016) to do a strip collage inspired by a picture in Stampington Halloween. I added Mr. Bones. When embossing his hat, my large heat gun went out. Thankfully, I had a small Commotion stamps gun as a back up. Both are over 20 years old so maybe time to replace LOL. I added the Googly eye for a little more effect. Almost looks like Mr. Bones has a monical.
Day 23
Day 24 - Fabric Friday. I pulled out a 4" swatch pack from Moda called Midnight Magic #2. I initially bought the pack to go with the G45 Midnight Tales. I also used a piece of the fabric to make a small yo-yo. The ephemera pieces fre from Tim Holtz Halloween 2023 and 2024
Day 24
Day 25 - SACs Saturday. I've been wanting to play with this black cat napkin ever since I saw it. The background is pieced with black tissue paper to fill out the space. I added a crescent moon embellishment from my stash. I'd like to have found a crow the same size to perch on his hat.
Day 25
DAY 26 - Spooky Sunday. The background paper is from Stampin' Up! Toil n Trouble. I stamped the house and colored in the windows. you can't see it very well in the picture but I die cut 3 ghosts from that same stamp/ die set from packing material. Very ethereal look against the background. They almost look like wisps of smoke. LOL
DAY 26
Finally, for today - Day 27, I played with Skeletons for Mixed Media Monday. I call them Dancing Skeletons.
The background is a treat bag from the Sept. 2019 Paper Pumpkin. I opened the bag and glued it to the base by using Tombo Mono white glue to adhere the bag. The other elements are also from that same kit.
DAY 27
That's it for me today. I'm going to be working on Meals In A Jar today with Ramen Noodles. I like to replace their seasoning packet with real bouillon then add extra freeze-dried veggies to mine. I put mine in pint jars with only 1/2 pack of noodles. I also only put 1/2 pack in the quart jars (sans veggies) for Bob and I for a quick lunch. I found out yesterday he prefers ramen noodles over Campbell's soups. After 42 years, I'm still learning things about him!
Here's the tag I came up with on the fly very early this morning.:
I used the brown bare tree paper for the background then randomly stamped the small acorns from the set. I stamped them in Chocolate Chip then colored the tops with the Chocolate Chip Stampin' Write Marker.
I stamped the squirrel with Early Espresso on Soft Suede cardstock.
the star hole reinforcer is from when I was testing which reinforcer to use on the December Daily album.
Silly me, braiding a golden rod colored bakers twine but I wanted a little pop of color.
That's my tag for this week. I hope you'll pop back tomorrow for What's On Your Workdesk Wednesday!
I'm kicking off the month of September with our first Fall tag.
I have chosen the Harvest Meadow paper pack from Stampin' Up! This was part of their Holiday 2021 release. You can check out the video of how this tag came together HERE.
I'm short on time this morning because things took me longer yesterday than I'd planned. Seems that happens a lot the older I get.
I used three stamp sets with this tag. The stitches are from a set I purchased from Spectrum Art Creations' Etsy store a couple of years ago. I use the set a lot and may have to pick up one of their other stitch sets. You'll find that set HERE. There are two other sets in their Etsy Store. HERE and HERE
I used a Memories & More card pack from Stampin' Up! called Santa Express. I bought a couple of packs because they also include a sticker sheet that this could easily be turned in to a December Daily. I also have more than one of the paper packs, too.
So, are you thinking about Christmas? Might want to. If nothing else, thoughts of snow and the holiday season might cool you off.
I've been picking up these simple 6 x 8 chip board albums whenever The Paper Studio goes on sale. I don't mind the all brown as I'm covering them for the December Daily Albums. I've been buying the black spine albums from Stampin' Up! for October Daily. You can find those HERE
For the pages, I'm using a kit from Shabbydabbydooda called Festive Frolic. Tina doesn't have this digital in her Etsy shop at the moment but I bet if you visited her SHOP and messaged her, she might be able to add it back in.
Here is a sample of the pages:
There's also an all-over 'angel wing' pattern on the back of each of the graphic digitals. The pages are a bit smaller than I wanted. The album is actually the same size as a Classic Happy Planner but the digitals aren't set up for that size but I'm okay with it. I have plans LOL
Lastly, here are the number tabs. The tabs are from the same kit but I've added tiny puffy stickers from Hobby Lobby Christmas. You'll see in today's video why I chose to use only the candy canes.
That's it for me this morning. Bob has coffee ready. I'll see you tomorrow for Timmy Tag Tuesday!
A bit late coming in because I'm still trying to figure out all the changes microsoft was so kind to make to my computer a couple of weeks ago. One required me to reinstall FastStone Photo Resizer... but that is totally different from the previous version I had. I hate change. Can you tell? LOL Especially when it makes doing a task much longer and with many more steps than it has to be.
You'll find the video for how this card came together by clicking HERE. I promised I'd have the measurements for the template posted in today's blog, but first here is the card (that took me 30 min to resize & crop!)
I needed a grid to lay the hearts in tic-tac-toe style but didn't have a die so I created one.
Cut a piece of cardstock
(You can use any color. I also suggest making a template to use for future cards)
Using a score board (or your paper trimmer with a score tool)
Score at 1-1/4" and at 2-3/4"
Turn the paper a quarter turn and score at the 1-1/4" and the 2-3/4"
From there, in the video you will see how to trim out the openings by cutting out the centers at about 1/8" on either side of the score line. You'll wind up with 9 little squares you can either use or scrap. I've been scrapping A LOT of leftover pieces.
This is the last card using the January 2022 Paper Pumpkin. We'll crack open a new kit next week.
Initially, today's card was supposed to be All About the Sparkle but my brain went to fall and setting up for October - which I have a special announcement about in today's PREMIERE video (11:30 a.m. est if you see this in time - otherwise replay will be available)
Here is today's Memory Dex:
As you'll see in the video, this is actually a file folder using a die set from Heidi Swapp. Spectrum Art Creations no longer has the set I used, but this one would work just as well - Spectrum Art Creations Etsy -
Poor lighting but I'm trying to get a gazillion things done at once so I can get back to writing my book.
While this looks staged, technically it was... for the Reindeer Club video I shot this morning. I showed the 21 Christmas cards I made from two Stampin' Up! Paper Pumpkin kits. Now to figure out what I'll do for May Reindeer Club. Hmmm... maybe get some projects out of the way?
Last week was super busy getting all the time I could in with Bob. He found out his very best friend since grade school will need a quadruple bypass. Since he doesn't know when the surgery will happen, Bob went up a day early just to spend some time with him... which meant I was doing everything last minute LOL. In spite of that, I made my way 'round to every desk yesterday in time to start over this week!
But we're fine now. He's in Chicago and I put in most of a full day of work yesterday. Well - until I picked up a book for research and couldn't put it down. The book - The Unremarried Widow is an amazing story of a woman's journey from meeting The One she didn't even know she was looking for to feeling like an outsider amongst military wives then becoming a widow less than a year after they'd married. #heartbreaking. I recommend the book.
Have any of you read, GreenLights by Matthew McCounahey? Yes, THAT Matthew McCounahey. I haven't read all of the book but Monday I had the opportunity to sit in on his The Art of Livin' webinar - all 4+hours! Amazing inspiration from him, Trent Sheldon, Marie Floris, Tony Robbins and Dean Graziosi. Another book I recommend.
You saw my painted book pages in progress last week. Here is what I made with one of the pages.
I took part in a challenge by Natalie from Line Dot Arrow to make a Stuffed Paper Bag. You can see my flip-through video here: (it's a short video.
As I mention in the video this is to be the front cover of my spring journal. I should have the full flip-through of that journal the first Wednesday in May for you.
That's it for my desk (and story)
this week. Who's Miss Julia and why am I here?
When you are done visiting me in the Ozarks, please hop on over toStamping Ground for all the details.
Miss Julia has a long list of other studios you can peek into. No standing on
an up-turned milk pail to look in the window. We open the doors wide and
welcome you. Please leave your number
and you'll be among the first on my list.
I thought I'd pop in today and show you some of the result of today's craft-a-long video.
In this morning's video I showed the masterboard sample I'd created. I didn't think to take a picture before cutting it up to make the card but you can see the board in the video before I cut out the piece needed for the card.
Here's the card:
I used a 4.25" x 5.5" card base from Pineapple Punch (retired Stampin' Up!)
Cut (1) piece of the Masterboard 4" x 5.25"
Cut (1) Pineapple Punch 3-1/8" x 1-3/8" square.
Cut (1) piece of Basic White 4" x 5.25" and (1) 3/4" x 3.75" and (1) 3" x 3"
Cut (1) length of ribbon 4-1/2" long. You want the ribbon approx. 1/2" wide
I used a Close To My Heart image - Quick Cards - Butterfly (A1120) I did not find the stamp available on their website so must be retired.
The sentiment is from a Paper Pumpkin -December 2017)
As a side note - I REALLY love Paper Pumpkin. The stamp sets are unique to the kits and so versatile.
If you're not a Paper Pumpkin subscriber, check with your demonstrator. Don't have a demonstrator? Mine will be happy to help - Rhonda Henkins. Here's her SU website with her contact information:
Next glue your piece of ribbon to the masterboard about 1.5" from the bottom of the card by wrapping the ends around and gluing to the back of the masterboard.
Next, glue the masterboard mat onto the white base.
Set Aside
Stamp the butterfly on the 3" square piece of Basic White.
Glue this piece to the Pineapple Punch square.
Add dimensionals to the back then adhere to the card front (use the picture above as your placement guide)
Stamp your sentiment on the strip of Basic White. I used the Triple Banner Punch from Stampin' Up! (retired) This Banners Pick A Punch will work nicely, too.
Because you're layering this on the bottom part of the ribbon, you will want two adhesives.
Add glue or double-sided adhesive to the top edge of the banner where you will glue to the ribbon.
Add Dimensionals (I used the mini's from Stampin' Up!) along the bottom half. This allows the bottom to be even with the depth of the ribbon.
Place as show in the picture above.
A simple card for any occasion simply by changing the colors in your masterboard and your sentiment.
I found out this morning that the STAMPARATUS from Stampin' Up! is now GONE! 😪
BUT... The techniques Anna shares can be used with most any stamping platform. So, enjoy the video!
This past weekend kicked off Camp Nano (a spin off of the November National Novel Month Challenge) so I spent the weekend work on my book and author admin stuff. No cards from me.
I made the decision not to do a card mostly because I received some information I wanted to share with you.
The stamping platform from Stampin' Up!, the STAMPARATUS, is being retired! The product is already on Low Inventory.
There've been rumors as to why but personally, of all the stamping platforms to come out in past years, I really think this one is the best, and like you'll see from Anna Helman, I'm heartbroken.
I'm sharing Anna Helman's video for a couple of reasons.
1) If you have one and think you can only use it like similar platforms, you are right AND wrong. The Stamparatus is just the best, in my opinion. I love mine!
2) If you don't have one and think after Anna's video you need to get one - DO NOT DELAY!
Contact your Stampin' Up! demonstrator ASAP. If you don't have a demonstrator you work with, I'm linking information to mine. Rhonda Henkins was one of my recruits and downline when I sold for six years. You can reach her through her Facebook Page - RHONDA'S CREATIVE CORNER.
Here's the video from Anna Helman!
I'd love to hear what type of stamping platform you use and why you like it. Educate me!
Now that I have a filming/ crafting table again we can get back on track. I ran the Reindeer Club today because I was involved in prepping for an on-line writing retreat that ran last weekend. I totally spaced getting the Reindeer Club project scheduled. But here we go:
I made these two cards from the October 2022 Paper Pumpkin entitled Ho Ho Ho. I'm going to finish up the rest of the cards today before I clear the table off for the March Junk Journal Challenge. I'll show those cards next month when I also work with the November 2022 Paper Pumpkin- From the North Pole.
Here's the video where I put these two cards together:
I will be back Wednesday for WOYWW then again on Thursday for our final stages of the #KCDMarJJ23 Challenge.
Are you working on Christmas? Remember, one day a month can make a big difference in the serenity of your Christmas season.
I finally got to sit and make a card - three actually, but I can't show you the other design until April. Just felt good to create again.
I had a lot going on yesterday, mostly author stuff, but I wanted to get a card up so while I had the Nesting Scalloped Circle dies out from Stampin' Up! I had an idea.
I pulled out the paper pack from Stampin' Up! called Everyday Enchantment (retired):
I had these strips left over from cutting the samples:
Picture taken after I had cut the circles
You could use different sizes of circle punches - or any shape really. I used the Layering Circle dies from Stampin' Up! I cut out a variety of sizes of the plain circles, though you could add scalloped for added interest.
Place the circles randomly on the card base, allowing some to hang off the edge. You can come back and trim them later. Here's the card:
I did use one of the scallops for a mat. The Hello is from October 2016 Paper Pumpkin. I cut the scalloped circle from Poppy Parade cardstock. The sentiment is glued to the scallop then the whole thing was added with dimensionals to bring it up a bit.
That striped paper on the right hand side... I used a 4.25x1.25 strip on the bottom of the inside of the card. I'm trying to get better about decorating the inside ;-)
That's it for me today. I'll be back Wednesday for What's On Your Workdesk Wednesday (WOYWW). I left on a Me Day last week and totally space playing along. Missed visiting with everyone!
Spent a bit of time getting a couple of cards made for today before I totally empty out the filming corner. I'm tired of the disaster. I'm taking the studio one area at a time and working my way through. I'll show pictures on Wednesday of the first mini-project I did on Sunday.
Before I get into today's card I want to talk about the Cardmaker's Success Summit 2023 that will be going on the end of this month. I participated last year and had a blast. We even have a virtual crop... and it's all FREE! (Though if you want life-time access, you can purchase an express pass)
Each presenter has a link for you to sign up. This month on KellysCreativeDreams, we're all about Tiffany Solorio so unless you know someone else on the panel you normally work with, please sign up through Tiffany's link. I'm linking her INFORMATION VIDEO HERE and you'll find her sign-up link in her Description Box. Come join the fun!!!
Today, I played with Lindy's again. I know... surprise! But I also added in older sets of Stampin' Up! Brushos and Sprinkles.
Here are the two cards then I'll tell you what I did.
You'll notice one is lighter than the other. That is because you will NEVER get the same look twice when working with these powders. That's part of the magic.
I mixed up the powders (Stampin' Up! Granny Apple Green) (Lindy's Magicals Forest Green from the Jingle Bells collection) with a few squirts of rubbing alcohol then dabbed the color on with a makeup sponge. You'll get a walk-through in the video below.
Then I layered a strip of varigated tweed patterned paper from my stash as well as the image in the center. I mounted the mat on a retired SU Emereld Envy card base from my stash.
I've been asked if I decorate the inside. I do, just usually when I'm ready to send it off so I decorated these with identical insides:
I used clear vellum stickers from The Paper Studios St. Patrick's Day packs.
Here's the video with the walk-through:
I'll be back on Wednesday with a way to get all that bling under control & a look at 'hopefully' the new and improved filming table!
Apologies for being late. I'm trying really hard NOT to come down with a spring cold. Sore throat yesterday so didn't really feel the creative vibe. I'm a bit better today.
For today's card, I was inspired by THIS one on Pinterest. I knew I wanted to use the Detailed Hearts die (retired) from Stampin' Up! This is one of those dies I knew I needed but haven't used a single time since I bought it. There will be a lot of those coming up in makes this year.
I also knew I wanted to play with Lindy's Magicals. If you've played with Ken Oliver powders or Stampin' Up! Color Bursts powders then you'll LOVE Lindy's. The pigmentation is sooooo intense and vibrant. Then add a little shimmer and you have the perfect new color medium to play with.
For the background, I used Alpine Ice Rose. I put a few sprinkles on my Tim Holtz glass mat then swirled with a bit of alcohol from my water brush. Alcohol dries quicker than water and since I'm on a time crunch, I wanted to give it a try. I just swirled with the alcohol then brushed across my watercolor paper cut to 4" x 5.25"
Then I worked directly on another piece of the 4" x 5.25" watercolor paper. I sprinkled on the Alpine Ice Rose and the Rudolph Nose Red (from the Jingle Bells collection), sprayed with water from my Tim Holtz mister bottle and swirled with the paint brush to spread everything around and break up the pigments faster. I didn't want a 'run' or 'drip' look. I wanted more concentrated intensity. Here's the paper after I'd already run through the die..
Then I ran the die through a sheet of Stampin' Up! Shimmer White cardstock. The picture below shows the die cut out and flipped over. I'm placing the Stampin' Up! mini dimensionals on the back of all the solid hearts.
After the dimensionals were in place, I added some liquid glue to the loose edges of some of the heart areas so they'd lay flat. Then flipped it over and adhered to the Lindy's color-washed mat. Then I punched out a few of the hearts from the Lindy's mat that I'd die cut and added dimensionals to a few of the hearts I punched out and placed them throughout the open hearts.
I mounted everything on a tent-folded card base of Flirty Flamingo (Stampin' Up!)
Here is the finished card:
I haven't decided if I'm adding a sentiment banner to the outside of just on the inside. I feel like a sentiment would detract from the over-all effect. What do you think?
I can not believe January 2023 is almost gone! Time to start thinking about Valentine cards if I want them out in a timely fashion.
Because I still haven't cataloged my stamps and gotten them put away, I'm pulling from paper pumpkin kits since they include stamps.
This week, I chose the January 2022 Paper Pumpkin kit.
The kit comprised of tri-fold cards that I just didn't get. Any way that you folded them put a sentiment of some type on the back. Really made no sense to me. So this week, I cut all the hearts apart. I used the diecut hearts to punch out smaller hearts from the larger patterned, vellum and Flirty Flamingo hearts. The only thing I added were Real Red and Flirty Flamingo card bases.
Here are the cards I came up with:
I used the heart duo punches from Stampin' Up!, giving me a scalloped background with a straight-edged heart. I layered those together then used the large Stampin' Dimensionals to give a little height.
On the middle set of cards, I glued the first and third heart mats flat on the bade then brought the center mat up on the dimensionals. The sentiment on the top right card as well as the heart bling were all from my stash.
You can see how the cards went together in my video. If you watch the video on YouTube, please remember to like/ share/ subscribe and answer the question from the video in the comments section. Very much appreciated.
I'll post more this week as weather permits. We're do for ice this afternoon then snow the rest of the week. Bob leaves tomorrow so I'll be on my own to function should the power goes out. I'm good with that.
We have a major snow storm headed our way but today is to be gorgeous so I'm hurrying to post then heading into the city for the day. Bob has plans and is going to hold down the fort.
The January 2023 Paper Pumpkin kit came just in time for this. Hard to believe it's time to start thinking about sending out Valentines!!! Do you send out cards for this day of love?
Here's the kit contents:
Key to my heart design was inspired by the Locks of Love bridge in Paris. You can read about the bridge/ fence HERE
I made one of each card in my video (posted below) but here is a picture of what the cards look like when completed:
I just realized I did not show you last Thursday's photo, so let me back up a bit.
We are starting the Creator's Corner back up this month with one of my favorite YouTube gals, Gayle Agostinelli. She is so much fun to watch and makes some of the most amazing things from scraps!
So each Thursday leading up to Creator's Corner (Last Thursday of the month) and including my interview with Gayle, I'm fashioning my own twist on things she does. Last week, I made a tag from a bubble mailer. I'll drop that video HERE so you can go check it out.
This week, she inspired me to make a tag out of packaging. Well, I made a tag out of packaging from a $Tree product BUT... I turned it into a tag with pockets! I'm using her inspiring videos to make things for my #KCDJanJJ23 journal. I finally chose papers and am going to use Stampin' Up! retired Snowflake Splendor:
Here are the pictures:
I'm not sure if I'll get back in here before Monday of next week. Bob should roll in here about Noon and I still have stuff to finish up. The first weekend he's home always belongs to him.
It's been a crazy 4 months! I am so ready to slide into 2023. How are y'all doin' out there?
I offered to co-host a collab back in September and things haven't stopped moving since.
This collab was with Brian Dickey @ B&D Crafts & More (see him on FB, IG and YouTube). He is also a Stampin' Up! demonstrator. The idea was to post a video every week from the second Sunday in September up through last Sunday - December 18th, related to Christmas. The final project took me a lot longer than I'd anticipated so posted the final video last night.
I chose to work with an older 6x6 paper pad from Stampin' Up! called NIGHT BEFORE CHRISTMAS For my projects I used the 6x6 paper pad and various 6x6 One Sheet Wonder sketches. One week I'd take a sketch and make cards. The next week, I'd work with the same sketch and make junk journal elements. (You'll see them in the video later in the post).
I wound up with 25 Christmas cards:
Links to all of the One Sheet Wonder templates are linked in the description box of the videos. You'll find the playlist HERE.
I combined most of the elements with others that I made from the remaining papers to make a 3-signature journal. Here's the final Flip-Through video with some important news about what's coming up on my channel:
I'm back to normal in here January 1st. I hope you were patient while I went nuts over here LOL. I'm fine, just took a lot of time off and spent lots of it with Bob.
P.S. He has since put me on a work schedule. LOL No more fluffing off when he's home. I work 9-5 or 10-6 four days a week except for his first and last weekend home. My plan is to have the content up ahead of those off-days.
I will be back on Monday, December 26th with a bit of what to expect in 2023. In the mean time...
I finally made time to pop open a current paper pumpkin and so glad I did. Aside from the florals and bee theme, they included free honeycomb foil laser cuts I can add to the bee journals! Journals, which I intend to finish this week!
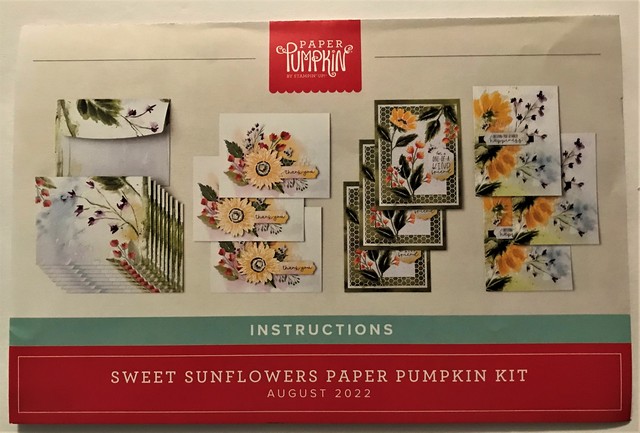
Here's a shot of the instruction sheet:
This kit will make nine cards and the envelopes are GORGEOUS! Everything has the 'look' of having been created on watercolor paper. If you missed out on this kit, I'm so sorry for you. If the items come up on a kit in the future, I'll be sure to let you know because I'll probably be buying a refill for myself.
I made one of each of the three cards.
For the first one, the flowers to the left as well as the sunflower and the sentiment strip are all raised on dimensionals. So are the bees. They gave us the sunflower base as a die cut. All I had to do was use the stamp set to stamp the sunflower, the center and the sentiment:
Card number two was the simplest of the three. The only stamping required was for the sentiment. Everything was just die cut and layered with dimensionals and glue dots!
I loved this. The honeycomb and the florals are all one piece. just adhere with four glue dots to the card base. The bees and the sentiment mat were attached with dimensionals. I just had to stamp on the sentiment mat then adhere.
Seriously, if you want quick cards or projects, Paper Pumpkin is the way to go! With the exception of the stamps and inks (included) you don't have any leftovers unless you want to go out on your own journey and do your own thing. So you are not adding a lot of bulk to your already bulging craft supplies.
The stamp sets are created exclusively for Paper Pumpkin.
I think the September kit will have something to do with Halloween Treat containers of some sort. Remember, you must subscribe before September 10th to get in on the mailing.
Demonstrators don't even know what the kit will actually contain. We are surprised when we get our box just like you are! Once you subscribe, the kit usually arrives around the 21st of the month. Please use the link below to subscribe and join the fun with me!