Showing posts with label storage. Show all posts

Monday, February 27, 2023

MONDAY GOODIES!

Good morning, everyone!

No cards this week. Bob got home Friday afternoon and as usual, we've been on the go. Today we are working on the filming corner.

I spent most of Thursday, Friday, Saturday watching all the amazing creators taking part in the Card Makers Success Summit at Stamp Me Some Love. The event is FREE unless you want to purchase the lifetime access. Trust me... if you think you're not going to be able to watch everything or want to go back at a later time and watch a video again, it is well worth the minimal price for the VIP.   Videos are only available for 24 hours without the pass! But here's the thing...   If you don't buy the pass the first time you click on the purchase link, the price goes up... so make your decision the first go round. You'll be glad you did. I think Brandi said there would be another the end of March as she has other stuff going on in July when she normally runs the next round.

Okay..  So no cards, but lots of video watching, downloading free tutorials and signing up for lots of emails I'll probably wind up dropping.

BUT... I did fall in love with a product that apparently has been around awhile.  I'm always late to the party LOL

Have you heard of STENCIL 360*?

I'm going to link you to Ardyth's video because I think it's one of the best. Justine Hovey also has a really good one, but here's Ardyth's:


You'll find the product on the Penguin Palace website. They are out of Canada. My starter kit, storage bag and one other stencil set should arrive Thursday or Friday. LOL

I'll be doing tutorials and plays in the near future. Keep in mind... whether you are a card maker, a scrapbooker or play with junk journaling.. THIS product has sooo many possibilities.

I also networked in the livestream chats quite a bit and had requests for tutorials using other products so I'll be busy this summer.

Okay... I'm recording a haul video this morning before we get started. I did a short Hobby Lobby trip on Saturday. When I went last week, not a lot of stuff had been marked down. Saturday was much more successful...


I was thrilled to find the teal wax melts for the glue gun. I want to make Thank You seals for my etsy gift packages. I also picked up charms for the mermaid journals, four wink of stella pens, a package of misters and four packages of different types coils for the cinch - 2 coil and 2 D style. The little blue crystal cup was from the Easter Spring Shop line. I'm going to use it to put my fine tip glue bottle in upside down when I'm working on a project. Then there's one other item up in the top right you can't see very well....


It is called a Glitter Vac from We R Memory Keepers. I saw one on the shelf for $15, but then looked behind and there was one for $10!!!  You recharge with a USB and use it to vacuum up all the little bits on your work desk. You can also run it across your keyboard.  I've been wanting one so grabbed this. I figure what I saved on the clearance more than paid for this new addition to my office... and it's teal!

okay... I'll be posting pics to my IG account for the #100dayproject. I have day 3, 4, 5 to post yet but thought I'd share them with you here. All about the studio progress...


The adhesives from off of one cart are all sorted and ready to go here:


I took all the punches off of this cart, sprayed it Teal and now I'll have all different styles of adhesives on hand next to my table. I've already put a liner in the middle tray and Bob trimmed down my stickles tray to fit in there. But since I'm not using the black carts anymore, the tray had been stored in, the tray had to be reconfigured to fit.

The punch cart is finished!


All of the punches I use most are on this cart. Most of the seasonal punches are in a rack on the end of my big work island.  I was even able to add the crocodiles and standard hole punches thanks to the clip on containers on the side. 

That's it for me. 

I'll be back Wednesday with our March Challenge chat and our stick samples on Thursday. Other than that, pretty quiet here this week as I have Bob home to help whip the studio into shape. 

Are you doing the #100dayproject?  Some have told me they were inspired to use the challenge to organize as I am doing. I'd love to hear what you're up to!

Creative Blessings!
~ Kelly


Monday, February 20, 2023

A DIFFERENT MONDAY - #100dayproject

 Good morning, crafty friends!

I've been so busy working on trying to get the filming corner done that I've not done any cards.  With that in mind, I thought I'd show you what I am doing.

Incidentally, my #100dayprojectd is to get the studio in order. 100 days and 100 projects should see me there, right? Well... Hmmm

I've been focusing on the filming corner. Once it's done, I can continue to put together content while I work my way out into the rest of the room. 

I hit a couple of bumps with the cube storage last week but managed to push through until I hit one that I just have to have Bob take care of. So much for having the stuff out of the living room before he gets home. ::: sigh :::

I showed you the empty space a couple of weeks ago. If you missed that, you can see the picture HERE.

That empty space was filled with 3 black mesh carts I bought on clearance at Office Depot several years ago. Each was comprised of 2 drawers. A deep bottom drawer for hanging file folders then a shallower top drawer. I bought them with the intention of keeping my Stampin' Up! business files and overstock of cardstock in the bottom drawers then other business/ and ink storage in the top drawers. The problem was, the bottom drawers could not handle weight of either the file folders or cardstock. I'd pull the drawer out but when I tried to put them back, the frame would torque. I'd have to take everything out of the drawer, straighten the frame then try again. Such a pain!

Here is a similar cart on AMAZON except with 3 drawers


I tried remedying the problem by moving the overstock cardstock to a milk crate in the warehouse. but the frames had just been done in and I only put things in those deeper drawers that were light weight and weren't needed often. 

I finally got frustrated enough that I had to have a better option. Then I had the idea for cube storage. 

Here's where I am and I'll explain why there are only 3


There will be a 4th cube top left. But there is a 1x4 brace under that end of the shelf  against the back wall that is about 1/2" too low to allow the top unit to slide back against the wall. I've cried uncle and decided that is just something Bob is going to have to take care of. I think he can do it without having to take the whole shelf down. 

I have drawn out the cubes and noted what will go where. There will be 4 teal cube storage boxes with lighter weight items in them and I think Bob can add a shelf to 2 of them so that I don't have wasted space... like the bottom right where my ink spots/ refills will go. 

My only challenge at the moment is how to reconfigure the stickles storage Bob built me - custom made to fit one of the metal drawers.


As you can see, I can spare a hole or two that might make it fit in one of the cubbies.

That's it for me. I will be back Wednesday with our final February stick pull and WOYWW. Thursday we'll have a complete interview with one of Tim Holtz' makers - Tiffany Solorio. Friday, the element from the stick pull then Reindeer Club on Saturday. Going to be a busy week so don't miss a minute!!!

Creative Blessings
~Kelly


Wednesday, February 15, 2023

WOYWW #715 & #KCDFebJJ23 Week 3 Challenge

 Good morning, crafty friends!

Wow... just rolling into 8 a.m. and I thought I was running late this morning. 

First off, this is my 'desk' for the week:


This is my filming corner and the desk should be to the left in front of those shelves but I've taken everything out of the space that I can to make room for improvements. I have cube storage units to put together today then I'm hoping (if I measured correctly) that 4 of them will fit below that window ledge (that I still need to clear off before I start).

As part of this whole studio redo, I took one day last week to sort gather all of my bling and sort out. 
This is just a small portion of what I have:


Back in 2021 I ordered THESE bags from Amazon with the plan to store all of my stamp sets in. I'm hoping to finally get to that project next month.
In the mean time, I took 55 of them, lined each with a piece of poster board for stability and put each bling type in their own bag.  This way I can store them in a photo box and flip through to find what I need. I may still pull the basic colors from the scrap rack and add them to here since when working on a project, unless it's theme specific, I may not know what I want to use.

I chose not to cut the sealing edge off in case I want to use the 'empty' bag for something else later. They are sized for 5x7 cards.


Week 3 Stick Pull for the February challenge:


In tomorrow's video we'll be making doilies for our journals. They can also be used on cards. No crochet hook/ thread required. Intriqued? 

That's it for my desk (and story) this week. Who's Miss Julia and why am I here?  When you are done visiting me in the Ozarks, please hop on over to Stamping Ground for all the details. Miss Julia has a long list of other studios you can peek into. No standing on an up-turned milk pail to look in the window. We open the doors wide and welcome you.  Please leave your number and you'll be among the first on my list.

  Creative Blessings!

~ Kelly


Wednesday, August 17, 2022

WOYWW #689

 Good morning, everyone!

Last week was just nuts. When Bob is only off the boat for two weeks and spends 5 of the first week at his brother's just really shortened our time to do things that needed done and just spend time together. We only got to play cards TWO days! That is so not like us. 

So my desk this week is busy. I took a Lindy's magical technique class from Madi at Spectrum Art Creations last night so all my pieces were left to dry over night. I worked with the Jingle Bells collection. She is sold out of those at the moment but if you go HERE, you'll see what color collections she does have in stock. 


Some of the bee journal items are along the back. I'm hoping to finish those this weekend. I'll have my video premiere Friday morning 11:30 a.m. EST on my youtube channel if anyone would like to come and chat with me. The video will run while we're in the chat room.

The studio organization is still in progress. I'll drop last week's video at the bottom of the post if you want to see where I'm at in the process. In the mean time, I have a drawer perfect for storing my stickles but the units from Stamp n Store won't fit so Bob made one for me:


As I organized I realized there were some colors I don't have... Orange for one. Madi pulled some colors into the sale for me last Saturday. I have four new colors on the way... including the errant Orange. You can't do Halloween without orange!

Here's the video from last week:


That's it for my desk (and story) this week. Who's Miss Julia and why am I here?  When you are done visiting me in the Ozarks, please hop on over to Stamping Ground for all the details. Miss Julia has a long list of other studios you can peek into. No standing on an up-turned milk pail to look in the window. We open the doors wide and welcome you.  Please leave your number and you'll be among the first on my list.

Creative Blessings!

~ Kelly


Wednesday, June 8, 2022

STAMP ORGANIZATION - Part 1 - Magazine Collection

NOTE!  I'm finishing up this project this morning! I worked all day on the breaking down of magazine components yesterday. The stamp/ embossing folders/ dies have been condensed to one photo box. 

I'm now in the process of copying anything from the magazines I want to keep so I can take the magazines to the thrift store this morning.  

Please come back here tomorrow morning for the final pictures!


A few weeks ago, I visited Angela @ Crafting With Jack. She shared in her WOYWW #671 post how she was dealing with the stamp sets she's gotten in magazines. 

So I thought I'd kick off what I'm doing with my stamp  sets with the boxes of magazines I have. I don't need the magazines any longer... share them with someone else. But I do want to keep the stamps. Did you know that the stamp sets you receive in those magazines are designed exclusively for that issue? They are not sold outside of the magazine. 

Here's what I started with:


Here's what I wound up with:

From here, the stamps will be divided by category/ theme and placed in their appropriate shoe boxes. 

How do you store your stamps?


Creative Blessings

~Kelly 

Monday, July 9, 2018

MIXED MEDIA MONDAY - An Organized Space

Good morning, everyone!

While I hope to be playing with projects soon, I decided the mixed media area first needed a bit of clean up. I don't have before pictures. Didn't think about them. I just dove in. But I'll explain with the first picture.


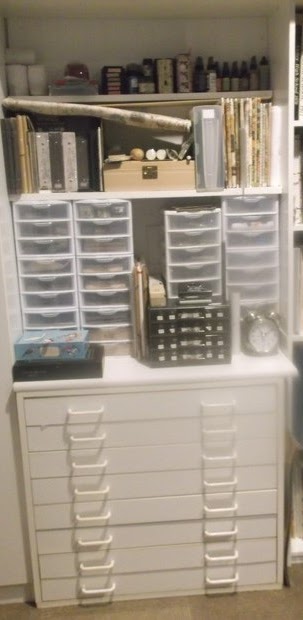
This is a full shot of the mixed media corner. Left to right: paint storage, wrapping paper stool (with casters making it easy to move out of the corner) a 2-door cabinet that houses most of my texturing supplies, blank journals, geli plate, etc, main mixed media storage, art books.

Before I started I couldn't open a single drawer without moving something. Getting to the cabinet required LIFTING the stool up over something then reaching over to open the doors to get what I needed.  This is MUCH nicer, don't you think? LOL

So, spot by spot:


I apologize for the bit of glare. Very sunny day. :-D
The main part of the paint storage is an old stamp display shelf unit from Michaels years ago when I worked in Peoria, IL. We got to pick them up for $20 a piece. I was out of town at the time but a good friend/ co-worker put my name on one. She figured if I didn't want it, she could take it. I thought that very sweet of her. The filing cabinet below holds various types of applicators in the top drawer, while the bottom one is full of all kinds of receptacles and palette trays.


Next to the bookcase, this is probably my favorite part of the entire space. The bottom 8-drawer unit was picked up at an auction for $5. I think it's an early Ikea peace. The top drawer holds larger Tim Holtz items, Drawer 2- tissue paper, Drawer 3 - packaging paper (like they wrap the breakables in at Hobby Lobby), Drawer 4 - Chip board, Drawer 5 - Mat board, Drawer 6 - foam core, Drawer 7 - manilla folder type weight and Drawer 8 - card board.  If the drawer is full, I don't keep any new coming in. I use it or recycle it.


The 2 towers on the right hold all Tim Holtz embellishments by theme. The bottom cigar box on the bottom holds bands Bob saves for me and I've not decided what's going in the top one yet. I've had that blue cigar box since I was 12. 

Bob found that little black drawer unit on top at a flea market. It was originally from an auto parts store. There are 4 drawers. I'm using them to store small alphabet/ numbers/ symbol keys from laptops/ keyboards.

The 2 towers on the right hold misc. assemblage (similar to TH) from other companies like $ tower baskets at Michaels, etc. The alarm clock no longer works. I got it at a garage sale for $1. I figured when the mechanism stopped working then I could do a scene in the inside ala Tim Holtz style.


Bob added these two shelves for me. The first one rests on top of the towers. I have TH books, fabrics, journals, papers. The jewelry box holds mostly keys/ locks. The top shelf is mostly TH. Though the white rolls on the far left are snake skins from our resident Black snake. One is over 8' long! I plan to bleach, die them in mixed media. 


Finally, my art journal/ art book shelving unit. A bit of glare form the sun. The window to the right out of the picture is 48"w X 36" h. lets in tons of light over my altar.

Top shelf - class yearbooks, weight loss I keep for reference, Tony Robbins complete motivation set, smaller journals

Second Shelf - handmade journals from past years, journal prompt books. The picture in the front on the stand was given to my by my upline when I sold UnderCover Wear. 

Third Shelf - art books such as lettering, altered art, workshop type books,

Fourth Shelf - the blue binder on the far left is all of my OneStroke practice books, then a basket of art papers such as water color pads, graph papers, etc. The rest is Writing prompt kits such as the Writers Toolbox and 12 Secrets of Highly Creative Women

Bottom Shelf - all art magazines I've kept for various reasons.

My goal is to keep all of this accessible so I can finally begin making art. I do have a large file box that will probably sit on the floor in front of the book case to house all of my magazine clippings. That project is still needing done. Also my 12x12 scrapbook binders that latch for holding mixed media pieces from packaging. I have 3 of those. They are easy to move as they all snap close and have handles, similar to a suitcase. 

Next project is to put my antique wardrobe back in order with Spiritual supplies then start on the office corner.

How do you keep your mixed media supplies in order? Do you bother? Are they mixed in with everything else you do in your studio? I'd love to know.
Creative Blessings!
~Kelly


Thursday, April 5, 2018

THURSDAY THREADS - Floss Storage


While digging out embroidery floss for those dish towel projects, I decided the time had come to make a change in my storage.

When we decided to move out here in the middle of nowhere, I wasn't sure what my shopping options would be for floss. So while working at Michaels and making use of my employee discount, every time thread came up on sale I'd buy about twenty five colors. I bought the bobbins, the number stickers that coordinated with the DMC colors and 2 big 3-ring D binders to hold the handy dandy bobbin pocket pages. 

They looked like this:


What I didn't realize was that having the pocket openings face the rings would become an issue when I wanted to turn the page. Every time I attempted to turn the page, bobbins would fall out of their pockets. Those handy dandy number stickers have come loose over the years (okay, so it's been 12 years. I know.. nothing is supposed to last forever but the knowing doesn't make the issue less annoying hehe)

Saturday morning, while I had the ironing board set up to press the summer kitchen curtains. (yes, I know spring is still refusing to arrive but it is after Easter - so summer decor it is!)

I decided to empty all of the pages and store the floss by Rainbow:


Here's an up close at the pretty Pink/ Red pile:


By the time I was finished, I had two full floss boxes:


As I went, I wrote the numbers in perma pen on each of the bobbins before the number labels became lost completely.  I also have a third box with the empty floss bobbins, marked with those colors I still need to acquire. 

One more task in the organization out of the way!

As to the dish towels, that process is taking longer than I'd hoped. Even with my cheaters, I'm having problems seeing some of the lines. I'm thinking of going back over them with a water color pencil. I'll try to have an update for you next Thursday. 

Do you embroidery? Have you found a way to store your floss other than in the bobbin boxes? I'd love to hear!
Creative Blessings!


Wednesday, May 3, 2017

WOYWW 413 - New Storage!

This is Bob. Husband and all around handyman.
In the first picture he is dismantling the old Entertainment center we had revamped into my stamp cabinet.


That's it with all the drawers where I used to store my loose stamps

Here's a shot of the center section after I moved into the new studio and revamped how I store everything.


I gave him dimensions for what I needed this cabinet to be.
He came up with using the interlocking slot technique for sturdiness
(because we all know how heavy paper can be!)
After a trip to Menards (home improvement) he began the construction process.


Here it is completed and ready for paper!

The cabinet is approximately 7.5' across and 7' tall. 
and is divided into 3 sections with the cubicles 15" high and 15" deep

The 3 narrower slots are to hold my existing fiber drawers. 
All of my stacks will go on the bottom shelves
Recollections/ DCWV Cardstcok in the units above.
I don't use these as often so they can be closer to the floor.
The top 3 rows are for Stampin' UP! 
12x12 CS & DSP, 8.5x11CS In-Colors
All filed by rainbow with each color being in ABC order.
I'm working on putting things away so will have a 'full' picture next weekend.

Oh yeah.. and I now have track lighting giving me 'daylight' on the unit so I can see everything regardless of what time of day/ night I want to work!

That's it for my desk this week. Who's Miss Julia and why am I here?  That's my desk? What's on yours? When you are done visiting me in the Ozarks, please hop on over to Stamping Ground where Miss Julia has a long list of other studios you can peek into. No standing on an up-turned milk pail to look in the window. We open the doors wide and welcome you.  Please leave your number and you'll be among the first on my list. 


Monday, February 22, 2016

MIXED MEDIA MONDAY - Studio progress


Not very pretty, eh? But there is a good use, I promise.

For months ahead of putting the studio together, I combed YouTube, Pinterest and Splitcoast Stampers for ideas. I wanted recyclable storage. Items I could use from around the house. I did not want to spend my budget on storage. That money was better spent on new toys for the studio. Right? 

One of the storage solutions that had my attention was this one.
https://www.pinterest.com/pin/184929128423808586/

If you would like to see Karen's full room make over, you can check it out at Sew Many Ways

While the black with white polka dot looked cool in her room, I wanted color. Though trying to find the right fabric in bulk became a challenge. I had found the perfect fabric prior to getting the budget in place for the build. But when I went back to get the fabric, they did not have any more. So I went to Plan B... A little of this and a little of that.

Here is one of the boxes covered:


If you look hard, you can still see the box beneath, but these are stored in my 2-door cabinet so I was not concerned with taking the time to primer, paint the box before covering as I did the larger ones for the visible shelves. (I'll show those in the Grande Finale)

But here's how the boxes look in place:


These sit inside of my 2-door mixed media cabinet. I use them to store mostly texturing tools such as large textured sponges, produce netting, and harder tools such as sea shells, threaded pipe, hot rollers, etc.  Though I do have a larger box on the very bottom shelf that holds all of my calendars.

Not that is finished, I can focus on finishing my ScrapRack.
Creative Blessings!


Monday, October 7, 2013

MIXED MEDIA MONDAY - More toys

Last week I told you about my ability to bring up the rear when it comes to trends and introduced you to my newest obsession of working with Alcohol Inks (well, as soon as I get them made hehe)

The other thing I've been eyeing for some time but not worked with yet is Washi Tape. I kept telling myself I didn't need any because I have TONS of ribbon and fiber. (who doesn't? LOL)  But two things keep pulling me back. 1) there are some really nifty designs out there that fit my Mixed Media style. 2) I can make my own to match what I'm working on.

So aside from picking up a couple rolls at Michaels while in Paducah a couple weeks ago, I also bought supplies to make my own. a roll of masking tape and a roll of paper tape.

So my measly Washi Tape supply looks like this:

Ignore the spool of bobbin ribbon. LOL The package on the right is part of a collection I got in a Secret Sister swap about 4 years ago. Here's a closer look at the two on the right I bought in Paducah:

I have stamp sets that are for doing borders and I'm looking forward to spreading blank strips out on my desk and creating my own designs. 

Now you guys know me and how I like to be organized. So this Washi Tape/ Ribbon tutorial by JenniBellie on YouTube got my attention. Because we heat with wood, keeping tapes/ ribbons/ etc dust free is not always easy. I really like this option so look for my version on an upcoming Mixed Media blog post.

Creative Blessings!


Monday, May 20, 2013

MIXED MEDIA MONDAY - Dauber Storage

I don't know why I had set this to run last Thursday. I wanted it to run today, so I've bumped it up.

Okay... I know the Mixed Media thing is a bit off course. I've just been so intent on getting things organized to use them that I've not done the mixed media art like I want to. I guess it's an OCD thing for me that I never realized I had until a couple of years ago. Things have to be 'just right' for me to work.

So for awhile my Mixed Media Monday posts will showcase some of the organization techniques I've been creating.

This week, it's all about Dauber Storage


I knew I wanted to use a dauber for each of my Stampin Up Ink Spots (which they've seen fit to retire - GRRRR!)


The challenge was how to bring the two together. How to store a dauber with its matching color? I didn't want them tossed into a dish to be dug through (that OCD thing kicking in again).  So after a bit of thought, I headed to my local hardware store and came up with these:


These are 9/16" diameter cork disks. They fit perfectly inside the finger hole of the dauber and they have adhesive on the back.  One cork is not thick enough to support the dauber. So I stacked them 2-high:

Then stuck one 'stack' on top of each spot lid:

I store my SPOTS, REFILLS and WaterColor Crayons by color family in their own Sterilite tub - minus the lid:


Next to each of the refill bottles, I have a piece of rubber mat like you put under exercise equipment that has a texture. The box of watercolor crayons store underneath the spot box.

With the retiring of the spots, I'll continue to use the available colors and my favorite colors. I don't think I'm going to purchase the full-size pads. I just don't have the room to store them... not even if I were to use one of those vertical storage units. I'd have to have a place to put that. LOL I'll purchase the refills and create a stamping pad with a dense sponge square whenever I need a color.

All the retired spots (I have all of those from when SU did a complete color family overhaul a couple years ago) are going to get their own daubers. Then I'm going to make a tray out of foam core to store them (along with their refill) with my Mixed Media supplies.

I'd love to hear how you store yours! What works for you?
Creative Blessings! - Kel

Wednesday, October 3, 2012

Recycle Wednesday - Cardboard?

Yep, Cardboard.  So much of this stuff winds up in landfills every day, even with the number of recycle centers available nationwide. Some people either don't think, don't have time, or don't care. All three are sad excuses in my opinion. My (step) mom aka Grammy, taught me out to make useful things from stuff most people would throw away. At the time I thought it was fun. I didn't know it was out of necessity.

So when it came time to figure out the best way to store my fibers, I found big 'bobbin' cards from Cropper Hopper. Well, cool as they might be I did not have the money to package up my MASSIVE amount of yarn, ribbon, thread. You'll get an idea in a minute.

I also wanted to get a handle on it BEFORE we moved. Being pre-carded, it would be easier to pack for the move. One thing I had a lot of was cardboard. You don't want to use just any cardboard. It needs to be the corrugated boxes like grocery products are shipped in. You don't want it bending as you wrap. It's easy to 'wrap tight' without even trying on more flimsy cardboard.


Each board is about 3" x 5". The one on the right is notched for ribbon and the one on the left, for fiber's such as yarn and embroidery floss.  For the real wide wired Christmas ribbon I use the same card except I only use one notch on either of the long ends... ie only one ribbon per card.

Now.. why did I need an organizations system like this?

This is one of 3 15" x 15" drawers in my storage cabinet jam packed full of the cards and filed by color. The drawers do NOT include season-specific ribbons. For those I try to leave them on their spools in themed sterilite containers. However, Christmas ribbon has a tub all it's own - separate from the Christmas embellishments. 

Let's just say, I've saved A LOT of cardboard. :-D

Creative Blessings!

Wednesday, August 22, 2012

Recycle Wednesday


For today’s recycle I’m pulling out something I’ve been using for about 5 years. My marker holder.


This is full of all my LePlume markers, Permenant Markers, a few Copics and glitter markers…
Markers should be stored horizontally. In the issue of space we sometimes forget and just stick them in an upright pencil holder or similar on our work surface. I designed this holder when I was first creating all the storage and whatnot for the then new office/ studio space.

I found these 16 oz glasses at Menards. I believe they came cellophaned together 3 for a $1. I bought 2 sets. These are blue whereas the ones I used in the project are clear.


With the help of a little E6000 glue, I put them together in a pyramid. I wrapped them tight with a rubberband and let the glue rest overnight. This is what it looks like empty…

All it takes is looking at something a little differently to come up with just the item you need to get organized.

Creative Blessings
Kelly

Wednesday, August 8, 2012

Recycle Wednesday

I started this project last week but just could't get the time to finish it until this morning. I rearranged an entire bookcase unit to accommodate my excess mixed media toys - you know the ones that wouldn't fit in that rolling bag I bought earlier this year. I wanted to have the  items I used frequently at my finger tips, not stashed in the bag.

In looking at the May/June issue of Paper Crafts magazine, a storage idea caught my eye... something they would be showing in their special publication Practical Solutions. If you can get a copy, look on page 34 - Found Objects for Mother's Day. They took a variety of empty cans and turned them into a decorative storage unit for your desktop.

So here's what I started with:

 I spray painted them all white. I didn't want the traditional colors I'll be using in the studio. I wanted something more about the 'artsy' side of me. Well... I picked up on my witchy colors and came up with this:

I left approximately a 1/4" of the white showing above and below the edge of the base of the deep wine ValuCardstock. Then I reached for the folder containing homemade papers. The green layer is almost tissue paper weight with a bit of leaf pattern through it. Then I added the heavier orange/ purple/ silver handmade papers.I adhered each layer with ModgePodge.  The can in the far back (hard to see) and each of the two cans flanking it (fabric markers and smaller brushes) are glued to another inverted can with E6000 to stagger the levels. 

Now I have my large OneStroke burshes in one can - great for spreading modge podge or gel medium, a can for a variety of smaller brushes, one for fabric markers, another for a variety of texturing tools and one for pallet knives. I'm not sure what I'll use the tuna can in the very front but it helps fill the space. They are not glued to the lazy susan but appear to be stable. 

Next week I'll have a storage solution I designed based on a sample I saw on-line. I saw a storage unit for Stickles and decided I could make one of those. Well, like most of my projects - though I could make it - I design it and hubby builds it. Can't wait to show you!

Creative Blessings!