Saturday, February 28, 2015

FRIDAY FREEBIE - The Build Part 8


To see a  larger version, click on the picture. 


Welcome to the Creative Dreams Studio. Sorry this is a day late. After I turned in my article yesterday I went into 'relax' mode. So let's talk space.

I have 16' x 30' to work with.  You enter the studio from off the dining room (North Wall) (See door opening on right side of graph)

Before I take you on a tour, let me explain some of my markings. The ORANGE dots denote approximate placement of the recessed light fictures. That Wagon Wheel looking spot over the sewing island is the ceiling fan /w light.  The RED Xs and Squares denote either outlets or switches throughout the room. As I type this, I realize I've mismarked outlets and switches. I probably should have had at least one full cup of coffee before re-drawing this floor plan this morning. LOL However, we do have switches and plug-ins placed around the room to match the specific task areas. The two red Xs within the confines of the sewing island are actually in the floor. 

So let's tour the room. Turn right when you enter the studio. That big cabinet is the repurposed entertainment center I currently have in the basement. This holds my loose block stamps, embellishments and will go through some modifications to become my Project Life station.

Circle around to the left, (WEST wall) I have a spacious work area below that 36x36 window. Air and natural light to craft by! The TV/ VCR/ DVD will be to my left so I can watch movies or follow along on many of my art videos. The island that stretches out from that will be my cutting/ embossing area - holding my Cricut and Vagabond. I plan to have shelves underneath. On the studio side they will hold all of my slabs. On the side facing out into the room I will store my mixed media/ art journaling books. At the end of that cutting area I will have my ScrapRack.

Okay, backing out of the craft area, we'll continue along that same wall. Three tall bookshelves flank the sofa and that 48x48 window. The windowsill will be built out to hide a compartment behind the sofa (think tall window seat with storage). I will keep the bedding for the sofabed in those shrink bags and stored here. 

Although it does not look like I have much room between the front of the sofa and my large sewing island, that big island is on casters and rolls easily. I am looking forward to having this surface to work on again. Plenty of room to lay out mixed media items to dry or cut fabric. 

Past those last three book cases you turn to the left again. (SOUTH Wall) That bare space on the wall is designated for hanging a LARGE picture quilt I made years ago. The original quilt is 10x10 so once I'm in the studio I'll have to figure out how to deconstruct the quilt down to a size that will fit that space WITHOUT losing any of the precious signatures I have. In front of that wall space is where my vintage singer sewing cabinet will be placed. I want to put my simple brother machine in the cabinet so it is handy for straight stitching on either fabric or paper.

The AC/ Heating unit is in the wall up above the row of 3-shelf book cases that connect to my desk. My vintage vanity - turned - desk sits under the window.  To the left of that, coming around (EAST wall)  is a large 6-drawer dresser I bought at auction. The top is perfect for the printer and laying out manuscript pages in progress.

At the end of the dresser, I'll have a lateral filing cabinet. The top of which is where I will display my Denver Broncos collection including an autographed ball from John Elway and a poster of him my daughter got me for my birthday eons ago. I've always wanted a lateral filing cabinet. No trying to reach into the very back for files and I am still a hard copy person when it comes to research.

Another tall book case then my vintage wardrobe for housing my spiritual items. I am still looking for a low table to go below that window. On the left side of that window as we get closer to the doorway again... I have an old rubber stamp display shelving unit my friend, Carla Bazenhow, rescued from me years ago when Michaels changed their display out. The shelving has adjustable glass shelves. This will be my paint storage. All of my Folk Art paints and their coordinating misters. A 2-drawer filing cabinet will fit in the base to store glue, gesso, and other mixed media mediums.

Next to that will be my 8-drawer cabinet that I use to store my SU 12x12. I'll have room on top for my 8.5x11 SU Cardstock and my 12x12 DP collections. Above the cabinet, I want to put a shelf to store the altered books where I keep my SU embellishments. 

Last on that wall is my 2-door Mixed Media art cabinet. I like how I have this cabinet arranged right now but think some things will change.

One last thing - a shelf will go all around the room on top of the book cases. Over the Mixed Media and SU cabinet, I will keep my retired SU catalogs. I will also have the space to display my Girl Scout memorabilia. A section of the shelf over the long wall of book cases (sofa wall) is where I will put my Antique/ Vintage book collection.

So there you go. Although it seems like a large space, this is both an office and a studio. A place to be creative, to enjoy items I currently have in storage and to get work done! Everything will be in one spot. When I need to take a stretch break from the computer, I can apply a coat of gesso or mod podge to a project in progress. Or curl up on the sofa while I listen to the newest CD I am reviewing, without having to sit at the desk. 

And anyone is welcome to come play once it is finished :-)
Creative Blessings!
Kelly


Wednesday, February 25, 2015

WOYWW - #299


Happy WOYWW everyone! My desk will still be in limbo for several months. Today I'm showing work in progress... my 'staging area' for the Organized Challenge through The Scrak Rack with Tiffany Spaulding. Slowly but surely I will get things moved out of the dungeon and up to the living room where I can tell what I have and what I'm pitching.

The box on the far left contains the hanging file folders of 8.5x11 SU cardstock. Mostly In-Colors and Neutrals. The basket in the front has some Valentine stuff... items I might need to finish my February Tim Holtz tag. Yes, I know I only have a couple of days left. That is a roll of white contact paper. The next 'column' is heavy duty page protectors (bottom of stack) for sorting my Cardstock into. On top is a jewelry box. I want to store all of my small Tim Holtz items in this but haven't decided if I am covering it in some way or leaving this muted pink. The two stacks behind that are all the current In - Colors from SU.


From this persepctive you can see what is actually behind the basket. Three pkgs of 3standard magazine holders. They are presently gray but am going to cover them with the white contact paper. I also have a pkg of 5 white 12x12 paper holders from The Scrap Rack. The 8.5x11 will hold all of my In-Color (present and retired) cardstock. The 12x12 will hold the pkgs of Themed DP from SU. You'll see how I change things over in the completed office tour.

For now, I send you on your way to visit other blogs on this world-wide journey. You will find all the links at Julia's Stamping Ground. You will also find the details on how you can join in the fun and be inspired by so many creative artists!

Monday, February 23, 2015

MIXED MEDIA MONDAY - Documented Life

NOTE: I had hoped to have some actual pages done to show you this week but I'm on a deadline with my first BIG freelance assignment so I've not done any art work or 'staging' for the Organzied Challenge that I had hoped to this weekend. 


I know I've shown this picture before but I wanted a quick reference. Those long notepads are  my To Do List. And so far they are working out perfect!


This is my Desk Set. I attach the weekly page from the DL planner to the clipboard and keep it handy. You can see at the top of the page I've designated lines to list the Blog numbers of the WOYWW blogs I visit each week. I can also see at a glance if there is anything special I need to pay attention to such as the Reindeer Club coming up on Wednesday. Wednesdays are bad days for me so I will probably move my Christmas card making day to Saturday this month where I can catch up on Januaray's and February's cards.

The other thing is the Montly list pad from the B & N Kit. I have written the day/ date at the top of each one and keep the notepad on my side pull-out. This is where I list EVERYTHING that I either need to do or get accomplished on that day. I also include phone calls and password changes.

At the end of the week, I remove those seven day To Do's and the Weekly page from my desk.


I turn the Weekly page over and adhered the To Do pages on the back using Washi Tape. I'm not positive I like this because I'm finding some Washi does not stick as well as others. Once I'm in the studio I will pay closer attention to the ones that work better and stick to those brands for most everything. 

I continue to layer in the 7 days of To Do's until the back of my Weekly page looks like this:


You can see how each page is stair-stepped just a margin's width out from the one below it and that I can just fit the 7 days. Behind the weekly page I include Swap outline sheets and anything else that was a part of tht week. 

For things like those swaps and other documentation I LOVE the kits from BoBunny. Although you can't see the picture well, this is taken from BoBunny misc me! life journal - Vintage Note Paper. Click the link then click on the Vintage Note Paper to enlarge and see the beautiful variety of papers in this pack. I keep the entire pack on the clipboard below my Weekly Page 

Since this is Monday, I have a new week of tasks begging to be done so best get moving!
Creative Blessings!
Kel


Friday, February 20, 2015

FRIDAY FREEBIE - The Build Part 7 & The Winner


This page planner by The Paper Studio has become one of my favorite organization tools. I can select papers, photos and embellishments for a layout and keep them all in one spot. While I do not go to crops, this is a great way to pre-plan for when you do have time to sit. Flip through your pictures and put them in one pocket, Then, when you go shopping, take this with you. As soon as your purchases are rung up, put the items right in your page planner pockets and you'll have everything in one place when you are ready to sit down to scrap.

On January 29th, I posted about the 5-Dash system for getting organized. You can use these Page Planners to file things together as you are going through your space.

I had 4 comments (one was from Sandy herself so really, you have 1 in 3 chances of winning).  So who has won this 3-pack of Page Planner Goodness?

And the winner is:

Random. org refused to load so I put Bobby to work. He needs something constructive to do while he's only 1-arm capable right now. I yelled into the other room and said pick a number from 1-3. He yelled back - 2

Pretty scientific, eh? LOL

That means... Joyce Casaldi has won the Page Planner Goodness!  Congratulations, Joyce. I'll drop these in the mail as soon as I can get out of my driveway LOL

In the mean time, I invite all of you to click on Joyce's name to check out her blog. So creative!

Thanks again to Sandy Leigh for her inspiration in this giveaway!


Now, on to the Build Update.
This is all about the lighting. I had two key things in mind for this room. LIGHT and AIR FLOW.
We've talked about my windows... so now let's discuss the lights. I LOVE them!


We have strategically placed 5 of these throughout the room. The diagram I'll show next week will be more precise but basically I have them in the following places:
 Over the area of my SU paper storage
Over the office area
One on either side of the center ceiling fan
Over the sofa area


This is a ceiling shot. Bob gave each one their own wall switch. The two on either side of the ceiling fan activate by a wall switch as you enter the studio. Then the others are placed in the wall near their respective light. They cast a great beam without being a glare. Already thinking how to take smaller ones and make a photo box. 


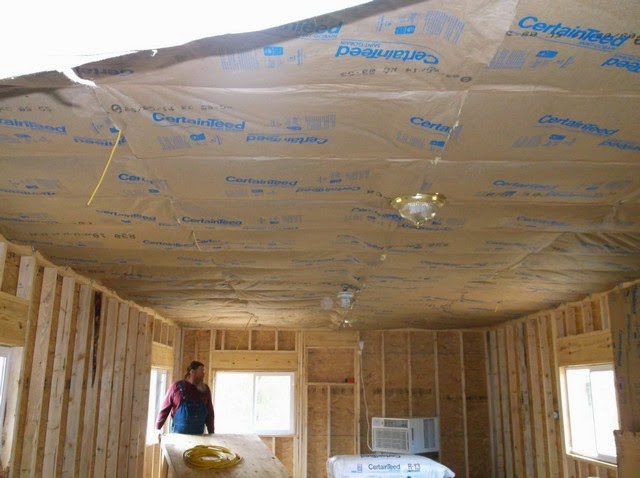
This is the room prior to the ceiling tiles going in. Where that one globe light is in the foreground is where one of the recessed lights is now. The walls also have insulation. That AC unit you see in the background is an AC/ Electric Heat unit. I hope not to use either option much in that room but is nice to have just in case.


One last picture. This will give you an idea of how cold it is out there right now. Bob has a t-shirt, his bib over alls then his insulated flannel shirt on. And although it looks like he's wearing a hoodie, he is not. That's his dark hair LOL I had to think about that for a minute. As you can see by the boxes on the stool this was an early picture when he still had not run all the electrical.

You guys have been asking about the floor plan so I'll have that for you next week.
Creative Blessings!
Kel


Thursday, February 19, 2015

TANGLED THREADS & TECHNIQUES - Mitten Tree Project continues


The mitten tree project is an on-going project. While I was in Springfield last week I had to stop in at Walmart and they had hats/ gloves marked down to $1 each. I picked up 4 sets of each of these three colors then took them back to crafting to pick out yarn tht would match. I'm not thrilled with the true red but red is one of those colors that is just hard to match perfectly. I couldn't match the teal blue at all - EXCEPT in this varigated. The varigated is working up nicely. I've done one scarf (minus fringe) and started a second.

Since winter stuff is beginning to clearance, I have pulled out one of each of the sets of gloves below (purchased last year) to see if I can match them to hats. Otherwise I'll be crocheting a lot of hats. Buying the hats is a lot cheaper than buying the yarn... and faster.


There are 26 pairs in all:
Gray - 7 pr
Hot pink - 3 pr
Teal - 1 pr. (think this and the burgundy will be the easiest to match hats too)
Chartreuse (top right) - 4 pr
Cream - 3 pr
Burgundy - 1 pr
Black - 4 pr
Purple - 2 pr
Pink stripe - 1 pr.

These, combined with what I have done already only gives me 41 sets for The Mitten Tree project so I'll need to pick up 11 more pair of hat/ gloves if I want to do 52 for the year.


Tuesday, February 17, 2015

TECHNIQUE TUESDAY - Cupid Secret Sister made me!


My Cupid Secret Sister was Susanne in MA. She is very creative as you can tell by this item above. Remember, at least one item had to be handmade with a Valentine theme. Susanne painted the little bird house with the love birds. There is suppose to be as sign above the opening that says Bob & Kel. I need to reattach that. Two very long streamers of ribbon/ beads/ hearts come from the base of the bird house.


As you can see from this picture, the streamers stretch over 7' !! Bob is holding the birdhouse up in front of the door way frame that leads to the new office.

Aside from the handmade item, I also received these fun toys...


First thing Bob did was hang his head when I pulled out the Washi Tape LOL That little thing that looks like a house on it's side by my tape runner is actually a book mark. There is an SU owl punch in the background. I've been wanting that punch for a long time. Chocolate, clothespins, twine, fiber and flowers. Alsso a key ring that will come in handy when I'm traveling. Beneath the flowers there is a package of paper doilies and the stone walk path stencil I had on my list.   Over all, Susanne did a fabulous job of treating me to a great Valentine  box of goodies!


Monday, February 16, 2015

MIXED MEDIA MONDAY - Cupid Secret Sister Swap


Many of you saw the beginnings of this two-page LO a couple weeks ago. Here is the page completey finished. The butterflies as well as the hearts in the corners were punched from DCWV Shimmer pink. The heart in the bottom is layered on top of the other with just pop dots for a bit of dimension. I used Studio G gems for the bodies on the butterflies. I know I used SU cardstock but can't remember the colors. I was more focused on getting the page down tht was in my head (and similar to a pinterest layout) than writing anything down. The green mats are the same color even though they don't look like it here. The pink heart in the corner is layered over a paper heart doily tht I trimmed away the outer part to just leave the scallop.

We each filled out a questionaire for our Secret Sister to work from. Our handmade item was to be a Valentine'd theme item. Everything else was up for grabs from their list.

Here is the rest of what I put in her box...


all packed up...


with these items.

In the top picture, you'll see a red box with a heart lid (that was the cutest packaging from $ General!) I put the 3 pkgs of Blendabilities that were on her wish list as well as the small pack of Project Life cards and the stickers you see up in the back. 

My secret sis has a 2 yr old little girl and a 9 month old little boy. I bought a stuffed animal for each of them. I also remember how much my granddaughters loved cheap bead necklaces so I bought the string of hearts for her little girl. 

My favorite thing I think to put together in this box was the candy box. See the cassette box in the bottom left corner....


I slid a Valentine patterned paper inside the sleeve of the CD case then added the embellishment on the outside. Inside, I used glue dots to adhere 24 Dove Milk Chocolate hearts.

She is a busy mom to two little ones and a school teacher. She scrapbooks in 12x12 but is also getting into Project life. She requested a Christmas pack from PL that I could not find but I did find a couple others I thought she could use:


While shopping at $ General, I found these Valentines shown in the photo below...


I think the pins can be removed easily from the back and these would make perfect swag buttons for a PL album. She also loves SU product so I got her the new heart EB folder. The Vintage Amour paper is from the Valentine isle at Hobby Lobby. 

Things are crazy here and I'm trying to keep some sort of work schedule while Bob is home. He doesn't need me, I just find it hard to work my schedule with him here. So posts may be sporadic and not according to 'theme' post over the next few weeks, but I will keep things going up as best I can.

A perfect example is tomorrow. For Technique Tuesday, I'll show you what my Cupid Secret Sister sent me! 

Creative Blessings!
Kel

Tuesday, February 10, 2015

TECHNIQUE TUESDAY - A Gift


I love doing first year albums. I'm not sure why I do the ones for gifts while the ones for my granddaughters' albums are still not even started. That is one of the first To Do items once I'm in the new space.  In the mean time, here is my latest album.

My sister needed a special gift for a young man who's wife is expecting a little girl in the next few weeks. While we were having our Saturday morning visit on-line, she told me she was cruising etsy for a gift. I pointed her to albums I've done in the past HERE and HERE. A very low price was agreed upon, a feeling for what she was after in terms of theme and I was off.

I am always still amazed how a plain album like the one above I found on clearance becomes this:


The cover is padded then covered in unbleached muslin. The ribbon and the roses are from Paper Studio. I fell in love with the lace and although you can not see the elegance of that wide heritage lace very well on the cover, the same lace also graces the opening of the front and back cover. I wish I had purchased more of that as well as the narrow lace trim set off by the burgandy ribbon on the left edge.  You will also notice three butterflies. Those were punched from DCWV shimmer cardstock. I layered a soft pink over a vanilla cream then accented the body with a crystal tear drop from Studio G.

The album ties together with the burgandy ribbon as well as a matching white ribbon I died with a alcohol mist I made using SU Creamy Caramel.

Here is the welcoming page:


This page as well as the photo pages you will see in a moment also have the leaf accent from the SU Bird punch. I stamped the image in SU Bravo Burgandy.

Here is the 2-pg layout:


And the individual pages:


The burgandy and pink cardstock are 8.5 x 11 from Hobby Lobby. The burgandy is textured. I can't remember the name of the swirl. I will look that up and insert. The background paper is also 8.5x11 from Hobby Lobby.  The lade trim is Ecru spool lace from The Paper Studio. 


I added three pearls from Recollections to balance this side out. The 4x6 photo mat is accented with the same Ecru spool lace. 

We were to meet my sister on Saturday for lunch. Saturday morning she texted wanting to know if I had remembered to make a card. My husband was in his usual form, and manning my phone while I put the final touches on the album at the hotel. He texted back 'what card?' Not realizing HE was the one texting her and not me, she went into a panic. Thankfully, he did not leave her in that state for too long. Here is the card I made - to match the album.  The sentiment inside and out came from the new SU set - B.Y.O.P.


Things are a bit crazy around here this week. Bob has carpal tunnel surgery on his right wrist on Friday morning. Between pre-op and surgery for him, we have also been trying to get some last minute things done while he still has two hands. As soon as the right is healed (approx. 3 weeks) they will go in and do the left. 

I also need to make a run to Springfield tomorrow. The weather was so gorgeous last weekend (70s) we hung our coats in the closet at the hotel... and left them when we packed up Sunday morning. If the weather had  been cold, we would have remembered them when we loaded up the truck. Because I hardly ever use the closet, I did not think to check there when I packed up the room - yep, my fault. Thankfully, this Baymont is like a 2nd home for me. The only place I stay when I go to Springfield. I am on first name basis with everyone from our new manager to the breakfast gal. I called to let them know our coats were there and they already had them on hold with my name on them. LOL


Friday, February 6, 2015

FRIDAY FREEBIE - The Build Part 6


Before we get to the inside, this is one of the last pics with various crew members. That handsome man at the end of the table in the orange shirt and bib overalls is my loving hubby, Bob, who works so hard to make this whole thing possible. Lunch for the day was one of Ian's favorites. Chicken fried steak, mashed potatoes, gravy, green beans and 7-Up rolls. 

As I promised, this week we step inside The Studio for the first time.

The entrance to my studio is from off our dining room. There was not a door there.. only this really big picture window:


Bob is removing all of the sashing/ trim pieces so that he and his friend Tracy can remove the window in one piece. Bob wants to save this glass in case he needs to replace glass elsewhere in the future.


here we go.....

Tracy came in from deer hunting. He doesn't always wear the orange vest LOL

Almost there....


The window is gone and the wall is stripped away. As soon as they had the rest of the wall out of the way....


I stepped into my space for the very first time! ::: Happy Dance :::

Though I did stand in the 'space' on Nov. 1 to celebrate the Spiritual New Year. Trevor took my picture standing on the 'space' the day the footings were poured. Just can't find that pic. :-(

Next week... The interior work begins!!!!!


Wednesday, February 4, 2015

WOYWW #296 - Migrated to new location


Not the besst picture but I'm either fighting the glare from the kitchen winow or the puck light over ... the counter.

I have migrated this week. I'm putting this 2pg scrapbook layout together on the kitchen counter where I have decent light and good height to work at.

And the ironing board of last week has now become my Cricut station for the day.

So what's on YOUR desk this week? Or maybe I should ask... WHERE is your desk? hehe

Want to see what others have in their creative spaces? Come join the rest of us at Stamping Ground for a complete map of the tour and details how you an join in the fun! Creative Blessings!

Monday, February 2, 2015

MIXED MEDIA MONDAY - Documented Life Project - Week 1


While I am not as artistic as some people, I do have my own style. I had an epiphany while doing this piece. I am not suppose to be as artistic as them... I am to be ME. So with that acceptance out of the way, here is my Week 1. This is the redo of the background I did not like. The previous background wound up as the base for Week 2 - which is almost finished.

CHALLENGE:  Book Paper
PROMPT: Be Your Own Goal Keeper

With those two things in mind I started with my base


I tore book pages into strips....


Created a basket weave for texture...


Added color using gelatos.

I downloaded a clip art of Scales of Justice since my word for 2015 is Balance. Then I added stacks of 'books' representing things I want as part of my balanced life this year.

The letters/ numbers are from a chipboard stack... using the positive and the negative/ gold and silver. 

One recurring item that will be included in all of my pages is the definition of a key word from that week. I am cutting them from an old paperback dictionary, adhering to cardstock for durability then coating with dimensional glaze. This week, the definition is for Balance.

Balance: 
: the state of having your weight spread equally so that you do not fall
: the ability to move or to remain in a position without losing control or falling
: a state in which different things occur in equal or proper amounts or have an equal or proper amount of importance

I should have Week 2 finished next week as well as Week 3 and hopefully Week 4.
Creative Blessings!