Saturday, April 30, 2022

SCRAPBOOK SATURDAY - Single Photo

Good morning, everyone!

As usual, I'm awake at the unheard of hour (for most of you) of 5 a.m. Between needing up this early to set a video to upload and just being awake in general, this is when my day starts.

I wanted to try a single page layout for today. I had this picture of Adrian when she was not quite two-years-old, right after she and Sue moved in with us. 


Who wouldn't fall in love with this little girl? She was my heart from the moment she came into this world. I think all grandchildren steal our hearts and each of us thinks ours are special above all others. It's a grandma thing. 

Here's the layout:


The flag in the bottom right of the photo will be dated once I have time to go through the memory card files.

I used some current and some retired Stampin' Up! items. The key is to USE WHAT YOU HAVE. Scrap Your Stash. I'll be doing a lot of that but when I do use current products, I'll link them here. Speaking of...

PRODUCT LINKS:
Bough Punch (great substitute for the retired one I used)
Pool Party Cardstock (substitute for the Balmy Blue)
Daffodil Delight (substitute for the Barely Banana)
Playful Alphabet dies (retiring TODAY!)

Here's the walk-through video:


As previously mentioned, I've joined a scrapbook challenge thread on Splitcoast Stampers. My goal was 4 pages for April - though I came into the month a little late. I'm a layout short of my April goal but that's okay, I've also done 4 double page pocket scrapbook layouts.  My May goal is to do (2) 2 page pocket layouts (1 layout for each of the girls with paper pumpkin and (4) layouts in traditional size.

I'll be back tomorrow with Sympathy Sunday.

Creative Blessings
~ Kelly


Friday, April 29, 2022

JUNK JOURNAL FRIDAY - Triple Pocket Fold

 Good morning, everyone!

I have a simple triple-fold pocket today from one 12x12 piece of paper. You can use this technique on a smaller piece - as was the original pattern I had in my stash. I'll give you the dimensions for both of those. 

Here is the finished product:


Here is the diagram:

The measurements for the video example:

A - No Fold

B - Make tick mark at 3-1/2"

C - Make tick mark at 4"

D - Make tick mark at 3"

Follow the steps in the video:

Use the same letters and fold measurements as in diagram one but with a smaller piece of paper.

Cut paper to -10" x 12". This makes the pocket more elongated where as the 12x12 is square

SUPPLIES:

NOTE: Please note that items with RETIRING next to them will not be available after tomorrow (4/3) the other items have their RETIRING date next to them WHILE SUPPLIES LAST!

Heart and Home designer series paper - (6/30/22)

Bumble Bee cardstock - Retiring

HoneyBee Home Bundle - (6/30/22)

Frayed Ribbon

HoneyBee Gingham Ribbon Retiring 

Matt Black Dots

Stamp n Seal

Tear and Tape

Tombo Liquid Glue

I'll be back tomorrow for Scrapbook Saturday.

Creative Blessings

~ Kelly


Wednesday, April 27, 2022

WOYWW - #673

 Good morning, friends!

Been a bit busy here. Although I didn't post last week, I did get 'round to everyone. Always nice to see what everyone's up to.

Sadly, for a few more hours, this is my desk:


I intended to clean this yesterday but had a horrid headache when I got up. That usually happens when I don't stay up at 5 a.m. when I first wake up. I set a video to upload then went back to bed until 7. I know that's what does it, but I did it anyway. All my fault! LOL

So, this is my project today. While I don't think my book flashdrive is under that mess, there are other things that need put away and if I find the flashdrive - that's a bonus for the hard work I'll have done to get there.

That's it for my desk (and story) this week. Who's Miss Julia and why am I here?  When you are done visiting me in the Ozarks, please hop on over to Stamping Ground for all the details. Miss Julia has a long list of other studios you can peek into. No standing on an up-turned milk pail to look in the window. We open the doors wide and welcome you.  Please leave your number and you'll be among the first on my list.

 Creative Blessings!

~ Kelly


Tuesday, April 26, 2022

APRIL PAPER PUMPKIN - Change is Beautiful

Good morning, everyone!

I didn't realize until I sat down to write this post that I hadn't posted cards from yesterday's video. 


I am dealing with a sinus headache today so I'm making this a quick, photo/ video laden post.

The cards were Z-fold in style. Here are the cards I made yesterday from the kit - As Is:

Outside of Abby's card

Inside 

Outside of Adrian's card

Inside

For today's video, I made a 2-page pocket page layout for each of the girls coordinating with their cards.

Abby's:


Adrian's:


Here are links to the process videos:


I hope to jump back in with WOYWW tomorrow. The headache will determine what I accomplish the rest of the day.

Creative Blessings!

~Kelly


Sunday, April 24, 2022

SYMPATHY SUNDAY - Sort Of...

 Good afternoon!

I apologize for being late but I did something today I've not done in weeks. I sat and enjoyed online coffee/ video time with my sister. We are the only remaining siblings. We only live three hours apart but the internet is wonderful. We are able to chat on-line using Trillian while enjoying coffee, breakfast and sharing videos - usuing gardening, cooking or crafting. 

I altered that time with popping up and doing some household cleaning while I can have all the doors and windows open for the first time this season. We're to have heavy storms later this afternoon so I'm multi-tasking.

One thing that irritates me with Stampin' Up! is that they won't just give us a good all-occasion stamp set and leave it alone so that we always have a go-to set for sympathy cards... real sympathy sentiments. Not thinking of you, you're on my mind, etc... but true sympathy wording. We've had them in the past but they are forever taking them away. Sorry, but I'm not going to keep buying sets when I have perfectly good ones that will work. 

I chose not to stamp any sentiment on the front but the inside leaves plenty of space to write a personal note.

So here I am trying to showcase a stamp set that is current so y'all can use it to. I chose Daffodil Daydream from the January-June 2022 catalog. The stamp set is carrying over into our 2022-2023 catalog but not as a bundle. If you like this set, now is the time to order it while you can get the stamp/ dies as a bundle for 10% off. I'm linking the bundle in the shopping list below.

The designer series paper is Hand Penned - also from the January-June2022 catalog. I love this paper and am so glad I ordered a couple of extra packs. The paper is sold out BUT, you can substitute the Hand-Penned Memories & More card pack. I'll link it in the shopping list

Here's the card I came up with:


I'm still working on the shadow thing. I had 2 daylight lamps shining on the card from either side. Hmm suggestions appreciated! 

I started with this sketch:


I used a Daffodil Delight card base, layered with a 4" x 5-1/4" piece of Hand Penned (#1). #2 is a piece of Hand-Penned floral 2-1/4? x 4-1/2". Adhere #1 to the card base ,then add #2. #3 is 1-4/4" x 4" layered as shown in the picture.

#4 is a piece of Basic White cut 1-3/4" x 3-3/4". I stamped the single daffodil from Daffodil Daydreams in Memento Tuxedo Black. After several trial and error, I finally decided to use Stampin' Blends in Daffodil Delight and Shaded Spruce. 

Once I figured out kinks, the card went together pretty quick. I'd already figured the dimensions from having used the sketch before. That helped. 

Shopping List:
Stampin' Blends -
     Shaded Spruce 
Stampin' Blocks
     H 
      I

I'll be back tomorrow with a Make It- Mail It Monday and video link when we take a look inside of the new Paper Pumpkin Box! I hope you'll join me.

Creative Blessings!
~ Kelly


Saturday, April 23, 2022

SCRAPBOOK SATURDAY - Cooking with Grandma!

Good morning, everyone!

We have a beautiful day on the program for today. I'm hoping the sun/ breeze will dry out the lawn a bit more so I can mow this afternoon. Crossing fingers and asking Mother Nature to play nice today.

I recently made the decision to get back to scrapbooking. By doing Scrapbook Saturday posts here and videos on my YouTube channel, I'm hoping those will help keep me motivated. I've also joined a challenge group on SplitcoastStampers.  The forum thread changes from month to month, I think. But here's the APRIL CHALLENGE THREAD

I'm going to be happy with four pages this month. Since I have this Saturday and next week, that is two double-page spreads.

I'm starting with a box of pictures of Adrian's first few years, under the age of 4, I think. I picked this first group of pictures from a day when we made Great Grammy's Cherry Cheesecake. That was always a tradition for 4th of July in our house growing up. I haven't put a title in yet. I need to locate my alpha letters or figure out which letter dies/ cricut I want to use. 


You'll learn more about the story behind this layout if you watch my YouTube video for today, but briefly, from the time Adrian was 18 months old she wanted to be in the kitchen with me. She was fascinated with whatever I was doing. Even now, when she visits, she wants to help.. or shove me out of the kitchen and just do. She is a chef in the making, I think. The video also tells significance of the apron and headband she is wearing. 


The title will go across the middle band. The white block on the bottom of this page will be the journaling spot. Details will wait until I have the work table back so I'm not working on my filming table. 

After not scrapbooking for years, this layout took me over four hours. I got lost in the process and watching the finale of Tournament of Champions on the DVR that I even missed a call from Bob. I'm still trying to get used to Bob being on 6 hr shifts instead of 12.  

Please leave me a comment below. Do you scrapbook? Do you have photos waiting that you've never seem to find the time? I'd love to know.

Creative Blessings!
~ Kelly


Friday, April 22, 2022

JUNK JOURNAL FRIDAY - Bee Journal Part 1 - Premiere!!

 Good morning, everyone!

Today, I'm kicking off an 8-week series creating a Bee journal using several items from the January - June mini catalog.

I have a list of what I'll be using in THIS POST. I've added to the list since the original posting!

This also starts a new presentation on my YouTube channel. I will be posting the Friday videos as PREMIERES.  What does that mean? That means, the video will be playing but there will be a LIVE CHAT so you can watch, visit and ask any questions while I'm there to answer on the spot! 

I hope you'll join me - 10 a.m. CST


Creative Blessings
~ Kelly


Thursday, April 21, 2022

STAMPIN' UP! FREE SHIPPING! - Today Only!


Good morning, crafty friends!


Just a quick post to let you know Stampin' Up! is offering FREE SHIPPING, today only (4-21-22) on orders of $75 or more (before tax).

Now is the perfect time to grab the retiring In-Colors or any of the Retiring items from our January-June/ Annual catalogs AND Clearance items!


Beginning this Friday, I'll be using the HEART & HOME as well as a couple retiring In-Colors & Designer Series Paper from the catlogs for the #A2ZJJJC with Dear Julie Julie. If you want to play along, NOW IS THE TIME to get those items ordered. I'll be providing the links here every Friday to the projects for each week as we walk through the 26 letters! 

Items for the FREE 8- week class: 


Here's the short details video:


I'll be back tomorrow to share our first items. Mind you, they may not go in alphabetical order - just whatever I pull from my sticks jar or am inspired to do, but we will work through all 26 letters!

Creative Blessings!
~Kelly 


Tuesday, April 19, 2022

CARD CHICKS & SHARING HOPE

 Good morning, everyone!

I have two things to share today. One is my card for the April Card Chicks group. We got kits in far-out tie-dyed tyvek envelops. Super cool happy mail. Inside, Roxie sent us this:


The items included:
papers from Stampin' Up! Flowering Fields
Stamped images from Inky Antics
A section of stamps from Jill Bean Soup
The embellishments are from Stampin' Up!

This is the card I made:


I used this sketch from SCS:


I used Lt. Smokey Slate Stampin' Blends to color in the bunny as well as Dk. Pink Pirouette for his nose. I used Garden Green watercolor pencil for the grass and the Auqua Painter brush and watered down Balmy Blue ink for the background.  The circle is cut using Layering Circles and the sentiment from the Stitched Rectangles dies.

Stampin' Up! has a campaign running from 14 April - 14 June 2022 to #SUShareHope. This is a ressurection of a past Paper Pumpkin kit to share hope and inspiration.


Here's a peek at the kit:


If you've never tried Paper Pumpkin before, this is the perfect opportunity! You get everything in the box you need except for the clear acrylic block (this comes in the first regular Paper Pumpkin subscription box) but our standard D block can be ordered by clicking on the shopping link below. 

If you are a Paper Pumpkin subscriber and have the original kit, you may purchase a refill kit. That link is also provided below.


While we're talking Paper Pumpkin, you have until May 10th to order the next kit - Celebrating In Color. 

The new Paper Pumpkin is built around the very Tropical new In-Colors for the 2022-2023 term.


You can sign up HERE but remember... before May 10th! 
Don't miss out on your opportunity to see & play with the new In Colors!

That's it for me. I should be back tomorrow with a What's On Your Workdesk Wednesday. Remember, anyone can play! We show you ours, show us yours!

Creative Blessings!
~ Kelly


Monday, April 18, 2022

MAKE IT- MAIL IT - New Hues of Happiness Suite Sneak Peek!

 Good morning, everyone!

I hope everyone had a pleasant Easter weekend. The weather here in the Ozarks was wet and dreary. I did have nice weather for errands on Saturday so I can't complain. 

I can't show you much about the Hues of Happiness Suite coming in the new catalog launching May 3rd!


Florals from Hues of Happiness Suite

I fell in love with this suite for a couple of reasons. The main one was they have roses that actually look like roses - both the classic and old fashioned roses. I was thrilled to see the Happiness Abounds Bundle as well as the papers on the pre-order.

NOTE: This set is not available to order until the catalog goes live on May 3, 2023... that's only a few short days away!

I started with this card I found on Pinterest several years ago as my inspiration:


Here's the card I made using the Hues of Happines DSP and Happiness Abounds Bundle:

You can see the walk-through video of how this card came together on my YOUTUBE channel.

RECIPE:

See Diagram above for corresponding letters:

Card Base - 4.25" x 5.5"

Mossy Medow Mat - 4" x 5.25"

B - 2" x 2-3/4"

C - 1-3/4" x 2-3/4"

D - 2-1/2" x 2-1/8"

E - 2-1/8" x 1-1/4"

PRODUCTS USED:

Melon Mambo cardbase

Melon Mambo Ink

Real Red Ink

Mossy Meadow cardstock

Sponge Dauber

Classic Matte dots

Wink of Stella


Saturday, April 16, 2022

SCRAPBOOK SATURDAY - All About Page Maps

 Good morning, everyone!

I hope you have family time planned this beautiful Easer Weekend.

I've decided that aside from Pocket Page albums for the girls, I really need the 12x12 albums for myself. I went searching for scrapbook challenges to give me a starting point and found Scrap Our Stash 

Joanne Burtel's April Challenge is a Tic Tac Toe.


My thought was to do the last column... Any Page Map Layout, Die Cut or PUnch and 2+ Photos

I have a series of pictures of Adrian in one of her favorite places - the kitchen... when she was about 3 or 4.  For die cuts, I have the What's Cookin' stamp/ die bundle.  I got stuck on page maps. So I went looking.

My first thought was to go through my library of idea books. Only one had actual page designs but not really much help. Then I thought about the Scrapbook Challenges on Splitcoast Stampers. There are over 400 maps on SCS!!!  I've saved them all to a file and printed all but about 100 so far.

Next, I went to google search and the first one that came up was a Scrapbook.com board on Pinterest. Over 700 sketches! And this board by CYNTHIA

I now have more than enough sketches to keep me busy for awhile. My first layout using the Tic Tac Toe will post next Saturday.

In the mean time, here's the VIDEO from this morning.

Creative Blessings!
~ Kelly


Friday, April 15, 2022

JUNK JOURNAL FRIDAY - Hidden Double Door Journaling Spot

 Hi Everyone!

Bob left Tuesday and I'm trying to get on track. My work days are long but I'm making sure I shut down in the evenings and take me time. Self-care is important when you have your fingers in as many things as I do. LOL

I learned how to make the Hidden Gatefold Card from fellow Stampin' Up! demonstrator, Wendy Cranford. You can see her video HERE.

When I saw the card, I thought of 'double doors' rather than a gate. You'll see in her video - and mine below - how simple this is to make.

Here's one of my cards:


Here's the other one:


RECIPE:

1 sheet of 8.5 x 11 cardstock of your color choice for base
1 12x12 sheet of Designer Series Paper (DSP) You'll want to use the front & back

CUTTING:
Watch Video for the cutting directions. These are just the dimensions. 
I'm using the colors for the 1st card.

Basic White - (cut 1) - 4-1/8" x 5-3/8" 
Mango Melody -  (cut 1) - 4" x 5-1/4"
Designer Series Paper - (cut 1) 3-3/4" x 5"  (cut 2) 2" x 5-3/8"
Evening Evergreen Ribbon (card 1) - 3-3/4" 
Crinkle Seam Binding (card 2) - 4-3/4" plus an additional 3" piece to tie

VIDEO:


Product Links to what I used: 

Cardstock:


If you don't already own them, I recommend the Stampin' Blocks!LOVE them and so glad I invested. I used hostess credits for the larger ones as well as the case and purchased the less expensive. Great Investment!  The link is for the bundle - saving 10%

Here are the individual blocks:


Monday, April 11, 2022

MAKE IT - MAIL IT Monday

 Good morning, everyone!

There are storms in the forecast for this morning so I'm trying to get ahead of them. 

Today, I'm sharing a card made using sketch SC06 - which is a Splitcoast sketch.


Here's the card I made using Flowering Fields DSP and Flowering Tulips stamp set:


This sketch also lends itself to a corner double tuck for a journal page.

RECIPE:
Stapler

Start with a Mango Melody cardbase - 5-1/2" x 4-1/4"
Cut a piece of DSP 5-1/4" x 4" and layer on top of the card base
Cut a second piece of DSP 3-1/4" x 4-1/4" 
With this dsp portrait 3-1/4"  wide across top & bottom - cut from the top left corner to the bottom right.
Glue to card front
Cut a coordinating piece (You could also use a piece of Mango Melody) 1" x 4"
Stmp the sentiment on a piece of either the DSP (as I did) or from Basic White cardstock, then cut out using the 3rd smallest layering circle die.

Line up 2 Stampin' Dimensionals across the back of the circle - lining up with the Thank You. Place on the card.

For the tag, you'll need a piece of 3" x 4" then cut to make the corners. (Directions in video HERE
Cut a piece of ribbon 3", fold in half then staple to top of the tag. 

For the inside of the tag, cut a piece of Basic White cardstock 4" x 5-1/4". Stamp a design on the inside using the Flowering Tulips stamp set then add a note or additional sentiment.

Your card is ready for the mail!

I'll be back tomorrow with a belated Card Chicks card.  Until then...

Creative Blessings!
~ Kelly


Saturday, April 9, 2022

SCRAPBOOK SATURDAY - Pocket Layout - Flowering Fields

 Good morning, everyone!

We have a beautiful, sunny day in the Ozarks. The 60s* in the forcast for today is a big change from the freeze warning we had last night. As Bob said, we'll probably go from freezing cold to super hot temps - just as in past years. I am just anxious to get out in the garden. 

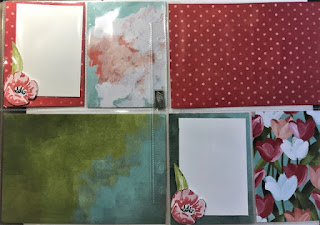
I'm continuing my series with the Flowering Tulips Bundle and the Flowering Fields DSP today by getting back in the swing of Scrapbook Saturday.  I'll leave a complete product list down below. Heres the layout:


I've used a 2 over 1 and a 1 over 2 layout. This creates a flow and balance. The layout provides room for at least three pictures (possibly a 4th) as well a journaling space. 

I stamped 2 of the tulips and leaves from the Flowering Tulips stamp set to add as an element and help anchor 2.5" x 3.5" photos. I still need to search Adrian's flashdrive and find those. I'm just not a fan of showing my grandchildren's photos on the internet. 

For a quick back story:
When Sue moved back home about fourteen years ago while she got her feet underneath her again, Adrian was approximately 18 months old. That was the first spring in our forever home and I'd planted tulips along the west fence the previous fall. The tulips all came up, creating a beautiful strip of color along the fence. I have pictures of Adrian squating in the grass, with her nose deep in a pinkish/ red tulip she had just plucked. Her first ever picking of a flower. I think that was the moment my precious granddaughter connected with Mother Earth. I knew when I decided to do scrapbook layouts with Flowering Tulips and Flowering Fields, this layout would be for her. 

Here's a list/ link to the products I used in this layout:


When I find those pictures, I'll share one in a future post.

Creative Blessings
~Kelly


Friday, April 8, 2022

LATE TO THE PARTY - Flowering Tulips Tip In

Hey everyone!

I am way later than I wanted to be with today's post. I'm still trying to get scheduling in place. I'll be more effective with that after Bob leaves on Tuesday. 

Bob has decided to semi-retire in October, which means I have six months to make this an active day job with a routine we can work with. Wish me luck! LOL

Today, I'm continuing my YouTube series working with the Flowering Tulips Bundle.


I chose to make a tip in pocket with coordinating tag. I gotta tell you, this project drove me nuts! I put the prototype together in about 10 minutes but every time I tried to film a walk-through I messed everything up - 4 times! LOL

Here's the tip-in pocket with tag:


RECIPE:
       Select 1 12x12 piece and cut 7" x 5" 
       Cut a coordinating piece 4.5" x 2-3/8"
       Cut a piece 2-7/8" x 1-1/4" for belly band on front of pocket
Basic White cardstock, large enough to stamp/ cut 3 tulips

NOTE: I used Wink of Stella on the original tip in but failed to show it on the vide.
Follow the video and you'll have a cute addition to your journal.

Creative Blessings
~Kelly 


Wednesday, April 6, 2022

WOYWW 670

  Good morning, friends!

Thank you so much for the well-wishes and welcome backs.

Before I step further, I do want to say that while the Stampin' Up! policy may seem a bit high-handed they are a company and as a representative of them I can understand why they wouldn't want me promoting competitor products. Just makes me sad that I can still play with all my toys but can not link to them. I do love them product and will continue purchase for many years, regardless of my status. 

Everything comes out in the wash, right?


I went a little higher with the camera this morning so you could see the trays in the very back. I've since added (but can't be seen) one of those file folder racks. I picked it up at a flea market last Saturday and thought it would be perfect for placing the stamp sets I'm working with rather than them being piled all around me.  You can also see a card to the left. 

Bob and I took Saturday to just drive and snoop. We ate breakfast/ lunch/ dinner out, stopped at flea markets and gun shops we came to. I came home with lots of goodies while Bob just enjoyed the day.

At the first flea market we stopped at (Houston MO), I found this stamp set:


The set is called CHARMING and is one of several sets in the 2011-2012 Idea Book & Catalog that were part of the Shelli's Signature Collection. 

If you're not familiar, Shelli is the co-founder of Stampin' Up! and a sweet lady. I wasn't a demonstrator then but was a customer. I couldn't see this as a 'card' stamp set I'd use and wasn't in to making the junk journals at the time so overlooked this gem.  You'll find the set on eBay for over $25 but if you'd like to purchase, I found it on Etsy for $8.00 - shipping from Canada.  

Here is a closer look at the card I made:


In my video I talked about how classic stamp sets we've not touched in awhile can pair beautifully with current papers. Here I used Hand-Penned designer series paper. Here's the quick (5 min) video.


That's it for my desk (and story) this week. Who's Miss Julia and why am I here?  When you are done visiting me in the Ozarks, please hop on over to Stamping Ground for all the details. Miss Julia has a long list of other studios you can peek into. No standing on an up-turned milk pail to look in the window. We open the doors wide and welcome you.  Please leave your number and you'll be among the first on my list.

 Creative Blessings!

~ Kelly